2.5
Installation / Operation -
2.5.1
Initial Operation -
1.) If different from factory settings (Table 2.2), set on-card jumpers as desired (Figure 2.4)
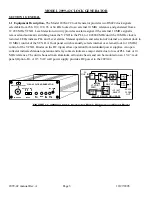
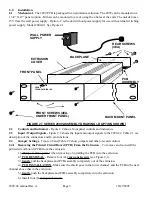
2.) Connect the wall power supply to the 2099 and the wall power supply to 115 VAC, 60 Hz (Fig. 2.1)
3.) Connect a 1 V P-P 10 MHz signal to J1,
10 MHz SIGNAL IN
(Figure 2.1, Figure 2.3)
4.) Be sure S1 is in the center (AUTO) position (Figure 2.2)
5.) Be sure DS1 and DS4 are off and DS2 and DS3 are green (Figure 2.2).
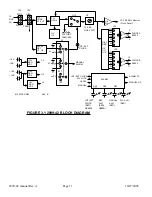
6.) If needed, R20 can be adjusted (Figure 2.2) to SLIGHTLY adjust the internal VCXO frequency with
S1 in the INTERNAL REF position and monitoring TP1. ALWAYS be sure S1 is in AUTO (center) for
normal operation.
2.5.2 Switch S1 (Figure 2.2) - S1 selects between Internal Ref / AUTO / External Ref and operates as follows:
External Reference - This is a manual over ride of the AUTO position which forces the 2099-42 to
always control the internal VCXO by locking it to the external 10 MHz reference. If in this position and the 10
MHz is removed, the PLL will lose lock and may force the internal VCXO to the high or low rail which causes
it to be up to plus or minus 1.2 kHz from center frequency. No auto switch over to internal control of the VCXO
will occur in this mode. The front panel potentiometer, R20 does NOT control the VCXO in this mode. Normal
operation in this mode will have DS1 red, DS2 and DS3 green, and DS4 off (Figure 2.2).
AUTO - This forces the 2099-42 to always control the internal VCXO by locking it to the external 10
MHz reference if it is present. If in this position and the 10 MHz is removed, the PLL will lose lock and will
force the internal VCXO to have the frequency set by front panel potentiometer, R20. R20 DOES control the
VCXO in this mode if it has automatically switched to Internal. Normal operation in this mode will have DS1
and DS4 off and DS2 and DS3 green (Figure 2.2).
Internal Reference - This is a manual over ride of the AUTO position which forces the 2099-42 to
always control the internal VCXO by front panel potentiometer, R20. R20 is a ten turn potentiometer which can
control the VCXO by up to plus or minus 300 Hz from center frequency. If the 10 MHz external reference is
present, the PLL Alarm LED, DS4 does not generally light in this mode but will flash occasionally, the rate of
which is a rough indication of the offset of the VCXO from the reference frequency. The slower the rate of the
flash, the closer the VCXO frequency is to the 10 MHz reference. No auto switch over to internal control of the
VCXO will occur in this mode. As mentioned previously, the front panel potentiometer, R20 DOES control the
VCXO in this mode. Normal operation in this mode will have DS1 red, DS2 red, DS3 green, and DS4 off and
occasionally red for short flashes (Figure 2.2).
2.5.3 Selecting Clock Frequencies - The output clock frequencies are selected by the jumper on JP4 for
Clock A and JP5 for Clock B. Setting this jumper closest to the front of the PCB selects 256, then moving it to
the rear selects 192, 128, 96 and 64. The jumper position closest to the back of the PCB is not used.
2.5.4 Selecting 10 MHz Interface Parameters - Jumper JP2 selects the input termination of the
external 10 MHz reference to either 75
termination (JP2 in DOT, factory setting) or 2 K
(JP2 in NON-
DOT).
2099-42 manual Rev. A
Page 6
10/27/2005

