Chapter Six
Attaching an HDMI
®
Display
Using Organelle as a computer.
Well, you have made it to the final chapter. Mazel tov! We hope you have enjoyed the
journey thus far, and it is worth mentioning that repeat visits to this document tend to be
rewarding.
This chapter deals with Organelle’s HDMI port, which has been sitting there the whole time.
The reason for our longstanding neglect is simple: only users who want to tweak/program
their own patches might benefit from connecting Organelle to a monitor, television, or what
have you. So if you are interested this chapter but have somehow skipped chapter five, you
may want to reconsider that.
While we have continually mentioned the microcomputer within Organelle, we have also
pointed out the “un-computer” nature of this instrument. But we also recognize that you
might want run Organelle with a monitor, keyboard, and mouse —
some folks might find it
particularly nice to edit patches in this fashion. So our main theme has reemerged: it’s your
choice.
This chapter will walk us through the general use of Organelle along with HDMI, which
presumes the use of a keyboard and mouse as well. We will do this by going through a
general narrative of using Organelle as a computer.
Let’s get visual. And peripheral.
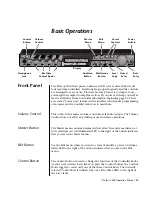
Keyboards and Mice
Connecting an HDMI monitor to Organelle is simple enough. But the function of the HDMI
device is to provide the visual output of Organelle’s functioning microcomputer. (As we will
see very shortly, connecting only a monitor will show you, well, not much.) As with any
computer, you need a keyboard and mouse actually interface with Organelle.
Just about any USB mouse should work with Organelle, and most PC-style USB keyboards
should also be fine. Additionally, mice and keyboards that have their own USB wireless