Cristofoli SuperGap Evolution 2 Manual Download Page 5

5

INSTALLATION INSTRUCTIONS


Instal vacuum pump on a flat, levelled and firm surface, at the same level or below the 

dental unit, never above.


The installation place must be ventilated, dry, clean, free of dust, corrosive gases, and 

direct  sunlight.  Keep  SuperGap  2  away  from  the  customer  service  area  and  from  places 
where there’s movement of people. Leave enough room around the equipment (at least 50 
cm) for ventilation and preventive maintenance accomplishment.


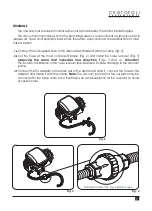
Open the package, remove the equipment and put the leveler glides, for it, use a 5/16" fork 

wrench. Put the lock washers and fasten the nuts for all the glides (Fig. 5, page 8).

1

2

3

ELECTRICAL INSTALLATION (Vacuum Pump)


See  “

How  To  Proceed  When  Service  Is  Needed

”  (Page  13).  If  the  owner  performs  the 

installation with a non- authorized electrician or technician, Cristófoli will not be responsible 
for services done in disagreement with the orientations descibed in this manual.

4

As  shown  in  the  identification  label,  the  SuperGap  2  is  a  dual  voltage  device,  and  it 
leaves the factory adjusted for 220 V. For 127 V operation, reposition the selector switch, 
placed  at  the  back  of  the  equipment  (Fig.  9,  page  9).  See  “

How  To  Identify  Your 

Vacuum Pump

” (Fig. 11, page 10).

For installation, use a grounded outlet (2 Pins + Grounding, 20 A), plugging phase/neutral or 
phase/phase at the side pins and grounding at the middle pin: 

Never plug the grounding 

on neutral.

Electrical Grounding is very important for the operator’s safety and for your equipment’s 
functionality. Therefore, the center pin (grounding) must 

never 

be removed or cut. 

The 

failure to observe this procedure may damage your autoclave. 

Install the equipment 

where the power cord can be easily disconnected.

Never

 use electric extensions, adapters or voltage transformers.

For the proper functioning of the autoclave, the electrical wire must be stable, in other 
words, without oscillations. 

It is mandatory the use of an exclusive circuit breaker for 

the outlet where the autoclave will be installed. 

If after


following all the specifications, 

the electrical wire still oscillates, contact the local electricity company.

C R I S T Ó F O L I

V A C U U M  P U M P S

I N S T R U C T I O N 

M A N U A L 

Summary of Contents for SuperGap Evolution 2

Page 1: ... better serve its customers To fulfill all the requirements of the applicable standards promote the continuous improvement of its quality and environmental standards prevent pollution reduce its environmental impact and continuously train its staff achieving therefore a sustainable and profitable maximization of its value Rev 2 CRISTÓFOLI S MISSION CRISTÓFOLI QUALITY AND ENVIRONMENTAL POLICY Crist...

Page 2: ...commendations and Warnings Installation Instructions Safety Devices Component Description How To Use the SuperGap Evolution Vacuum Pump How To Identify Your Autoclave Technical Data Preventive Maintenance Troubleshooting Quality Control How To Proceed When Service Is Needed Guidance For Final Disposal Of The Equipment Warranty Terms 03 04 04 04 05 09 09 09 10 10 11 12 13 13 14 15 ...

Page 3: ...ection Terminal Date of Manufacture 3 Keep Dry Recyclable Keep out of sunlight This side up Fragile handle with care LOT SN Serial Number Lot number ISO 13485 13485 DE S G A E M S E T T Ã S I O S C R I S T Ó F O L I V A C U U M P U M P S I N S T R U C T I O N M A N U A L ...

Page 4: ...ues from odontological treatments or surgeries INTENDED USE RECOMMENDATIONS AND WARNINGS Read all instructions of this manual before using your SuperGap Evolution The incorrect use may result in malfunction and or accidents For your safety when performing any kind of maintenance remember to unplug the power cord and use PPE Personal Protective Equipment Do not allow patients especially kids to get...

Page 5: ... voltage device and it leaves the factory adjusted for 220 V For 127 V operation reposition the selector switch placed at the back of the equipment Fig 9 page 9 See How To Identify Your Vacuum Pump Fig 11 page 10 For installation use a grounded outlet 2 Pins Grounding 20 A plugging phase neutral or phase phase at the side pins and grounding at the middle pin Never plug the grounding on neutral Ele...

Page 6: ...ressure must be around 3 to 40 wcm water column meters above 20 wcm it could be possible to hear an acute sound from the flow regulator Connect the hose with a 90 angle to the water inlet at the front of the vacuum pump Fig 8 page 9 and the other side to the water valve The water flow regulation is automatically done by an internal device Fig 8 page 9 SUCTION The pipe that connects the dental unit...

Page 7: ...tall the noise reducer Fig 3 observing the arrow that indicates flow direction Figs 3 and 4 Attention The incorrect installation of the noise reducer backwards will cause damage to the vacuum pump Connect the R L adapter to the drain exit of the dental unit after it connect the hose to the adapter and fasten it with the clamp Note The vacuum pump and the cuspidor may be connected to the same drain...

Page 8: ... most distant from the dental unit vacuum pump SuperGap 2 10 m max 32 mm Model Pipes length Pipes diameter Table 2 Fig 5 Fig 6 Strip Connector Residue Filter Voltage Selector Switch Identification Label Fig 7 45 C R I S T Ó F O L I V A C U U M P U M P S I N S T R U C T I O N M A N U A L ...

Page 9: ...se it is necessary to wait for 2 minutes until the vacuum system is filled with water To turn on the vacuum pump just take the suction instrument out from it s support and to turn it off get the instrument into the support again so the vacuum pump will be automatically deactivated At the end of the workday clean the residue filter Fig 10 See Preventive Maintenance Page 11 HOW TO USE THE SUPERGAP E...

Page 10: ...ification This equipment is manufactured by Cristófoli Biossegurança company whose the Quality Management System is certified by and in accordance with ISO 13485 2003 I Suitable for up to 4 dental units 14 6 kg 13 5 kg 23 2 cm x 23 5 cm x 35 cm 27 cm x 27 cm x 39 cm 127 220V AC single phase 60 Hz 0 16 l min 560 W 3 4 HP 0 56 h kW 300 liters min 3450 620 mm Hg 78 dB 70 0 a 75 70 106 kPa 5 ºC a 40 º...

Page 11: ...and biodegradable neutral detergent after it clean with a cloth moistened with 70 alcohol and 1 peracetic acid Never use solvents or petroleum derivatives Verify the openings at the bottom of the motor if there s dirtiness accumulation on it perform cleaning YEARLY General revision and flow limiter regulation we recommend that this procedure be performed by an authorized technical assistance Unplu...

Page 12: ...m tip remove de rivets and the cover locate the fuse and replace it by a new one Take out the the pushed plastic pins place the lid again and the plastic rivets Note To place the rivets insert the plastic pins at the center of the rivets about 2 mm put the rivets inside the holes and push the pins until they get alined with the rivets to lock it See Safety Devices Item 1 page 9 If the problem pers...

Page 13: ...e date of manufacture found in the identification label located in the back of the equipment Fig 6 page 8 and a description of the problem Always contact your local dealer If you have problems contacting your dealer contact us through our website www cristofoli com HOW TO PROCEED WHEN SERVICE IS NEEDED THE VACUUM PUMP STOPS AND DOES NOT SWITCH ON The motor is overheated and the thermal fuse was ac...

Page 14: ...EQUIPAMENTOS DE BIOSSEGURANÇA LTDA strongly recommends users of their products to seek the best destination when disposing equipment or components taking into account the materials recycling legislation effective in each country We advise you to take your equipment to specialized recycling companies that due to the continuous and fast paced development of new recycling technologies and materials r...

Page 15: ...ng from natural causes such as floods lightning etc Sinister theft or robbery Damage caused by accidents such as dents drops short circuits fire etc Problems due to failure of the power supply and or building wiring Improper use installation of the equipment and or plugging it into an incorrect voltage outlet Removal and or tampering of the serial number shown in the identification label of the pr...

Page 16: ......

Reviews: