background image

44 • TSS-70 Series

Product Manual — Doc. 8745D

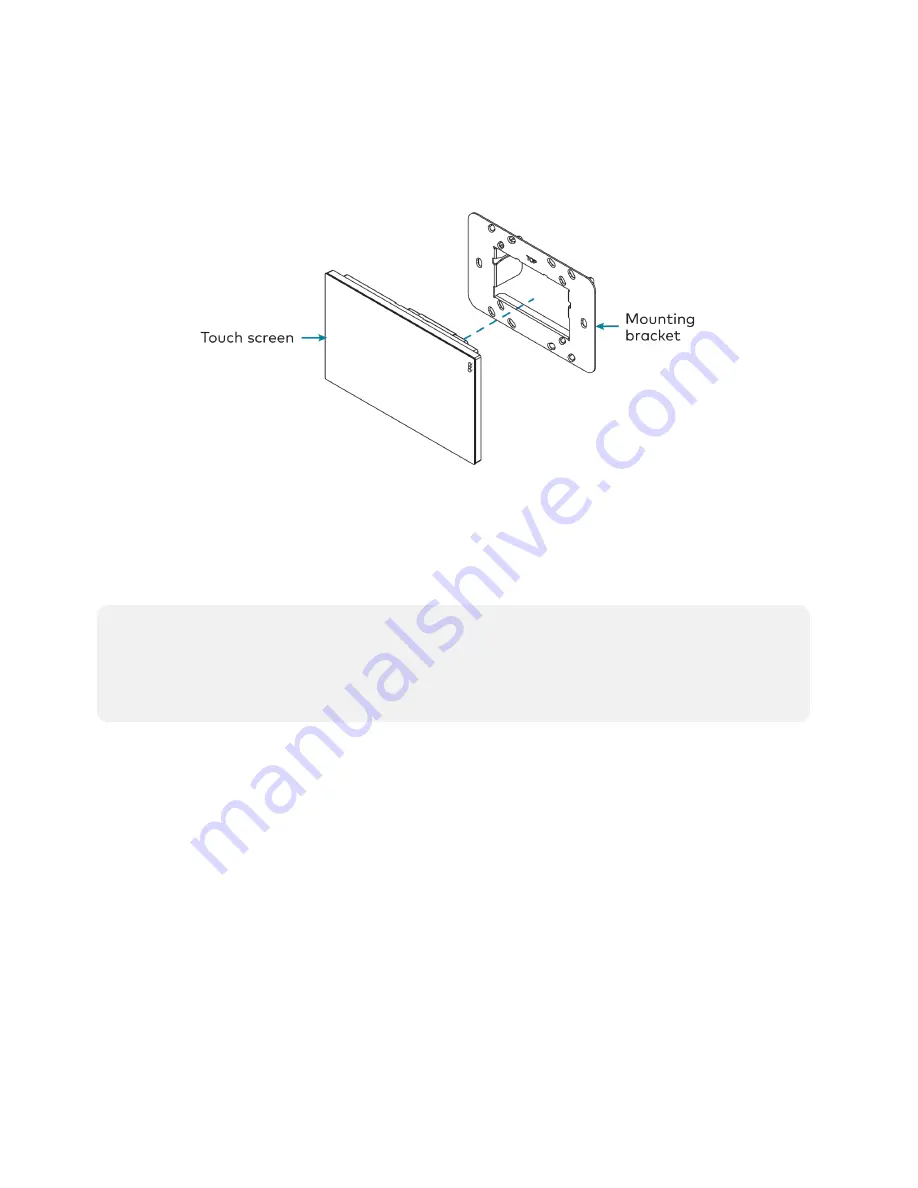
Mount the Touch Screen

After all connections have been made, push the touch screen gently into the mounting bracket so
that its rear housing is secured within the center opening of the mounting bracket.

If the touch screen is not level after installation, pull it out of the mounting bracket and loosen
the screws holding the bracket into place. This procedure allows the mounting bracket to be
rotated slightly.

Once the mounting bracket has been repositioned, retighten the screws, reinstall the touch
screen into the bracket, and ensure that the touch screen is now level.

NOTE: 

To clean or disinfect a touch screen display, use a soft, clean, damp (not wet) cloth with

any commercially available non-ammonia glass cleaner or disinfectant cleaner. Bezels do not
provide a complete watertight seal, so apply cleaning solution to the cloth rather than the
surface of the touch screen. Wipe the touch screen clean and avoid ingress of moisture beneath
the bezels.

Summary of Contents for TSS-1070

Page 1: ...TSS 70 Series 7 in and 10 1 in Room Scheduling Touch Screens Product Manual Crestron Electronics Inc...

Page 2: ...mark or a registered trademark of iOffice LP in the United States and or other countries Kardham Digital is either a trademark or a registered trademark of Kardham Digital in the United States and or...

Page 3: ...pecifications 36 Product Specifications 36 Dimension Drawings 39 Installation 40 Install the Mounting Bracket 40 Electrical Box Mounting 40 Drywall Mounting 41 Install the Security Bracket Optional 42...

Page 4: ...Configuration 75 Actions Menu 76 Status 79 Settings 83 Security 96 802 1x Configuration 106 Application Selection 109 Connect to XiO Cloud Service 111 Operation 112 Resources 114 Crestron Support and...

Page 5: ...ilar For simplicity within this documentation the term touch screen is used except where otherwise noted Crestron offers the following variations for its standard touch screen models Certain settings...

Page 6: ...r a complete room scheduling solution out of the box Key features include l Touch screen designed specifically for enterprise room scheduling applications l Delivers a superior and cost effective alte...

Page 7: ...app downloads from the cloud and installs on the touch screen without any programming or control system required 1 2 3 Built for Enterprise Scheduling The TSS 770 is engineered to meet the demands of...

Page 8: ...e room as the beacon and signals the mobile app to automatically display the appropriate controls and information for the room 5 Proximity Sensor and Brightness Controls The TSS 770 provides a built i...

Page 9: ...eal for mounting at the entrance to a meeting space for room scheduling applications l The TSW 770 1070 MUMK allows the touch screen to be attached to the mullion of an interior glass wall window or p...

Page 10: ...770 runs only one app which is selected at setup Only the apps approved and delivered by Crestron can run on the TSS 770 The TSS 770 cannot be interfaced with a control system and cannot be custom pr...

Page 11: ...bility light bar providing for a complete room scheduling solution out of the box Key features include l Touch screen designed specifically to run the Microsoft Teams Panels scheduling application l D...

Page 12: ...y sign accessories are available to increase the visibility of the room availability status l Reliable The TSS 770 T is purpose built for permanent installation and years of reliable 24 7 operation in...

Page 13: ...prise or an entire client base Built on the Microsoft Azure software platform and utilizing Microsoft s Azure IoT Hub technology XiO Cloud enables installers and IT managers to deploy and manage thous...

Page 14: ...etails about the capabilities and requirements of its scheduling application and services The TSS 770 T cannot be interfaced with a control system and cannot be custom programmed for any other functio...

Page 15: ...or a complete room scheduling solution out of the box Key features include l Touch screen designed specifically for enterprise room scheduling applications l Delivers a superior and cost effective alt...

Page 16: ...p downloads from the cloud and installs on the touch screen without any programming or control system required 1 2 3 Built for Enterprise Scheduling The TSS 1070 is engineered to meet the demands of a...

Page 17: ...the mobile app to automatically display the appropriate controls and information for the room 5 Proximity Sensor and Brightness Controls The TSS 1070 provides a built in proximity sensor that wakes th...

Page 18: ...or more information on supported Wall Smart hardware click here Notes 1 Actual functionality and onscreen appearance varies based on which scheduling app is in use and how the app is set up The functi...

Page 19: ...lability light bar providing for a complete room scheduling solution out of the box Key features include l Touch screen designed specifically to run the Microsoft Teams Panels scheduling application l...

Page 20: ...sign accessories are available to increase the visibility of the room availability status l Reliable The TSS 1070 T is purpose built for permanent installation and years of reliable 24 7 operation in...

Page 21: ...s Crestron devices across an enterprise or an entire client base Built on the Microsoft Azure software platform and utilizing Microsoft s Azure IoT Hub technology XiO Cloud enables installers and IT m...

Page 22: ...t website for details about the capabilities and requirements of its scheduling application and services The TSS 1070 T cannot be interfaced with a control system and cannot be custom programmed for a...

Page 23: ...1070 Series Connectors Connectors and Indicators LAN PoE 1 8 pin RJ 45 connector female with 2 LED indicators 100BASE TX Ethernet port PoE PD port Green and yellow LEDs indicate Ethernet port status...

Page 24: ...Refer to the following sections for more information on the specifications for various TSS 70 Series models l TSS 770 Specifications on page 21 l TSS 770 T Specifications on page 26 l TSS 1070 Specifi...

Page 25: ...orwegian Portuguese Brazil Portuguese Portugal Russian Spanish Swedish Wired Communications Ethernet 100 Mbps auto switching auto negotiating auto discovery full half duplex TCP IP UDP IP DHCP SSL TLS...

Page 26: ...8 pin RJ45 connector female with 2 LED indicators 100BASE TX Ethernet port PoE PD port Green and yellow LEDs indicate Ethernet port status USB 2 USB Type A connectors female USB 2 0 host ports For op...

Page 27: ...or 2 gang UK BS 4662 electrical box Lectern mount over a 2 in H x 3 3 4 in W 51 mm H x 96 mm W cutout 1 3 8 in 35 mm minimum mounting depth Wall mount surface mount and rack options available separat...

Page 28: ...24 TSS 70 Series Product Manual Doc 8745D Dimension Drawings...

Page 29: ...770 runs only one app which is selected at setup Only the apps approved and delivered by Crestron can run on the TSS 770 The TSS 770 cannot be interfaced with a control system and cannot be custom pr...

Page 30: ...SL TLS SSH SFTP SSH File Transfer Protocol IEEE 802 1X SNMP HTTPS IPv4 or IPv6 Active Directory service authentication HTTPS web browser setup XiO Cloud client IEEE 802 3at compliant USB USB 2 0 host...

Page 31: ...thernet port PoE PD port Green and yellow LEDs indicate Ethernet port status USB 2 USB Type A connectors female USB 2 0 host ports For optional room scheduling accessories NOTE The touch screen suppor...

Page 32: ...or 2 gang UK BS 4662 electrical box Lectern mount over a 2 in H x 3 3 4 in W 51 mm H x 96 mm W cutout 1 3 8 in 35 mm minimum mounting depth Wall mount surface mount and rack options available separat...

Page 33: ...Product Manual Doc 8745D TSS 70 Series 29 Dimension Drawings...

Page 34: ...equired 3 The TSS 770 T may be powered by either a PoE or PoE power source when a light bar or hallway sign is connected Refer to the Accessories section for a list of all available options Refer to e...

Page 35: ...e Brazil Portuguese Portugal Russian Spanish Swedish Wired Communications Ethernet 100 Mbps auto switching auto negotiating auto discovery full half duplex TCP IP UDP IP DHCP SSL TLS SSH SFTP SSH File...

Page 36: ...cators 100BASE TX Ethernet port PoE PD port Green and yellow LEDs indicate Ethernet port status USB 2 USB Type A connectors female USB 2 0 host ports For optional room scheduling accessories NOTE The...

Page 37: ...electrical box 2 gang European DIN 49073 electrical box or 2 gang UK BS 4662 electrical box Lectern mount over a 2 in H x 3 3 4 in W 51 mm H x 96 mm W cutout 1 3 8 in 35 mm minimum mounting depth Wall...

Page 38: ...34 TSS 70 Series Product Manual Doc 8745D Dimension Drawings...

Page 39: ...e TSS 1070 runs only one app which is selected at setup Only the apps approved and delivered by Crestron can run on the TSS 1070 The TSS 1070 cannot be interfaced with a control system and cannot be c...

Page 40: ...TLS SSH SFTP SSH File Transfer Protocol IEEE 802 1X SNMP HTTPS IPv4 or IPv6 Active Directory service authentication HTTPS web browser setup XiO Cloud client IEEE 802 3at compliant USB USB 2 0 host fo...

Page 41: ...en and yellow LEDs indicate Ethernet port status USB 2 USB Type A connectors female USB 2 0 host ports For optional room scheduling accessories NOTE The touch screen supports the use of a single light...

Page 42: ...electrical box 2 gang European DIN 49073 electrical box or 2 gang UK BS 4662 electrical box Lectern mount over a 2 in H x 3 3 4 in W 51 mm H x 96 mm W cutout 1 3 8 in 35 mm minimum mounting depth Wall...

Page 43: ...connection is required 3 The TSS 1070 T must be powered by a PoE power source when a light bar or hallway sign is connected Refer to the Accessories section for a list of all available options Refer t...

Page 44: ...BBI wall mount back box o TSW 770 1070 MSMK series multisurface mounting kits o TSW 770 1070 MUMK mullion mounting kit o TSW 770 1070 RMB series retrofit mounting brackets o TSW 770 1070 RMK series ra...

Page 45: ...thout an electrical box Using this hardware will ensure that the bracket is completely flush with the touch screen to provide maximum magnetic force To install the mounting bracket into drywall 1 Usin...

Page 46: ...ncluded security bracket may be attached to the touch screen to prevent unauthorized removal after installation The security bracket snaps into place behind the mounting bracket so that the touch scre...

Page 47: ...screen rear housing Observe the following when connecting the touch screen l Power and data connection is provided to the touch screen by a single Ethernet cable A Crestron PoE Power over Ethernet pow...

Page 48: ...edure allows the mounting bracket to be rotated slightly Once the mounting bracket has been repositioned retighten the screws reinstall the touch screen into the bracket and ensure that the touch scre...

Page 49: ...ay be configured using the built in setup screens or the web configuration interface For more information on configuring the touch screen refer to Configuration on page 51 NOTE The touch screen includ...

Page 50: ...ch screen IP address or the XiO Cloud service Touch Screen IP Address To access the web configuration interface using the touch screen IP address 1 Ensure that the touch screen is connected to the net...

Page 51: ...Guide Select the device from the cloud interface to view its status and settings The device may now also be managed and assigned to a group or room For more information refer to the XiO Cloud User Gu...

Page 52: ...eams Panels scheduling application only No other application can be selected on these models NOTE Applications can be selected and configured from the device setup screens or from the web configuratio...

Page 53: ...pon initial boot The application must be configured prior to use NOTE A Microsoft Teams account is required for configuration Refer to your IT administrator for assistance To set up the Microsoft Team...

Page 54: ...username and password when prompted 7 If two factor authentication is enabled by your organization follow the prompts provided to authenticate with the application Upon successful sign in the scheduli...

Page 55: ...is applied for the first time the touch screen boots with the Crestron room scheduling application selected by default The touch screen may take up to two minutes to boot Place five fingers on the dis...

Page 56: ...uct Manual Doc 8745D l To configure the device using the built in setup screens refer to Local Configuration on page 53 l To configure the device using the web configuration interface refer to Web Con...

Page 57: ...up Screen The Setup screen shows the IP address and hostname of the touch screen and provides the following configuration selections l Buttons for Ethernet setup application selection Wi Fi network se...

Page 58: ...N Access to turn the Ethernet adapter on or off If LAN Access is set to Off Ethernet will not function and a Wi Fi connection can be established l Tap On or Off under DHCP Enable to turn DHCP dynamic...

Page 59: ...TSS 70 Series 55 Static IP Ethernet Setup Screen To edit the static IP address the static subnet mask the static default router the preferred DNS or the alternate preferred DNS tap the text field und...

Page 60: ...n to delete the last digit l Tap Save to save a new entry or tap CANCEL to discard any changes The display returns to the Static IP Ethernet Setup screen After new settings have been saved tap APPLY C...

Page 61: ...Swipe up or down through the list and then tap an application to select it Tap Confirm Selection to confirm the selection or tap Cancel to return to the previous screen Once confirmed the touch scree...

Page 62: ...on can be configured The following buttons are provided for configuring Wi Fi settings l Tap On or Off under Wi Fi Access to turn the Wi Fi adapter on or off If Wi Fi Access is set to Off Wi Fi will n...

Page 63: ...isplay the Wi Fi Static IP Setup screen Wi Fi Static IP Setup Screen To edit the static IP address the static subnet mask the static default router the preferred DNS or the alternate preferred DNS tap...

Page 64: ...s and stay in setup mode Tap REBOOT to exit setup mode and reboot the touch screen Tap BACK to return to the Wi Fi Setup screen Tap BACK on the Wi Fi Setup screen to return to the Setup screen Select...

Page 65: ...ally when adding a new WAP 2 Tap the WAP Name SSID text field to display an on screen keyboard 3 Enter or modify the WAP name if necessary and then tap SAVE 4 Tap the Security text field to display th...

Page 66: ...s a failure message is displayed Tap Connect to a different access point to return to the Connect to a Wi Fi Access Point 1 2 3 screen NOTE If four WAPs have already been assigned the Wi Fi WAP Select...

Page 67: ...Points Screen Use the Manage Wi Fi Access Points screen to manage settings for up to four saved WAPs Tap one of the listed WAPs to display controls to manage the WAP Tap Delete this Access Point to d...

Page 68: ...obile device is in or near the same room as the beacon and signals the mobile app to automatically display the appropriate controls and information for the room l Tap On or Off underneath BLE Beacon t...

Page 69: ...creen to configure settings for the virtual toolbar By default the virtual toolbar can be accessed by swiping down on the tab located at the top of the screen and provides virtual buttons for power ho...

Page 70: ...ar on the respective location on the screen l Tap the up and down arrow buttons under Toolbar Autohide Timeout to increase or decrease the duration before the toolbar is automatically hidden from 0 to...

Page 71: ...Product Manual Doc 8745D TSS 70 Series 67 On screen Toolbar Screen Toolbar Buttons Tap BACK to return to the Setup screen...

Page 72: ...Diagnostics Advanced screen Diagnostics Advanced Screen Use the Diagnostics Advanced screen to access various diagnostic test screens for the touch screen The Diagnostics Advanced screen also provide...

Page 73: ...screen to display the Test Pattern Diagnostics screen Test Pattern Diagnostics Screen Use the Test Pattern Diagnostics screen to display any of the available test patterns Tap one of the buttons on th...

Page 74: ...stics Advanced screen to display the touch test screen Touch Test Screen Use the touch test screen to test the touch functionality of the display When a location button is tapped its respective indica...

Page 75: ...name and domain name A Link indicator is provided to indicate the status of the Ethernet connection Green indicates that the Ethernet connection is active The Ethernet Diagnostics screen also provides...

Page 76: ...and domain name A Link indicator is provided to indicate the status of the Wi Fi network connection Green indicates that the Wi Fi network connection is active The Wi Fi Diagnostics screen also provi...

Page 77: ...ates to scan the network for any updates to the touch screen applications If application updates are available the touch screen downloads and installs the updates The status of the updates is shown on...

Page 78: ...74 TSS 70 Series Product Manual Doc 8745D...

Page 79: ...the network 2 Open a web browser 3 Enter the touch screen IP address into the browser URL field The configuration interface is displayed TSS 770 shown NOTE If authentication is enabled for the touch...

Page 80: ...n Actions drop down menu on the top right of the page The Actions menu may be accessed at any time Actions Menu Once any changes have been made to the touch screen configuration the Actions button cha...

Page 81: ...n the host computer 2 Select the firmware PUF and then click Open 3 Click Load to load the PUF to the touch screen The upload progress is shown in the dialog box 4 Once the touch screen has completed...

Page 82: ...restron Default scheduling mode To upload a custom scheduling project 1 Click Browse and then navigate to the project vtz file on the host computer 2 Select the project vtz file and then click Open 3...

Page 83: ...tus Tab Selections Each selection is described in the sections that follow Device Click Device to view general device information Status Tab Device The following Device information is displayed l Mode...

Page 84: ...touch screen domain to an IP address Click the plus icon next to Ethernet to display the following Ethernet settings l Domain The touch screen domain name l DHCP Reports whether the IP address is sta...

Page 85: ...is enabled l Default Gateway The Wi Fi network gateway router address shown only if a Wi Fi network connection is enabled l Link Active Reports the status of the Wi Fi network connection A true messag...

Page 86: ...is displayed l Room Status The status of the connected room available or reserved l Calendar Sync The status of the sync between the touch screen and the room scheduling calendar l Crestron Fusion On...

Page 87: ...screen application Settings Selections Each selection is described in the sections that follow NOTE If an invalid value is entered for a setting the web interface will not allow changes to be saved un...

Page 88: ...er s used to synchronize the date and time for the touch screen o Click Add to add a new SNTP server entry into the table o Enter the following information for each entry n Enter the SNTP server addre...

Page 89: ...the touch screen using the pop up calendar that is displayed l Time Format Select the format that the time will display on the touch screen 12 hour or 24 hour l Date Format Select the format that the...

Page 90: ...e plus icon next to Network to display the following network settings Settings Tab System Setup Network NOTE The IP Address Subnet Mask and Default Gateway fields are required only if DHCP is set to D...

Page 91: ...fully qualified Wi Fi domain name on the network o Subnet Mask Enter the Wi Fi subnet mask address on the network o Default Gateway Enter the Wi Fi gateway router address on the network l WI FI Acces...

Page 92: ...88 TSS 70 Series Product Manual Doc 8745D Click the plus icon next to Device Display to display the following device display settings Settings Tab System Setup Device Display...

Page 93: ...Hour Digital Clock Enabled Turn on the toggle to display a 24 hour digital clock on the touch screen during standby timeout o Outdoor Temperature Enabled Turn on the toggle to display the outdoor temp...

Page 94: ...Enter a URL of video to be used by the touch screen screensaver o Logo Setting Select one of the radio buttons None Crestron and Custom to select a logo type to use on the touch screen screensaver o...

Page 95: ...o make the Bluetooth beacon available to Crestron devices that support this functionality o Select Config to put the Bluetooth beacon into configuration mode Services Click Services to configure Crest...

Page 96: ...IP address of the HTTP proxy server o HTTP Proxy Port Enter the port number of the HTTP proxy server o Username Enter the username required for the HTTP proxy server o Password Enter the password req...

Page 97: ...ide Settings Tab Device Pairing l Device Model Use the drop down menu to select POE Occ Sensor l Pairing Retry Time Min Enter a duration in minutes that must elapse before the CEN ODT C POE reattempts...

Page 98: ...lume setting l Panel Mute Turn on the toggle to mute the touch screen master volume l Panel Volume Enter a value 1 100 for the touch screen master volume level l Media Mute Turn on the toggle to mute...

Page 99: ...ath is turned on enter the custom URL path for the update server l Day of Week Select the day of week when the touch screen will check for updates Select Daily to have the touch screen check for updat...

Page 100: ...ult Once a new application is selected click Save Changes from the Actions menu A pop up dialog box is displayed stating that the touch screen must be rebooted for the new application to take effect C...

Page 101: ...or the touch screen Authentication is turned on by default When authentication is enabled settings are displayed within the Security accordion Authentication Settings When authentication is turned on...

Page 102: ...to an Active Directory group before the user may be selected as an active directory user For more information refer to Groups on page 103 l Groups Any groups of which the current user is a member Cli...

Page 103: ...ot No authenticated through Active Directory NOTE A user must be added to an Active Directory group before the user may be selected as an active directory user For more information refer to Groups on...

Page 104: ...are displayed for the current user l Name The chosen username l Active Directory User Reports whether the user is Yes or is not No authenticated through Active Directory l Groups Lists any groups tha...

Page 105: ...the Password field l Groups Add the user to one or more groups For more information refer to Groups on page 103 NOTE A user must be added to an Active Directory group to be selected as an Active Direc...

Page 106: ...toggle to use authentication via Active Directory for the user l Password Enter a password for the user l Confirm Password Reenter the password provided in the Password field l Groups Add the user to...

Page 107: ...stored in the touch screen console along with a unique SID security identifier When an Active Directory user attempts to authenticate against the console the console first checks the user credentials...

Page 108: ...icating with Active Directory do not enter the domain name for the Active Directory group in the Name field If this information is being entered via console commands omit domain local from the command...

Page 109: ...of the page to create a new touch screen group The Create Group dialog box is displayed Create Group Dialog Box Use the following settings to create a new group l Name Enter a group name l Access Leve...

Page 110: ...word is selected for Authentication Method enter a username that is required for authentication l Password If EAP MSCHAP V2 password is selected for Authentication Method enter a password that is requ...

Page 111: ...l Expiry Date The date and time that the CA is set to expire If the CAs span multiple pages use the navigation arrows on the bottom of the page to move forward or backward through the pages or select...

Page 112: ...ch screen The upload progress is shown in the dialog box 5 Once the touch screen has completed the upload click OK Click the x button to close the Add Certificate dialog box at any time during the upl...

Page 113: ...heduling application l Kardham Digital room scheduling application l Matrix Booking room scheduling application l Microsoft Teams Scheduling Panels application l New Wave Apps room scheduling applicat...

Page 114: ...scheduling application and services For more information on using and setting up each application refer to the provider s website Note 1 The application supports RFID functionality via the Crestron R...

Page 115: ...ddress and serial number that are labeled on the shipping box or the device The MAC address and serial number are required to add the device to the XiO Cloud service NOTE If the device has multiple MA...

Page 116: ...ctions Supported touch controls vary by application or program The virtual toolbar is used to perform basic device functions if it has been enabled By default the virtual toolbar can be accessed by sw...

Page 117: ...tionality can be custom programmed using a Crestron control system l Power Powers the touch screen off l Home Returns to the home page of the application or program l Lighting Navigates to lighting co...

Page 118: ...rogrammer and Developer Resources l help crestron com Provides help files for Crestron programming tools such as SIMPL SIMPL and Crestron Toolbox software l developer crestron com Provides developer d...

Page 119: ...This page is intentionally left blank Product Manual Doc 8745D TSS 70 Series 115...

Page 120: ...Crestron Electronics Inc 15 Volvo Drive Rockleigh NJ 07647 Tel 888 CRESTRON Fax 201 767 7656 www crestron com Product Manual Doc 8745D 12 10 21 Specifications subject to change without notice...

Reviews: