background image

Software  

Crestron 

D3 Pro


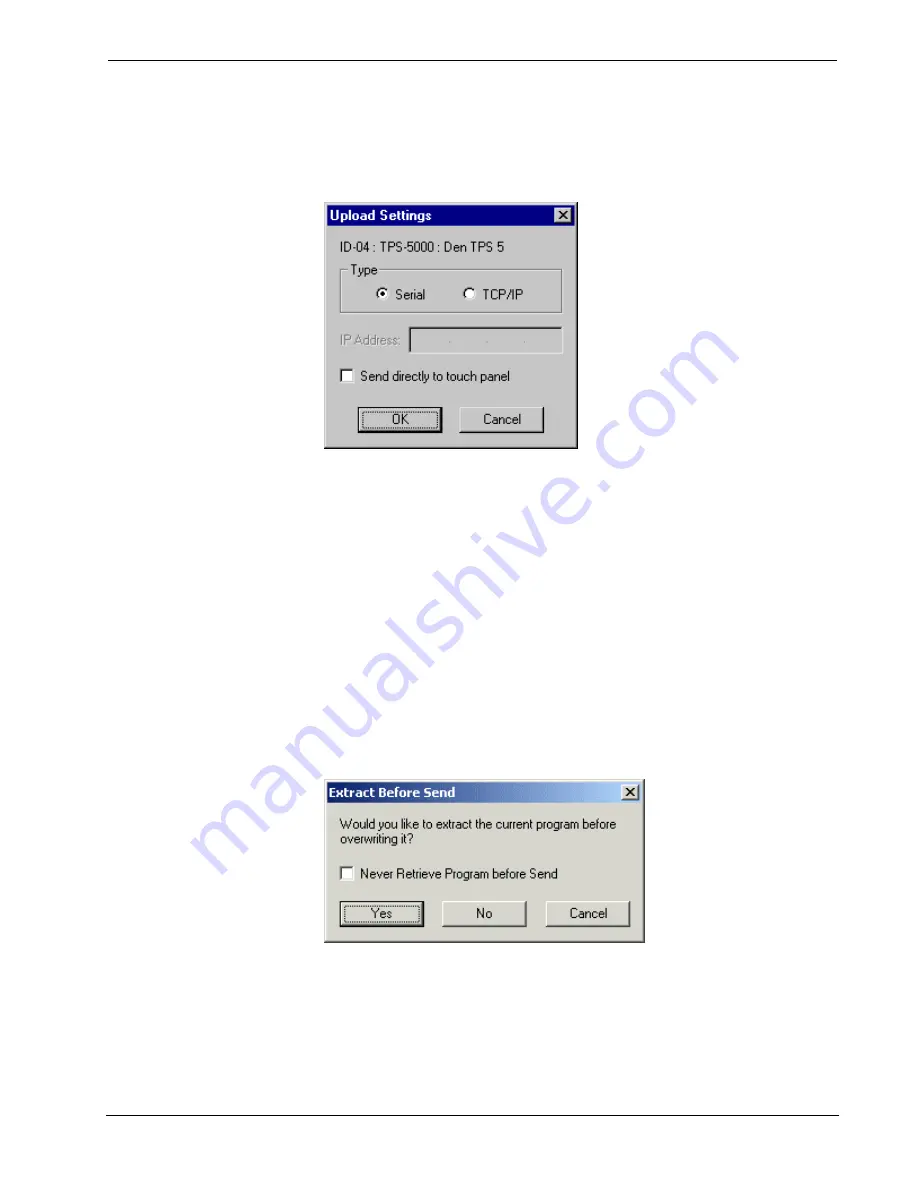
With touchpanels, various connection types are possible. If the panel project 
should be uploaded over Cresnet (via the control system), you want to 
specify the connection type and address (if over TCP/IP) of the control 
system.  


If the touchpanel should be uploaded directly over TCP/IP, the select 

TCP/IP

 as the connection type and enter the IP address of the touchpanel 

(NOT the control system). You must also select the 

Send directly to 

touchpanel

 checkbox. 

 
If the touchpanel should be uploaded directly over RS-232, select 

Serial

 as 

the connection type and click 

Send directly to touchpanel

.  

 
To communicate directly to an Ethernet touchpanel, select 

TCP/IP

 as the 

connection type, enter the IP address of the panel (not the control system) 
and select 

Send directly to touchpanel

3. Click 

Upload

 to begin the file transfer. If the control processor already has a 

program installed in memory, you will be prompted to save that program to 
disc. To save the program, click 

Yes 

and


browse to the directory where you 

want to save the SPZ file. 


4.  As files are transferred, first to the control processor and then to touchpanels, 

D3 Pro will display a progress bar. 
 
In applications that do not include wireless panels, D3 Pro will display the 
progress bar as it uploads each project to every selected touchpanel. In 
applications that do include wireless panels, D3 Pro will interrupt the upload 

94 

 Crestron D3 Pro™ 

Reference Guide – DOC. 5998a 

Summary of Contents for D3 PRO

Page 1: ...Crestron D3 Pro Reference Guide...

Page 2: ...by the Technical Documentation department at Crestron Electronics Inc 15 Volvo Drive Rockleigh NJ 07647 1 888 CRESTRON All brand names product names and trademarks are the property of their respectiv...

Page 3: ...ns 16 Load Schedule View 21 Create a user defined fixture 24 Controlled Circuit Properties 27 Advanced Lighting Motor Properties 29 Module and Enclosure Assignment View 31 Module Assignment Wizard 31...

Page 4: ...cheduler 76 Vacation Scheduler 81 Trace Tool 83 Finish View 84 Sync Learned Lighting 86 Set Network IDs 86 Build System 92 Upload System 93 SOFTWARE LICENSE AGREEMENT 96 RETURN AND WARRANTY POLICIES 9...

Page 5: ...Interfaces View The design aspect of D3 Pro enables you to easily organize each lighting system into areas and rooms To each room you can add user interfaces selected from Crestron s extensive lineup...

Page 6: ...motes If you set engraving options for an interface a file containing the engraving data and your dealer information will be stored in the Engraving subfolder of your system directory The file will ha...

Page 7: ...piler Crestron Database version 15 9 9 VisionTools Pro e version 3 0 0 8 Engraver version 2 1 0 2 File Structure By default D3 Pro lighting programs are saved in Crestron D3 Pro Systems The Systems di...

Page 8: ...in the spreadsheet you must download the price list from the Crestron Web site and save it in your lighting program s Reports subfolder 1 Go to http www crestron com pricelist 2 Click Crestron Home De...

Page 9: ...th the assigned modules and control system Modules and Enclosures Report To print a report 1 Click Documentation on the File menu or click the Generate Documentation toolbar button 2 Select the desire...

Page 10: ...lable that program will be checked off and Update Available will appear in brackets You can clear the check box next to any program you don t want to download You can click Get Update to download the...

Page 11: ...devices will be shown in the display list If you are not connected to the control system the display list shows all Cresnet devices and control systems To download the update to your hard drive 1 Sel...

Page 12: ...folder The program file itself will be saved in the subfolder and have a d3p extension The Location field gives the default file path although you can specify a different file path You can type infor...

Page 13: ...ter the longitude latitude and time zone If you schedule events according to an Astronomic Clock D3 Pro uses the longitude and latitude to calculate sunrise and sunset times You can also select the op...

Page 14: ...ly set to be recorded will be affected To mark a circuit to be recorded go to the Advanced Lighting Properties screen of the Load Schedule View see page 30 and select the Record check box The Vacation...

Page 15: ...l templates pages will be added for that device to all the touchpanels in the system You can rename the Equipment Room and Equipment Area but you cannot remove them You can define areas in several way...

Page 16: ...er to be available to a remote system If your project will include virtual keypads you can select the Automatically add remote system check box in System Properties This will add a remote system autom...

Page 17: ...ft side of the D3 Pro screen the program detail area lists all the interfaces that you have added to that room Similarly selecting an area will display all the interfaces in every room in that area Fi...

Page 18: ...e backlight illuminates all the buttons on the interface all the time The LED indicator is used only when a given button has feedback Some touchpanels provide templates that are used to design the tou...

Page 19: ...as the TPS 5000 or TPS 6000 with TPS ENET card then the Network ID is referred to as an IP ID In addition to the IP ID you should enter the IP address of the Ethernet touchpanel With wireless interfac...

Page 20: ...trim color combination You can also show or hide engravable areas by toggling Show Text Area Outlines on the submenu Engraving Options for the CNX B6 The right click submenu provides a WYSIWYG What Y...

Page 21: ...on the buttons ST 1700 STX 1700C AND TPS 3000L The ST 1700 and STX 1700C touchpanels provide ten engravable buttons five on either side of the touchscreen The TPS 3000L provides five buttons On each o...

Page 22: ...ose Combine Button Caps from the submenu The new button will be shown in the selected horizontal or vertical position 3 To revert back to the two button setting right click the long button and select...

Page 23: ...functions such as Fast Forward Rewind Volume Up and Volume Down Each symbol corresponds to a letter of the alphabet from A to P not case sensitive After selecting the font enter the desired text in t...

Page 24: ...a Outlines on the right click submenu Replacing center buttons with text and lines This feature allows you replace center buttons with horizontal text and lines in the manner shown below To replace ce...

Page 25: ...Fan CLW DIM CLW DIMS Incandescent Dim only Magnetic Low Voltage Dim only CLW SW CLW SWS Switched i e general purpose fan consult CLW SW S documentation to verify the appropriateness of a particular sw...

Page 26: ...hift key right click a room point to New and select the fixture Then select the amount You can right click a room point to New and then select a generic fixture from the submenu A generic fixture appe...

Page 27: ...or Lights Pendants Sconces Table Lamps Other Lighting Neon Cold Cathode Bent Glass Lighting Ceiling Fan Ceiling Fan Multi speed ceiling fan motor Magnetic Low Voltage Cove Lights Lighting 3 Wire Motor...

Page 28: ...lear the Dimmable check box If the lighting load is dimmable you can enter Upper Limit and Lower Limit values which define the lower and upper light levels for dimming That is Upper Limit is the maxim...

Page 29: ...tor will move in the indicated direction 1 until Max Time expires 2 until another command turns the motor off or 3 until it hits a limit switch in the motor assembly Valid values for Max Time range fr...

Page 30: ...id values for Lockout Time range from 0 2s to 2 00s 6 Finally you can enter optional information about the load including the manufacturer model number and description in the text fields This informat...

Page 31: ...ixtures will be sorted by that category To show or hide different properties of a fixture right click the header bar and select the properties you want to see or hide You can select the cell to the le...

Page 32: ...each value is unique The controlled circuit numbers will appear in all reports and documentation you generate Fixture D3 Pro supports a variety of generic fixture styles including pendants wall sconc...

Page 33: ...quantity is used to calculate total wattage Total Watts If you enter a fixture wattage and quantity the total watts will be calculated automatically Otherwise you can enter a total wattage Entering a...

Page 34: ...ies for a 3 wire motor select Advanced Motor Properties from the drop down list at the bottom of the Load Schedule screen Here you can set values for Max Time Jog Time and Lockout Time Max Time sets t...

Page 35: ...and so are ignored by the Wizard Again you should connect CLW devices before running the Wizard To launch the Wizard click the Module Assignment Wizard button and then click Next This will display th...

Page 36: ...specify the room in each group where an enclosure will be located Here you highlight the group and then click the check box next to the room where you want to place the enclosure You should have one...

Page 37: ...hat were previously added Once the Wizard completes the module and enclosure assignments you can select any of the components in the system directory on the left side of the screen This will display d...

Page 38: ...rolled circuit electronic low voltage dimmer Switches and Motor Controllers CLX 1MC4 1 input feed 4 motor control outputs CLX 4HSW4 4 input feeds 4 high inrush switched outputs CLX 1FAN4 1 input feed...

Page 39: ...es of different sizes located in the Accessories toolbox as follows CAEN UMP2x2 2 columns of 2 modules 15 H x 14 W CAEN UMP2x1 1 column of 2 modules 15 H x 7 W CAEN UMP1x2 2 columns of 1 module 7 H x...

Page 40: ...rea in the center of the screen The PAC2 will automatically be placed in Position 1 of a singlewide cabinet or Positions 1 and 2 of a doublewide Step 4 Add control modules to each enclosure Drag a con...

Page 41: ...een successfully connected This will also display the total wattage Use the same procedure to connect all the CLW interfaces in your project with the desired circuits in your load schedule To disconne...

Page 42: ...hat the circuit has been successfully connected This will also display the total wattage Use the same procedure to connect all the controlled circuits in your load schedule to compatible outputs on ea...

Page 43: ...s of auxiliary devices are control cards such as the C2IR 8 card or C2COM 3 You can switch between modes by clicking the buttons over the system directory For Controlled Devices click the Controlled D...

Page 44: ...Crestron or User Databases toolbox to a room Alternatively right click the room where you want to add the device point to New and click Device Then select the manufacturer device and model 2 When you...

Page 45: ...n accommodate This field is ignored if the Add Panel Pages check box is cleared Some Crestron modules provide additional descriptions and help Here you can click the button to view the help You can al...

Page 46: ...tab lists parameters that are contained in the Crestron module that controls the device not all devices have a Properties tab Each parameter consists of a property with a corresponding default value...

Page 47: ...nterfaces view The programmer of the remote system has to retrieve the RSD file and enter the IP information of the lighting control processor Similarly when you import devices you have to retrieve th...

Page 48: ...d non lighting equipment 5 Click the Communication tab and enter the IP address of the remote system The Export to IP ID value is the IP ID of the Ethernet Intersystem Communication symbol which has t...

Page 49: ...Communication tab and enter the IP address of the remote processor Verify that the IP ID indicated in the Import from IP ID drop down list is the same as the IP ID in the remote program 4 Click Done...

Page 50: ...mands are identified by icons as shown in the following table Command Type Icon Unaffected Edge triggered digital command Level triggered maintained digital command Analog command Serial command DIGIT...

Page 51: ...nes how long it should take to get there The most common example of an analog command is the Level command on dimmable lights Here the Target Level is used to set the light level from its current valu...

Page 52: ...uts by clicking the Launch VTPro e button This will start VisionTools Pro e Crestron s touchpanel design software and generate the touchpanel project if it has not already been generated To view infor...

Page 53: ...e you have selected a button for programming you must select the button model and feedback type Depending on the button model you may also have the option to synchronize events and or set the button t...

Page 54: ...ts depending on whether the Learnable Lighting check box is selected If you do not enable learnable lighting the single press button provides one programmable event Press In learnable lighting mode th...

Page 55: ...ess 2 Off In learnable lighting mode the toggle button provides two programmable events Tap 1 On and Tap 2 Off and one non programmable event Hold Here the event names change because tapping the butto...

Page 56: ...t with multiple speed light levels including Ceiling fans Lights with multiple levels such as low medium and high Drapes Garage doors The Multi Press button model provides up to eleven events Press 1...

Page 57: ...ent are not included in the dimming operation Suggested feedback ON when ANY light in preset is ON TOGGLE DIM The Toggle Dim button model adds dimming capabilities to the Toggle button model If you pr...

Page 58: ...ry MASTER LOWER A Master Lower button model will lower all the lights associated with the last button that was pressed on the keypad Alternatively if a control button group is selected from the Contro...

Page 59: ...l Toggle button with join 30 an error message will be generated if you subsequently assign join 530 to another object Button Feedback Every button model provides a certain number of events and may als...

Page 60: ...d on current lighting levels Thus you should not assign these feedback types to button models that do not provide a Press event i e Clone Master Raise or Master Lower or to buttons that do not control...

Page 61: ...s the dining room ceiling fan is at Speed 1 Advanced feedback requires more work to set up but can be particularly powerful If more than one button controls a device the feedback states can track one...

Page 62: ...on has no clear alternate the alternate action will be Unaffected For example if you assign the command set light level to 85 to the Press 1 event of a Toggle button D3 Pro will automatically assign t...

Page 63: ...for this particular event this device should not be controlled in any way 4 You can enter a Step Delay for each command you define A step delay signifies that the current action will not be triggered...

Page 64: ...you to add another command simply by clicking the New Step button Alternatively you can click OK to add the command to the Event tab and exit the Edit Step dialog If the current button has more than o...

Page 65: ...lower the current light level until the user lets go of the button or until the level reaches 100 or 0 The default ramping speed is set in the System Properties Lighting tab For non dimmed lights the...

Page 66: ...ng The Jog Open and Jog Close commands move the motor in fine increments Recall that if you select a Jog Time in the Advanced Motor Properties section of the Load Schedule View you were specifying how...

Page 67: ...vents Thus except for the Enable and Disable commands you should disregard the other Scheduler commands Enable and Disable are digital commands that turn the Scheduler on and off Copy Paste Steps and...

Page 68: ...right click the command and select the desired operation from the submenu You can cut copy and paste the command to a different event or you can delete the command To work with all the defined steps f...

Page 69: ...ing button Programming View Define a Level command for each light that will be a part the Tap 1 or Tap event You can add other logic here as well such as to control fans or motors but these steps will...

Page 70: ...ator blinks about 5 seconds then continue holding for about another 10 seconds until the feedback indicator blinks a second time At this point you should see the lights return to the their original le...

Page 71: ...appropriate module right click the fixture you want to adjust and select Realtime Control 2 To verify the connection click Start Flashing This will cause the lights in the room to flash on and off Whe...

Page 72: ...vel field to display the slider control 6 Adjust the slider up and down until the lights are at the desired level You can also type the desired value into the box and press the Enter key 7 When you ar...

Page 73: ...tional step will warn you that doing so will turn off synchronization for the entire button To define a conditional statement 1 Select the event you want to program For example if you want to program...

Page 74: ...in true The OR operator signifies that an action will be triggered if any one or more expressions in the list result in true 6 You can specify a Step Delay by selecting a value from the drop down lis...

Page 75: ...t as described earlier in this Programming View section As shown below the Drapes Close command is in the indented position directly below the If clause signifying that it is part of the conditional s...

Page 76: ...led FrontGateStatus with two possible values or variable states Open and Closed You can then define a conditional statement anywhere in your program that selects a path of action depending on whether...

Page 77: ...iable state for FrontGateStatus called Offline You can also change the order of variable states by clicking the up and down arrows 4 To delete a variable or variable state select the item you want to...

Page 78: ...ets allow you to create a set of pre defined actions that you can assign to any event That is you can assign the preset to any button or other system input in your lighting program To define a global...

Page 79: ...Expand the Global Presets device in the Target list and select the preset You can then assign the Run or Cancel command to control the actions defined in the preset The Run command starts all the act...

Page 80: ...nrise or sunset For example you can schedule an event for 1 hour before sunrise If the Scheduler calculates sunrise for a given day to be 5 05 A M then the scheduled event will be triggered at 4 05 A...

Page 81: ...f you select the Standard clock enter the time of day you want the event to be fired If you select the Astronomic clock enter an offset from Sunrise or Sunset In the example below the event will be fi...

Page 82: ...select Run forever the Stop Date will be dimmed and the event will be fired each day at the scheduled time starting on the Start Date If you select Run annually the event will be fired each year durin...

Page 83: ...re you can create an event calendar or edit an existing event calendar To select the dates that will pertain to a calendar select the check box next to the calendar and click Edit 10 Select the dates...

Page 84: ...dates click OK 12 Once you have defined the schedule dates you can program events by double clicking the red text inside the Preset Actions tab You can define actions conditionals statements and set g...

Page 85: ...u can assign to any button Enable and Disable These commands simply turn the Scheduler on and off Vacation Scheduler The Vacation Scheduler is a built in utility that memorizes and replays light level...

Page 86: ...dent goes away they will need a button programmed to put the Vacation Scheduler into Playback mode Upon returning from vacation they would most likely put it back into Record mode If the user puts the...

Page 87: ...list of the programming sources appears you can double click a source to jump immediately to the appropriate commands in Programming View To activate the Trace tool from any of the system views click...

Page 88: ...he control system for the first time you must use RS 232 You can then enter the IP information of the control system for subsequent connections over Ethernet For RS 232 communication use a DB9 straigh...

Page 89: ...room if you have selected the Sort by Room option The system tree lists the name of each device its type and its Network ID Once you have connected the control system interfaces and lighting modules...

Page 90: ...cluding CLX control modules have an internal Cresnet ID that is set at the factory This internal Cresnet ID has to match the Cresnet ID that is assigned in the D3 Pro lighting program For example if y...

Page 91: ...polling If you select Setup a new system then you must first confirm that any existing network configuration should be deleted After polling the Wizard will display different screens depending on the...

Page 92: ...e ID differs depending on the device and will be described in the Setup Instructions In most cases you have to connect only the indicated device to the network and click Set ID D3 pro will then automa...

Page 93: ...he information here includes the Cresnet ID of the device meaning the ID assigned in the program not the internal Cresnet ID the name and type of device the type count and its location The Type Count...

Page 94: ...device its type the type count and serial number As you set valid Cresnet IDs for these touch settable devices they will be removed from this list To set IDs drag the devices you want to configure fr...

Page 95: ...later To identify the device to the control processor and thus assign its ID you must press the device s setup button Some devices will have a button marked setup e g CLX modules and others will use...

Page 96: ...n mark indicating that their presence cannot be confirmed In addition the control processor will be preceded by a if the logic program has not yet been compiled or if the system has been changed in an...

Page 97: ...upload them to the control system and user interfaces 1 Click the Upload System button to poll the network and display the list of target devices that require uploading If the control system and inter...

Page 98: ...icate directly to an Ethernet touchpanel select TCP IP as the connection type enter the IP address of the panel not the control system and select Send directly to touchpanel 3 Click Upload to begin th...

Page 99: ...ID is the temporary wired ID that is used solely for uploading and is not used during normal program operation 5 After transfer D3 Pro will display information about each file including the filename a...

Page 100: ...ands data or instructions from or to another computer b for local campus or wide area network internet or web hosting services or c pursuant to any rental sharing or service bureau arrangement The Sof...

Page 101: ...inety 90 days from the date of receipt and b that any hardware accompanying the Software will be subject to its own limited warranty as stated in its accompanying written material Crestron shall at it...

Page 102: ...ered This warranty extends to products purchased directly from CRESTRON or an authorized CRESTRON dealer Purchasers should inquire of the dealer regarding the nature and extent of the dealer s warrant...

Page 103: ...Crestron D3 Pro Software This page intentionally left blank Reference Guide DOC 5998a Crestron D3 Pro 99...

Page 104: ...Crestron Electronics Inc Reference Guide DOC 5998a 15 Volvo Drive Rockleigh NJ 07647 8 03 Tel 888 CRESTRON Fax 201 767 7576 Specifications subject to www crestron com change without notice...

Reviews: