background image

Installing Your Audio Card     2

E

N

GLIS

H

Installing the 
Audio Card

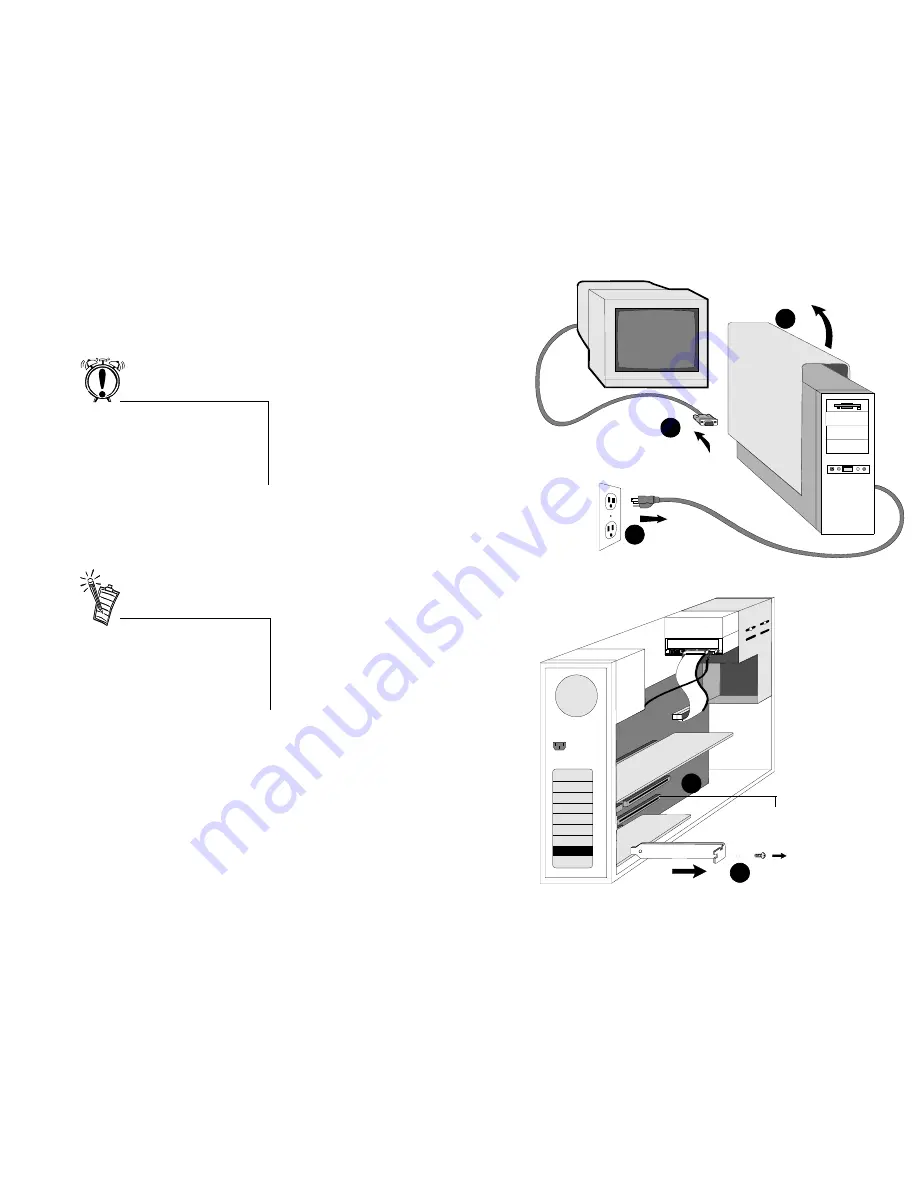
To install the audio card:

1. Turn off your computer, and 

disconnect the power cable.

2. Disconnect the monitor and other 

devices that are connected to the 
computer.

3. Remove the computer cover.

4. Locate a PCI slot to 

accommodate the audio card.

5. Remove the slot cover from your 

computer—save the screw to 
secure the audio card.

1

2

3

4

5

PCI Slot

Before you remove the computer 
cover, touch a grounded metal 
surface to discharge static 
electricity.

Remove or disable any existing 
audio card and its driver from your 
computer.  Refer to the 
manufacturer’s documentation for 
details.

Summary of Contents for Sound Blaster PCI128

Page 1: ...Sound Blaster PCI128 User Guide On line Version...

Page 2: ...Installing the Audio Card 2 Installing the Creative Software 5 Windows 95 5 Windows 98 9 Windows NT 9 Testing the Installation 10 Creative Mixer 11 Real Time Effects 11 Recording 11 Microphone 11 Opt...

Page 3: ...is not working 17 Determining your Windows version 18 Computer hangs or restarts during installation 18 Audio card is not automatically detected 19 CD does not automatically run when you insert it in...

Page 4: ...uirements For the best results from your audio card you need IBM compatible PC with an Intel Pentium or AMD K5 Series processor rated at 133 MHz 16MB RAM Random Access Memory 6MB of storage space on y...

Page 5: ...ample you must supply a value for xxx yy Italic in the text emphasizes or identifies a word or phrase that is being defined In this document it is also used to identify a button or menu item that you...

Page 6: ...basic components necessary for a complete installation CD Audio Cable Phillips Screwdriver not included Audio Card Creative Audio Software Installing your audio card requires you to perform the follo...

Page 7: ...er 3 Remove the computer cover 4 Locate a PCI slot to accommodate the audio card 5 Remove the slot cover from your computer save the screw to secure the audio card 1 2 3 4 5 PCI Slot Before you remove...

Page 8: ...slot and firmly press the card into place until it fits snugly 7 Use the screw from the slot cover to secure the audio card to the frame of the computer securing the card assures proper grounding 8 Co...

Page 9: ...mputer cover 11 Reconnect the power cable monitor and other devices Joystick Microphone Stereo CD player tape deck etc Powered speakers rear or amplifier Powered speakers front headphones or amplifier...

Page 10: ...log appears 3 Insert the Sound Blaster PCI128 Software CD in your CD ROM drive Enter the path for your CD ROM drive and the software on the disk For example use the Browse button to locate or type the...

Page 11: ...t Creative Audio Software and any other applications that you want to install and click on OK 7 Next the Software License Agreement appears Read the text and click on the Yes button if you accept the...

Page 12: ...correct click the Next button 9 Next the Setup Options are displayed When you select an option the installation continues 10 The Select Program Folder dialog allows you to select the folder to which t...

Page 13: ...tion to be changed Then click Next until you are returned to the Installation Information dialog If the information is correct click the Next button to continue 12 The Creative Sound Blaster PCI128 in...

Page 14: ...O ENGLISH WIN95DRV D represents your CD ROM drive Click the Next button 4 Click the Next button to install the Windows 98 drivers 5 Click the Finish button when the installation is complete 6 Restart...

Page 15: ...layer from the menus The Windows Media Player appears 2 Open a wave file such as THE MICROSOFT SOUND WAV and select the Play button You should hear the wave file being played 3 Open a MIDI file such a...

Page 16: ...ects Spatial surround sound is available for the Wave and Synthesizer devices Reverb is available for the Synthesizer Chorus adds depth to music files played back by the Synthesizer Recording The audi...

Page 17: ...ou to dynamically adjust the settings for sound currently being input output Voice Control Only limits the Mixer display to only the main volume control You can select the panels to be included in the...

Page 18: ...and select Properties The System Properties dialog appears 2 Click the Device Manager tab 3 Double click Sound video game controllers A list of multimedia devices appears 4 Select your audio card for...

Page 19: ...correct problems change configurations or make upgrades To uninstall the software 1 Click on the taskbar and select Settings from the Start menu 2 Select Control Panel The Control Panel group appears...

Page 20: ...ticks a Y cable is available from Creative Labs Customer Service Y cables from other sources may not work Some sophisticated joysticks may require the MIDI adapter or Y cable to work with the audio ca...

Page 21: ...onnection from the CD ROM drive to the audio card Ensure the speakers are properly connected to the audio card s output connector See the colored insert for detailed connection information Joystick po...

Page 22: ...lict may cause the computer to hang or restart during the installation procedure Check the following to resolve the conflict A hardware conflict with another device in your system see Resolving Hardwa...

Page 23: ...95 1 Click on the taskbar and select Settings from the Start menu 2 Select Control Panel The Control Panel group appears 3 Double click the Add New Hardware icon The Add New Hardware Wizard dialog app...

Page 24: ...Troubleshooting 20 6 Select Next to continue 7 Select Finish and follow the prompts to complete the new hardware installation 6 7...

Page 25: ...tem Properties dialog appears 2 Click the Device Manager tab A list of devices appears 3 Double click CD ROM and select your CD ROM drive 4 Choose the Properties button The CD ROM drive properties dia...

Page 26: ...age 13 or the Windows on line help for detailed information PCI bus mastering devices may be interfering with the operation of the audio card Temporarily remove non essential PCI bus mastering devices...

Page 27: ...ystick MIDI connector Line In Jack Microphone Jack Line Out Front Jack TV IDE Audio Input 1 3 2 4 5 6 8 Auxiliary In Line Out Rear Jack 7 NOTE To use passive speakers with your Sound Blaster PCI128 yo...

Page 28: ...o Microphone In jack Connects an external microphone for voice input Jack de entrada de micr fono Conecta un micr fono externo para la entrada de voz Prise d entr e microphone Permet de brancher un m...

Page 29: ...Utilizes system RAM for wave table samples User configurable for 2MB and 4 MB Sistema de memoria Utilizaci n de la RAM del sistema para muestras de sonido wavetable Configuraci n por parte del usuari...

Page 30: ...Sound 3D etc Compatible avec Windows 95 98 NT 4 0 DOS 6 x ou version ult rieure General MIDI MPC3 Plug and Play PCI Sound Blaster Microsoft DirectSound DirectSound 3D etc Compat vel com Windows 95 98...

Page 31: ...lwater OK 74075 EE UU Soporte Tecnico en espa ol por facs mil y correo electr nico Facs mil 1 405 742 6613 Correo electr nico soporte creativelabs com Creative Labs nous voulons offrir nos clients les...

Page 32: ...ble o vous auriez besoin de renvoyer le produit Creative Quand vous renvoyez un produit n cessitant des r paration L exp dition destination de Creative se fait vos frais et vous en assumez tous les ri...

Reviews: