background image

8

SECTION F: SERVICE AND REPAIR

NOTE: All item numbers in ( ) refer to Figures 7 & 8 and 9 & 10 

For 2 Stage Models.

WARNING ! - Hydraulic power to the pump must be 

disconnected to prevent personnel danger before 

any service work is done to the pump.

F-1) Lubrication:

F-1.1) Checking Oil:

To check oil, remove pipe plug (18) from diff user (9). With a 

fl ashlight, visually inspect the oil in the seal cavity to make 

sure it is clean and clear, light amber in color and free from 

suspended particles. Milky white oil indicates the presence of 

water. If the the oil looks milky white, pour the oil out of the oil 

chamber and let it settle in a clean, dry container. If any water 

settles out in the bottom of the container or if the oil is white 

and thick (emulsifi ed) replace rotary shaft seals (See Section 

F-4) and oil.

You can also check oil for contamination by using an oil tester 

with a range to 30 Kilovolts breakdown. If oil is found to be 

clean and uncontaminated (measure at or above 15 KV. 

breakdown), refi ll the seal cavity. If oil is found to be dirty or 

contaminated (or measures below 15 KV. breakdown), replace 

rotary seals and oil.

TABLE 1 - SEAL CHAMBER OIL

SUPPLIER

GRADE

Gulf

(334206) Harmony 68

Texaco

URSA P-68

F-1.2) Replacing Oil:

Remove pipe plug (18) from diff user (9), and drain oil from 
seal chamber and dispose of properly. Flush inside seal 
chamber of diff user (9) thoroughly to be sure it is clean 
and free of abrasives. Refi ll oil chamber (See Parts List for 
amount), or about half full, of a 20W non-detergent turbine oil 
with rust and oxidation inhibitors, See Table 1. After replacing 
oil, replace pipe plug (18) using a sealant.

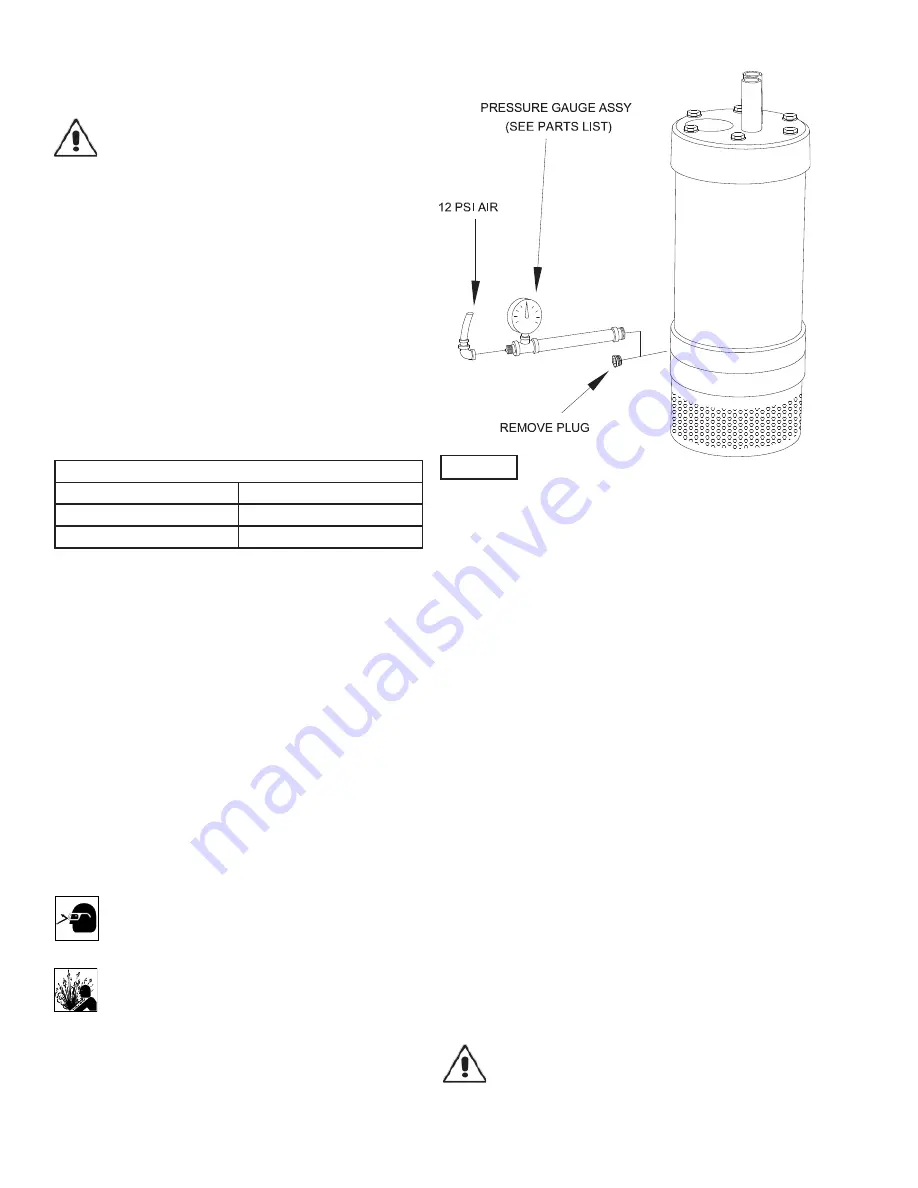
F-1.3) Seal Cavity Pressure Test:

Remove pipe plug (18) from diff user (9) and check that the 
seal chamber is of the correct amount of oil (See Figure 2). 
Apply pipe sealant to pressure gauge assembly and tighten 
into hole in Intermediate diff user (9). Pressurize seal chamber 
to 12 P.S.I. and check for leaks. If after fi ve minutes, the 
pressure is still holding constant, and no leaks are observed, 
slowly bleed the pressure and remove the gauge assembly. 
Replace the pipe plug (18) using a sealant. If the pressure 
does not hold, then the leak must be located and repaired.

CAUTION ! - Always wear eye protection when 
working on pumps.

CAUTION ! - Pressure builds up extremely fast, 
increase pressure by “TAPPING” air nozzle. Too 
much pressure will damage seal. DO NOT exceed 
12 P.S.I.

F-2) Impeller Service:
F-2.1) Disassembly:

 - (See Fig’s 7 & 8)

On 7-08 single stage models, to inspect or replace impeller 
(3) and impeller o-ring (43), remove screws (40) and remove 
strainer (24). Remove capscrews (32), fl atwashers (30) and 
brackets (41) then remove suction case (4). On 7-06 models, 
remove capscrews (32), fl at washers (30) strainer (24) and 
suction case (4). Check the suction case (4) lining for wear, 
cuts, or defects and replace if necessary. Now remove 
locknuts (16) and washer (27) from shaft. The impeller (3) 
should slip off  the shaft, if not, remove the o-ring (43) from 
the impeller groove and use a bearing puller. Inspect the 
impeller for wear or damage, also check shims (17a) & (17b) 
and replace if necessary. 

NOTE:

 Seal spring relaxes when 

impeller is removed and may cause oil to leak through.

2-STAGE MODELS:

 (See Fig’s 9 & 10) To inspect or replace 

impellers (3) and impeller o-rings (43), remove screws (40) 
and remove strainer (24). Remove cap screws (32), fl at 
washers (30) and brackets (41) then remove suction case (4). 
Check suction case (4) lining for wear, cuts, or defects and 
replace if necessary. Now remove locknut (16) and washer 
(27) from shaft. The outer impeller (3) should slip off  the shaft, 
if not, remove the o-ring (43) from the impeller groove and 
use a bearing puller. Inspect the impeller for wear or damage, 
remove shims (17a), (17b), (17c), spacer (45), keys (15), 
lower diff user (46), replace if necessary. The inner impeller 
(3) should slip off  the shaft, if not, remove the o-ring (43) from 
the impeller groove and use a bearing puller. Inspect the 
impeller for wear or damage, remove shims (17a), (17b) and 
(17c). Seal spring relaxes when impeller is removed and may 
cause oil to leak through.

CAUTION ! - Clean all parts with solvent. DO NOT 
scrape, sand or 

fi

 le aluminum parts.

FIGURE 2

Summary of Contents for PROSSER HYMERGIBLE 7-06000 Series

Page 1: ... Inc constant product improvement program product changes may occur As such Crane Pumps Systems reserves the right to change product without prior written notification 420 Third Street 83 West Drive Bramton Piqua Ohio 45356 Ontario Canada L6T 2J6 Phone 937 778 8947 Phone 905 457 6223 Fax 937 773 7157 Fax 905 457 2650 www cranepumps com Form No 096965 Rev G Series 7 06000 7 08000 DISCONTINUED Parts...

Page 2: ...ES 7 08000 2 Stage CROSS SECTION Fig 9 17 SERIES 7 08000 2 Stage EXPLODED VIEW Fig 10 18 PARTS LIST 19 RETURNED GOODS POLICY 20 WARRANTY 21 START UP REPORT 22 WARRANTY REGISTRATION SPECIAL TOOLS AND EQUIPMENT DIELECTRIC TESTER PRESSURE GAUGE KIT see parts list Other brand and product names are trademarks or registered trademarks of their respective holders HYMERGIBLE is a registered trademark of C...

Page 3: ...ays wear eye protection when working on pumps Make sure lifting handles are securely fastened each time before lifting DO NOT operate pump without safety devices in place Always replace safety devices that have been removed during service or repair Secure the pump in its operating position so it can not tip over fall or slide DO NOT exceed manufacturers recommendation for maximum performance as th...

Page 4: ... Design Hydraulic System should include 25 micron filtering PUMP SERIES WEIGHT SHIPPING WT STD UNIT PUMP DOMESTIC CUBES 7 06000 17lbs 7 7kg 23lbs 10 4kg 1 7Ft 05m SECTION A PUMP SPECIFICATIONS SERIES 7 06000 inches mm IMPORTANT 1 PUMP MAY BE OPERATED DRY FOR EXTENDED PERIODS WITHOUT DAMAGE TO MOTOR AND OR SEALS 2 THIS PUMP IS APPROPRIATE FOR THOSE APPLICATIONS SPECIFIED AS CLASS I DIVISION II HAZAR...

Page 5: ...gle Row Ball Lubrication Prelubricated high temperature grease Load Radial Thrust LOWER BEARING Two Stage Design Double Row Ball Angular Contact Tandem Mounting Lubrication Prelubricated high temperature grease Load Radial Thrust MOTOR Design Hydraulic System should include 25 micron filtering PUMP SERIES WEIGHT SHIPPING WT STD UNIT PUMP DOMESTIC CUBES 7 08306 7 08406 37lbs 16 9kg 42lbs 19 1kg 3 6F...

Page 6: ...rough discharge line fittings valves etc Maximum fluid temperature for sustained operation is 140 F 60 C at specific gravity 1 0 Pump may operate up to 10 minutes running dry not pumping water without damage DO NOT allow pump to be buried in mud or sand IMPORTANT Pump Should Have Strainer Affixed At All Times Inspect And Clean The Pump Strainer Periodically For Maximum Efficiency And Performance C 2 Disc...

Page 7: ...nd other means of fastenings and also threaded covers shall be in place properly tightened and secured 4 Shaft Seals The seals should be inspected every 100 operating hours for wear more often if abrasives are present To make a quick check of the seal s condition drain and inspect the oil in the seal chamber See Section F 1 If oil removed from the pump contains water or abrasives replace seals Cha...

Page 8: ...s still holding constant and no leaks are observed slowly bleed the pressure and remove the gauge assembly Replace the pipe plug 18 using a sealant If the pressure does not hold then the leak must be located and repaired CAUTION Always wear eye protection when working on pumps CAUTION Pressure builds up extremely fast increase pressure by TAPPING air nozzle Too much pressure will damage seal DO NO...

Page 9: ... 030 Inspect strainer 24 and clean making sure hole are not clogged to ensure unrestricted flow Now position strainer 24 onto suction case 4 On 7 06 pump models insert the rest of cap screws 32 with flat washers 30 tightening to 5 Ft lbs On 7 08 models insert three screws 40 in holes and tightening F 3 Shaft Seal Bearing Service F 3 1 Disassembly To replace shaft seal drain oil per Section F 1 1 and...

Page 10: ...lapped surface of rotating member 10c facing inward toward stationary member 10d slide rotating member 10c over bullet and onto shaft using seal pusher until lapped faces of 10d and 10c are together see Figure 6B IMPORTANT It is extremely important to keep seal faces clean during assembly Dirt particles lodged between these faces will cause the seal to leak Place spring 10b over shaft and in place...

Page 11: ...nto motor 6 and tighten by placing wrench on the flats located on fitting Assemble lower end of pump per Sections F 3 and F 2 SECTION G REPLACEMENT PARTS G 1 ORDERING REPLACEMENT PARTS Your local Prosser distributor can supply parts and repair service When ordering parts ALWAYS furnish the following information Specify pump model number as shown on nameplate serial number part number item number and...

Page 12: ...ds 9 Piping is leaking 1 Check supply pressure flow 2 Recheck all sizing calculations to determine proper pump size 3 Check discharge line for restrictions including ice if line passes through or into cold areas 4 Remove and examine check valve for proper installation and freedom of operation 5 Open valve 6 Check impeller for freedom of operation security and condition Clean impeller and inlet of a...

Page 13: ...13 FIGURE 7 PUMP SERIES 7 06000 7 08000 ...

Page 14: ...14 FIGURE 8 PUMP SERIES 7 06000 7 08000 ...

Page 15: ... 18 1 2 32004 8 Pipe Plug 125 NPT Stainless 19 2 2 31003 158 O Ring Buna N 4 737 ID 20 2 2 31003 239 O Ring Buna N 3 609 ID 21 1 615017 Outer Shell 22 1 7 061700 Discharge Case External 7 06106 020 1 5 1 7 062700 Discharge Case Internal 7 06206 020 2 5 23 1 7 060502 Retainer Mounting Plate 24 1 9 100000 4 Strainer Stainless Steel 25 2 2 31015 6 O Ring Buna N 078 ID 26 4 2 31003 016 O Ring Buna N 6...

Page 16: ...ing Buna N 6 484 ID 20 2 2 31003 246 O Ring Buna N 4 484 ID 21 1 9 250555 Outer Shell 22 1 7 081700 Discharge Case External 7 08306 1 7 081710 7 08312 1 7 082710 Discharge Case Internal 7 08406 1 7 082700 7 08412 23 1 7 080504 Retainer Mounting Plate 24 1 9 500000 1 Strainer Stainless Steel 25 2 2 31015 6 O Ring 7 08306 08406 Buna N 078 ID 2 2 31015 8 O Ring 7 08312 08412 Buna N 064 ID 26 4 2 3100...

Page 17: ...17 PUMP SERIES 7 08000 2 Stage FIGURE 9 ...

Page 18: ...18 PUMP SERIES 7 08000 2 Stage FIGURE 10 ...

Page 19: ... 25 NPT Stainless 19 2 2 31003 260 O Ring Buna N 6 484 ID 20 2 2 31003 246 O Ring Buna N 4 484 ID 21 1 9 250555 Outer Shell 22 1 7 081710 Discharge Case External 7 08312 1 7 082700 Discharge Case Internal 7 08412 23 1 7 080504 Retainer Mounting Plate 24 1 9 500000 1 Strainer Stainless Steel 25 2 2 31015 8 O Ring Buna N 064 ID 26 4 2 31003 117 O Ring Buna N 799 ID 27 1 9 815211 Lock Washer Impeller...

Page 20: ... PXVW EH VLJQHG E RXU DXWKRUL HG UHSUHVHQWDWLYH XH WR LQDFFXUDFLHV LQ HOG WHVWLQJ LI D FRQÀ LFW DULVHV EHWZHHQ WKH UHVXOWV RI HOG WHVWLQJ FRQGXFWHG E RU IRU XVHU DQG ODERUDWRU WHVWV FRUUHFWHG IRU HOG SHUIRUPDQFH WKH ODWWHU VKDOO FRQWURO 5 200 1 7 216 25 63 33 7 216 25 7 26 5 68 7 1 520 6 67 06 1 6 6 1 9 8 7 216 21 8 7 6 21 285 67 9 3 5 1 1 38 6 1 8675 1 250 7 21 68 5 200 1 7 216 2 127 2167 787 55 ...

Page 21: ...ent To Insure That Employees Will Not Be Exposed To Health Hazards In Handling Said Material All Applicable Laws And Regulations Shall Apply IMPORTANT WARRANTY REGISTRATION Your product is covered by the enclosed Warranty To complete the Warranty Registration Form go to http www cranepumps com ProductRegistration If you have a claim under the provision of the warranty contact your local Crane Pump...

Page 22: ...22 Notes ...

Reviews: