background image

9

Loosen motor screws and pull motor (1) straight up and off 
seal plate (2). Inspect all parts for signs of wear and check 
motor resistance values. Check capacitor (6) with an Ohm 
meter by grounding the capacitor by placing a screwdriver 
across both terminals and then removing the screwdriver. 
Connect Ohm meter (set on high scale) to terminals, if 
needle moves to infi nity (

) then drifts back, the capacitor 

is good. If needle does not move or moves to infi nity (

and does not drift back, replace capacitor (6).

Bearings -

 Disassemble motor as per section F-3.1. 

Remove snap ring (5) with snap ring pliers and pull motor 
(1) and lower bearing (4) straight off of seal plate (2). 
Inspect all parts for signs of wear and replace as needed.

CAUTION: - Handle seal parts with extreme 
care.  DO NOT scratch or mar lapped surfaces.
All parts must be clean before reassembly.

F-3.2) Replacing Bearing: 

When replacing bearing, be careful to not damage the rotor 
or shaft threads. Press the old bearing off the shaft with 
an arbor press or gear puller. Clean the shaft thoroughly. 
Apply adhesive compound to shaft and press new bearing 
on, pushing only on the inner race, until it seats against 
shoulder of shaft (see fi g.8).

F-3.3) Reassembly:


Make sure shaft seal (3) is clean and in proper position as 
per section F-4.2 before reassembling rotor and bearing. 
Slide lower bearing and rotor shaft squarely into the seal 
plate (2) until bearing seats on the bottom. Insert snap 
ring (5) into seal plate with fl at edge against outer race of 
bearing. Place motor stator squarely onto seal plate (2) and 
tighten motor screws. Install o-ring (11) onto seal plate (2).

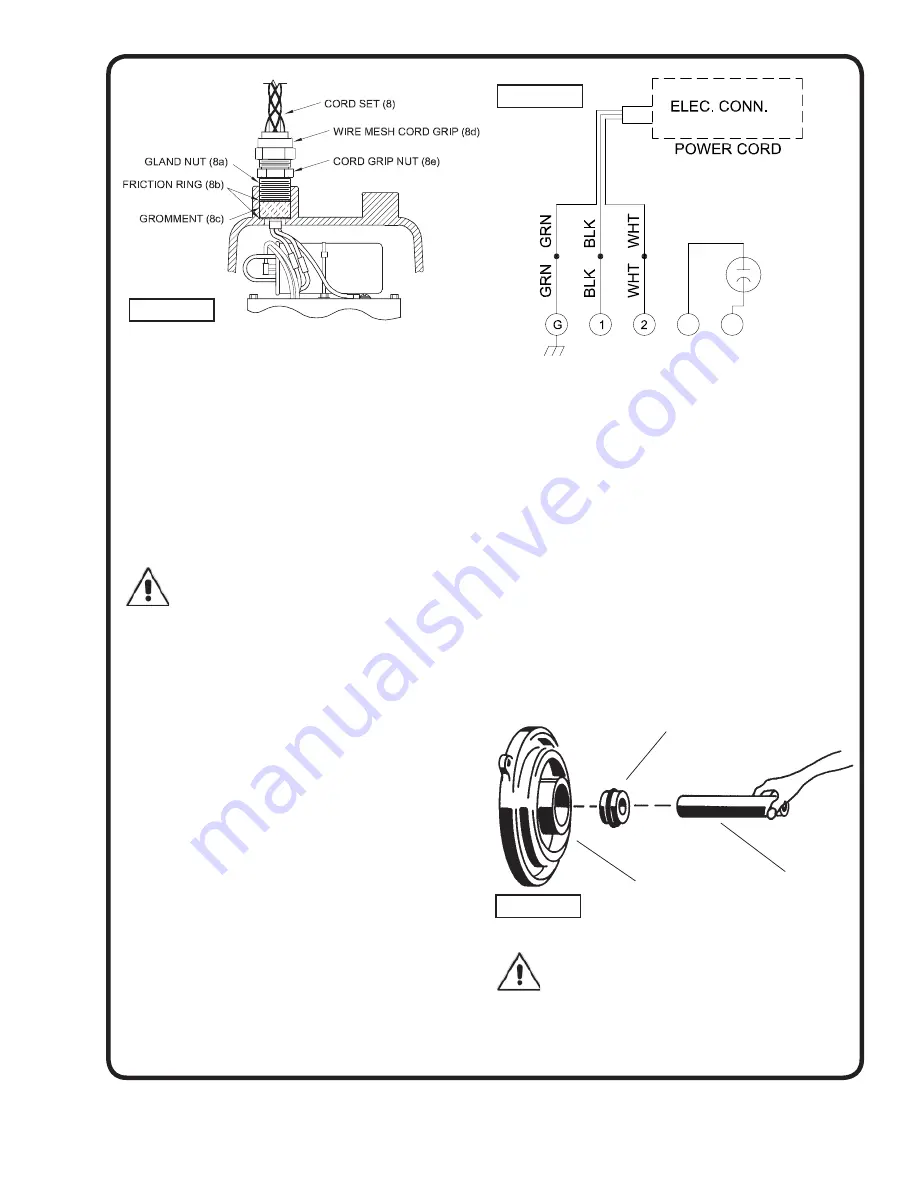
Slide the gland nut, friction rings and grommet onto cord 
set (see Figure 5) and slip cord through motor housing (12). 
Connect motor wires per Figure 6. Place motor housing (12) 
squarely onto seal plate while pulling excess cord through 
hole. Tighten socket head screws (13) into motor housing. 
Slide the friction rings (8b), grommet (8c) and gland nut 
(8a) into motor housing and tighten gland nut to 17.5 ft. lbs. 
Attached cord grip nut (8e) and wire mesh cord grip (8d) 
onto gland nut (8a) and tighten. Refi ll with cooling oil as per 
paragraph F-1.3.

F-4)  Shaft Seal Service
F-4.1) Dissassembly and Inspection:

Disassemble pump motor as per section F-3.1. Inspect 
seal for signs of wear such as uneven wear pattern on the 
stationary member or chips and scratches on either sealing 
face. Do not interchange seal components. Replace entire 
seal if damage occurs.

F-4.2) Replacing Shaft Seal:

When replacing the shaft seal (3), remove used rotating 
member (3c), spring (3b), and spring retainer (3a) from 
motor shaft. Press used stationary member (3d) from the 
seal plate (2). At reassembly, clean seal cavity thoroughly 
and apply a light coat of oil. Lightly oil the rubber ring 

(DO 

NOT use grease)

 and press the stationary member fi rmly 

into the seal plate using a seal pusher (See Parts List- 
Seal Tool Kit), nothing but pusher to come in contact with 
seal face (see Fig. 7). Insert so that the fi nished surface 
is up and the grooved surface is against the seal plate. 
Make sure the stationary member is in straight and that the 
rubber ring is not out of it’s groove.

DO NOT HAMMER ON THE SEAL PUSHER - IT 
WILL DAMAGE THE SEAL FACE. 

FIGURE 5

FIGURE 6

Seal Pusher

Seal Plate

Stationary Member
(3d) Polished Face Out

FIGURE 7

Summary of Contents for Barnes SE411HT

Page 1: ...stant product improvement program product changes may occur As such Crane Pumps Systems reserves the right to change product without prior written notification 420 Third Street 83 West Drive Bramton Piqua Ohio 45356 Ontario Canada L6T 2J6 Phone 937 778 8947 Phone 905 457 6223 Fax 937 773 7157 Fax 905 457 2650 www cranepumps com Form No 107027A Rev D Series SE411HT 4Hp 1750 RPM 60 Hz Manual Index ...

Page 2: ...NS 3 A PUMP SPECIFICATIONS 4 B GENERAL INFORMATION 5 C INSTALLATION INSTRUCTIONS 5 6 D START UP OPERATION 7 E PREVENTATIVE MAINTENANCE 7 F SERVICE AND REPAIR 7 10 G REPLACEMENT PARTS 10 TROUBLE SHOOTING 11 CROSS SECTION Fig 10 12 PARTS LIST 13 RETURN GOODS POLICY 15 WARRANTY START UP REPORT WARRANTY REGISTRATION SPECIAL TOOLS and EQUIPMENT INSULATION TESTER MEGGER DIELECTRIC TESTER SEAL TOOL KIT s...

Page 3: ...ings DO NOT insert fingers in pump with power connected Always wear eye protection when working on pumps Make sure lifting handles are securely fastened each time before lifting DO NOT operate pump without safety devices in place Always replace safety devices that have been removed during service or repair Secure the pump in its operating position so it can not tip over fall or slide DO NOT exceed...

Page 4: ...nless Steel PAINT Air Dry Enamel SEAL Design Single Mechanical Reservoir Secondary Exclusion Seal Material Carbon Ceramic Buna N Hardware 300 Series Stainless CORD ENTRY 15 ft 5m Cord with plug On 115 volt and Stainless Wire Mesh Strain Relief Pressure Gromment for sealing and strain relief SPEED 1750 RPM nominal UPPER BEARING Single Row Ball Oil Lubricated LOWER BEARING Single Row Ball Oil Lubric...

Page 5: ...nes representative or Crane Pumps Systems Inc Service Department in Piqua Ohio telephone 937 778 8947 or Crane Pumps Systems Canada Inc Bramton Ontario 905 457 6223 SECTION C INSTALLATION C 1 Location These pumping units are self contained and are recommended for use in a sump or basin The sump or basin shall be vented in accordance with local plumbing codes This pump is designed to pump effluent ...

Page 6: ...t be modified in any way except for shortening to a specific application Any splice between the pump and the control panel must be made in accordance with the electric codes It is recommended that a junction box if used be mounted outside the sump or be of at least NEMA 4 EEMAC 4 construction if located within the wet well Do not use the power cable to lift pump NOTE THE WHITE WIRE IS NOT A NEUTRA...

Page 7: ...nd allowing the pump to operate through it s pumping cycle The time needed to empty the system or pump down time should be recorded on the start up sheet SECTION E PREVENTATIVE MAINTENANCE As the motor is oil filled no lubrication or other maintenance is required and generally Barnes pumps will give very reliable service and can be expected to operate for years on normal sewage pumping without fai...

Page 8: ...on around the sealed areas and inspect joints for air bubbles If after five minutes the pressure is still holding constant and no bubbles are observed slowly bleed the pressure and remove the gauge assembly Replace the pipe plug using a sealant If the pressure does not hold then the leak must be located CAUTION Pressure builds up extremely fast increase pressure by TAPPING air nozzle Too much pres...

Page 9: ...ate 2 and tighten motor screws Install o ring 11 onto seal plate 2 Slide the gland nut friction rings and grommet onto cord set see Figure 5 and slip cord through motor housing 12 Connect motor wires per Figure 6 Place motor housing 12 squarely onto seal plate while pulling excess cord through hole Tighten socket head screws 13 into motor housing Slide the friction rings 8b grommet 8c and gland nu...

Page 10: ... serial number and date code Paragraph G 4 2 Pump model number Paragraph G 3 3 Pump part number Paragraph G 2 4 Part description 5 Item part number 6 Quantity required 7 Shipping instructions 8 Billing Instructions G 2 PART NUMBER The part number consists of a six 6 digit number which appears in the catalog A one or two letter suffix may follow this number to designate the design configuration Thi...

Page 11: ...eller for freedom of operation security and condition Clean impeller and inlet of any obstruction 9 Loosen union slightly to allow trapped air to escape Verify that turn off level of switch is set so that the suction is always flooded Clean vent hole 10 Check rotation If power supply is three phase reverse any two of three power supply leads to ensure proper impeller rotation 11 Repair fixtures as...

Page 12: ...12 FIGURE 10 ...

Page 13: ... 2 051449 Friction Ring 8c 1 051451 Grommet 8d 1 108335A Wire Mesh Cord Grip 304 Stainless 8e 1 108336 Hex Nut 1 2 Stainless 10 1 016660 Self Tapping Screw 8 32 x 3 8 lg Stainless 11 1 019289 O Ring 12 1 093065A Motor Housing 13 2 084948 Socket Hd Cap Screw 1 4 20 x 1 25 Stainless 14 1 068053 Exclusion Seal 15 1 112561TE Impeller Cast Iron 16 1 099295 Ground Wire 17 1 068984 Gasket 18 1 089120A Vo...

Page 14: ...formance specifications must be in writing and such writing must be signed by our authorized representative Due to inaccuracies in field testing if a conflict arises between the results of field testing conducted by or for user and laboratory tests corrected for field performance the latter shall control RECOMMENDATIONS FOR SPECIAL APPLICATIONS OR THOSE RESULTING FROM SYSTEMS ANALYSES AND EVALUATI...

Page 15: ...nt To Insure That Employees Will Not Be Exposed To Health Hazards In Handling Said Material All Applicable Laws And Regulations Shall Apply IMPORTANT WARRANTY REGISTRATION Your product is covered by the enclosed Warranty To complete the Warranty Registration Form go to http www cranepumps com ProductRegistration If you have a claim under the provision of the warranty contact your local Crane Pumps...

Page 16: ...Notes ...

Reviews: