background image


7. Adjustment 

1.  Resistance can be adjusted by tension control to increase or decrease the exercise intensity. 

2.


After  long  term  use,  if  you  believe  the  turning  parts  are  loose,  please  tighten  the  bolts  or 

screws.


8. Maintenance and Treatment 

1.  Verify that all the bolts and nuts are locked properly and the turning parts should be turned 

freely without damaged parts. 

2.  Clean the equipment with soap and slightly damp cloth only. Please do not use any solvent 

to clean the equipment. 


Malfunctions and treatment


Malfunction 

Reason 

Treatment 

Base is unstable.


1.  Floor is not flat or there is small 

object under the front or rear 

stabilizer. 

2.  The front and rear base feet have 

not been leveled when assembling. 

1.  Remove the object. 


2.  Adjust the front and rear 

base feet. 

Right and Left 

handlebar tubes or 

seat cushion are 

shaking. 

The screw loose. 

Tighten the screws. 

Loud noise from 

the moving parts. 

The interval of the parts has not been 

tightened correctly. 

Open the covers to check. 

Summary of Contents for TRIM-210

Page 1: ...Magnetic Power Recumbent Bike OWNER S MANUAL TRIM 210 ...

Page 2: ...1 Table of Contents 2 Precautions 3 Operating Instruction 4 Parts List 5 Overview Drawing Hardware Packing List 6 Assembly Instructions 9 Adjustment Maintenance and Treatment 10 Warm Up Exercises ...

Page 3: ...ing a suitable amount of exercise it is also very important to insist on doing exercise every day 5 Before exercise in order to avoid injuring the muscle warm up exercise of every position of the body is necessary Refer to section 9 Warm Up Exercises After exercise relaxation of the body is suggested for cool down 6 Keep children and pets away from the equipment while operating the equipment This ...

Page 4: ...CAL Count the total calories from exercise start to end ZERO CLEARING Button being pressed over 4 seconds all data returns to zero PULSE Hold pulse sensors with hands and the screen will display your current heart beat rate in beats per minute BPM after 4 5 seconds means the pulse signal input REPLACING THE BATTERY Open the battery cover and place two AA or UM 3 batteries when the screen can not s...

Page 5: ... Left cover 1 15 M8 40 Bolt 8 49 Front base foot 4 16 M8 Nylon nut 6 50 Tension control wire 1 17 Seat cushion 1 51 Plastic cover 1 18 Back cushion 1 52 Tension control 1 19 Seat cushion frame 1 53 Φ5 Flat washer 1 20 Right handlebar tube 1 54 Crosshead bolt M5 35 1 21 M10 70 Bolt 4 55 Sensor wire 1 1 22 Crosshead self bolt ST4 2 20 11 56 Computer wire 1 23 Right cover 1 57 Computer 1 24 Belt 1 58...

Page 6: ...5 4 Overview Drawing 5 Hardware Packing List ...

Page 7: ...ol wire 50 as shown on drawing A of figure 3 c Pull the resistance cable for the Tension control 52 up and force it into the gap of metal bracket of Tension control wire 50 as shown on drawing B of figure 3 d Connect the resistance cable of Tension control 52 with the Tension control wire 50 completed as shown on drawing C of figure 3 e Insert the Front upright tube 46 into the Plastic cover 51 an...

Page 8: ... to the wires that come from the Computer 57 Attach the Computer 57 to the top of Front upright tube 46 See figure 4 5 Install the Seat Cushion Frame Attach the Seat cushion frame 19 to the Seat cushion adjustor 4 with four Bolts 64 Flat washers 13 and Nylon nuts 16 See figure 5 ...

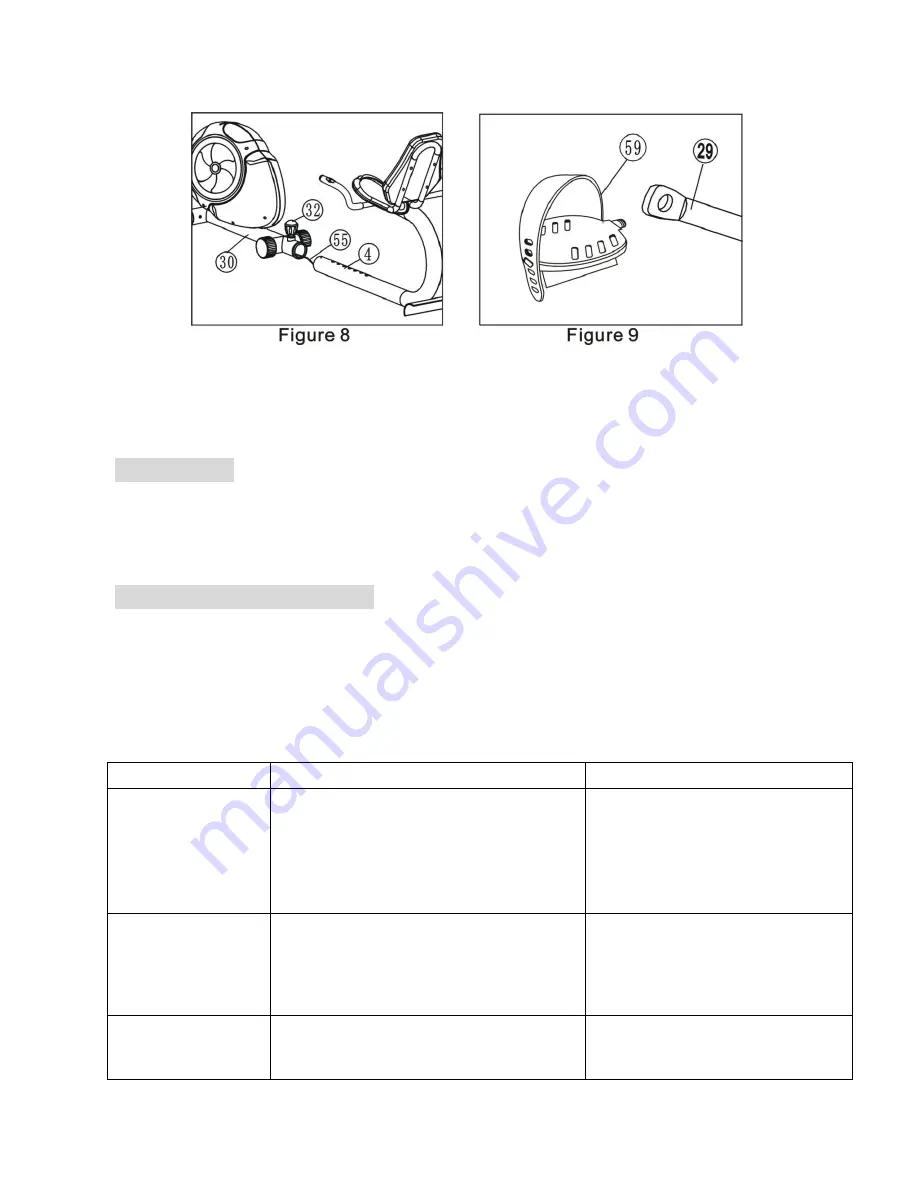
Page 9: ... with four M8X20 Bolts 14 and Arc washers 12 See figure 7 8 Adjustment of the Seat cushion Adjustor Release and pull the Round knob 32 and then insert the Seat cushion adjustor 4 into the tube of Main Frame 30 Adjust the Seat cushion adjustor 4 to the desired hole for the appropriate position and tighten the Round knob 32 after adjustment Refer figure 8 9 Install the Left Right Pedals Attach the L...

Page 10: ...t with soap and slightly damp cloth only Please do not use any solvent to clean the equipment Malfunctions and treatment Malfunction Reason Treatment Base is unstable 1 Floor is not flat or there is small object under the front or rear stabilizer 2 The front and rear base feet have not been leveled when assembling 1 Remove the object 2 Adjust the front and rear base feet Right and Left handlebar t...

Page 11: ...asing your circulation and pulse rate and delivering more oxygen to your muscles At the end of your workout repeat these exercises to reduce sore muscle problems We suggest the following warm up and cool down exercises Inner Thigh Stretch Sit with the soles of your feet together with your knees pointing outward Pull your feet as close into your groin as possible Gently push your knees towards the ...

Page 12: ...er up toward your ear for one count Then lift your left shoulder up for one count as you lower your right shoulder Toe Touch Slowly bend forward from your waist letting your back and shoulders relax as you stretch toward your toes Reach down as far as you can and hold for 15 counts Side Stretch Open your arms to the side and continue lifting them until they are over your head Reach your right arm ...

Reviews: