background image

The products, technical information, and instructions contained in this manual are subject to change without notice. 
These instructions are not intended to cover all details or variations of the equipment, nor to provide for every possi-
ble contingency in the installation, operation or maintenance of this equipment. This manual assumes that the per-
son(s) working on the equipment have been trained and are skilled in working with electrical, plumbing, pneumatic, 
and mechanical equipment. It is assumed that appropriate safety precautions are taken and that all local safety and 
construction requirements are being met, in addition to the information contained in this manual.

This Product is warranted only as provided in Cornelius’ Commercial Warranty applicable to this Product and is sub-
ject to all of the restrictions and limitations contained in the Commercial Warranty.

Cornelius will not be responsible for any repair, replacement or other service required by or loss or damage resulting 
from any of the following occurrences, including but not limited to, (1) other than normal and proper use and normal 
service conditions with respect to the Product, (2) improper voltage, (3) inadequate wiring, (4) abuse, (5) accident, 
(6) alteration, (7) misuse, (8) neglect, (9) unauthorized repair or the failure to utilize suitably qualified and trained per-
sons to perform service and/or repair of the Product, (10) improper cleaning, (11) failure to follow installation, oper-
ating, cleaning or maintenance instructions, (12) use of “non-authorized” parts (i.e., parts that are not 100% 
compatible with the Product) which use voids the entire warranty, (13) Product parts in contact with water or the 
product dispensed which are adversely impacted by changes in liquid scale or chemical composition.  

Contact Information:

To inquire about current revisions of this and other documentation or for assistance with any Cornelius product con-
tact:

www.cornelius.com

800-238-3600

Trademarks and Copyrights:

This document contains proprietary information and it may not be reproduced in any way without permission from 
Cornelius.

This document contains the original instructions for the unit described.

CORNELIUS INC

101 Regency Drive

Glendale Heights, IL 

Tel: + 1 800-238-3600

Printed in U.S.A.

Correct Disposal of this Product

RECYCLE

This marking indicates that this product should not be disposed with other household wastes throughout the EU. To 
prevent possible harm to the environment or human health from uncontrolled waste disposal, recycle it responsibly 
to promote the sustainable reuse of material resources. To return your used device, please use the return and 
collection systems or contact the retailer where the product was purchased. They can take this product for 
environmental safe recycling.

Summary of Contents for IDC PRO 255

Page 1: ...DC PRO 255 Service Manual Release Date Mar 15 2017 Publication Number 621058649SER Revision A Revision Date Mar 15 2017 Visit the Cornelius web site at www cornelius usa com for all your Literature needs ...

Page 2: ...failure to utilize suitably qualified and trained per sons to perform service and or repair of the Product 10 improper cleaning 11 failure to follow installation oper ating cleaning or maintenance instructions 12 use of non authorized parts i e parts that are not 100 compatible with the Product which use voids the entire warranty 13 Product parts in contact with water or the product dispensed whic...

Page 3: ... Cycle Agitation Settings 6 E Box Configuration 7 Multi flavor Valve Configuration 8 Disassembly Of An MFV Valve Module 9 Reassembly Of MFV Valve 10 IDC Pro Interactive Touchscreen 11 Touch Controller Removal 12 Intake Fan Removal 13 Exhaust Fan Removal 14 Single Board Computer 15 Nozzle Diffuser Removal 16 Drip Tray Cover And Removal 17 Splash Panel Removal 18 Ice Chute Removal 18 Connecting Prod...

Page 4: ...he Water to Syrup Ratio BRIX 27 Cleaning Interior Surfaces 30 Unit Operation 32 Unit Shutdown Restart 33 Updating Software Revisions 34 Editing the Media Playlist 36 Plumbing Diagram 40 Wiring Diagram 41 Troubleshooting 42 Unit Troubleshooting 42 ...

Page 5: ...jury death or equipment damage CAUTION Indicates a potentially hazardous situation which if not avoided MAY result in minor or moderate injury or equipment damage SAFETY TIPS Carefully read and follow all safety messages in this manual and safety signs on the unit Keep safety signs in good condition and replace missing or damaged items Learn how to operate the unit and how to use the controls prop...

Page 6: ... in serious injury death or equipment damage CAUTION Always be sure to keep area around the unit clean and free of clutter Failure to keep this area clean may result in injury or equipment damage SHIPPING AND STORAGE CAUTION Before shipping storing or relocating the unit the unit must be sanitized and all sanitizing solution must be drained from the system A freezing ambient environment will cause...

Page 7: ...nd MUST NOT be placed in an area where a water jet pres sure washer could be used CAUTION This appliance is not intended for use by personnel including children with reduced physical sensory or mental capabilities or lack of experience and knowledge unless given supervision or instruction concerning use of the appli ance by a person responsible for safety ...

Page 8: ...mper or warm up for a minimum of 20 minutes in room temperature before loading into the unit hopper FEATURES Brand density 10 brands on each side 7 chilled 3 ambient and up to 8 flavor shots 4 per side for over 320 drink combinations Large 32 HD merchandising display 255 lbs capacity ice cube hopper Dispenses cubed or chewable soft ice UI Touch screen SPECIFICATIONS Table 1 Model IDC Pro 255 Maxim...

Page 9: ... lines and water lines Syrup non Insulated tubing for syrup lines Flavor Non Insulated tubing for flavor lines for under counter or backroom installation INSTRUCTIONAL VIDEOS Instructional videos can be viewed at the following web address www newproducts cornelius com resources Cup Clearance 9 3 4 in 24 77 cm Ambient Operating Temperature 65 to 95 F 18 3 to 35 C Table 1 ...

Page 10: ...anual Publication Number 621058649SER 6 2016 Cornelius Inc OFF CYCLE AGITATION SETTINGS The off cycle agitation timer is set from the factory for a 4sec agitation every hour For soft ice reset to 3hours off 5sec on Figure 2 ...

Page 11: ...valve bank MFV board 2 Right hand valve bank MFV board 3 12VDC 24VDC Power Supply A 12VDV Control voltage for MFV boards and computer B 24VDC Powers display and touchscreen 4 30VDC Power supply for LH Valve Bank 5 30VDC Power supply for RH Valve Bank 6 Circuit Breakers as follows A 5A 12VDC B 4A 24VDC C 3A 30VDC D 3A 30VDC 7 Agitation Timer Liquid Level Control Board 8 AC Power Inlet ...

Page 12: ... CONFIGURATION WARNING Disconnect power to the unit before accessing the MFV valve Table 2 Step Action 1 Back block layout behind each valve bank Figure 4 2 MFV Valve Module placed on the back block Figure 5 3 Press the top snap Dovetail of black block towards down as indicated in Figure 6 Figure 6 ...

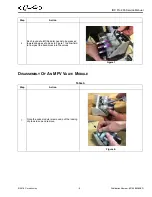
Page 13: ...F AN MFV VALVE MODULE Table 3 4 Each round shutoff Spindle needs to be pressed towards down as shown as in Figure 7 to allow fluid to flow past the back block into the valves Figure 7 Step Action 1 Once the valve module is removed pull the locking clip towards up and remove Figure 8 Step Action ...

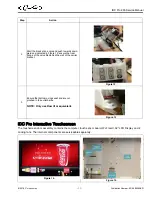
Page 14: ...l up and rotate valve upwards of bracket to remove from the module NOTE Check for all O rings on bottom of valves Figure 9 3 Rotate solenoid counterclockwise and remove to service the solenoid and plunger NOTE Solenoid should read 9 1ohms Figure 10 Step Action 1 Place valve into the valve carrier Figure 11 Step Action ...

Page 15: ...isplay and 2 cooling fans The internals components are serviceable separately 2 Start the block at an angle and push towards down wards as indicated in Figure 12 ensure that rear flange of the valve fits behind the wall of the carrier bracket Figure 12 3 Ensure that bottom o rings seat and are not pinched in the outlet barbs NOTE Only use Dow III or equivalent Figure 13 Figure 14 Figure 15 Step Ac...

Page 16: ...splace assembly Table 5 Step Action 1 Remove touch controller board cover top right on back of door by unscrewing the four screws as indi cated in Figure 16 Figure 16 2 Unlock the touch tails from board by flipping up black tabs and carefully remove touch tails from the board Figure 17 3 Unscrew the four screws and take the touch control ler board out Figure 18 ...

Page 17: ... Table 6 4 Reverse process for re installation Step Action 1 Remove the intake fan cover by unscrewing the four screws pull the cover up front and disconnect the harness Figure 19 2 Loosen the nuts from all the four corners and pull it out 3 Reverse process for re installation Step Action Intake Fan ...

Page 18: ...Inc Exhaust Fan Removal Table 7 Step Action 1 Remove the exhaust fan cover by unscrewing the four screws Figure 20 2 Disconnect the harness connected with fan and pull towards front and take it out as shown in Figure 21 Figure 21 3 Reverse process for re installation Exhaust Fan ...

Page 19: ...gle board computer cover by unscrewing the four screws NOTE The fan connection will be on the board Figure 22 2 Disconnect all the harness connected to the board Figure 23 3 Unscrew the two screws and pull the sheet metal block towards downward Figure 24 4 Unscrew the screw from all the four corners and take the single board out Figure 25 ...

Page 20: ...able 9 Step Action 1 Turn nozzle counterclockwise left pull down the diffuser will stay in position it is keyed only fits one way Figure 26 2 Pull diffuser down Clean with warm soapy water then sanitize and reinstall NOTE Do not soak for more than 2 minute Seal may warp Figure 27 3 Repeat removal process for each side Figure 28 4 Reverse process for re installation ...

Page 21: ...ublication Number 621058649SER DRIP TRAY COVER AND REMOVAL Table 10 Step Action 1 Remove the cup rest from the unit Figure 29 2 Loosen the thumbscrews on both sides of the drip tray cover Figure 30 3 Remove the drip tray cover from the unit Thumbscrew ...

Page 22: ...o screws from the top two corners of the splash panel as shown in Figure 32 slide the panel upward to dis engage the two bottom tabs and pull the splash panel forward to remove it Figure 32 3 Replace the splash panels onto the unit Step Action 1 Open the display panel and remove the thumbscrew holding the upper splash panel as shown in Figure 33 and pull the panel forward and down to remove it to ...

Page 23: ...ions Always check for leaks on all connections WATER SYRUP LINE CONNECTIONS The standard unit supports the following 1 water line from carbonator chiller 1 water line for non carbonated drinks 20 Syrup lines 8 Flavor Shots 2 Release locking tabs outward on both the side as shown in Figure 34 Then lift chute upwards to remove as shown in Figure 35 NOTE Make sure the pin of ice gate is through the h...

Page 24: ...side Ex S1 S8 S2 S9 A1 A4 A2 A5 F1 F5 F2 F6 Table 13 Step Action 1 Locate the water syrup and flavor lines under the counter The lines are marked S1 S14 for chilled syrup A1 A6 for ambient non chilled syrup CW for Carbonated Water PW for plain water and F1 through F8 for flavor lines 2 Connect syrup lines 1 4 from the unit to the appropriate lines from the backroom package 3 Connect the carbonated...

Page 25: ... To enter the service mode perform the procedure in Table 15 Table 15 Step Action 1 Display the keypad screen by tapping each cor ner of the video screen Starting in the upper right corner 1 and continuing to tap each corner in a Counter clockwise direction in a sequence of 1 2 3 and 4 as shown in Figure 36 NOTE As each corner is touched a small confirmation rectangle may momentarily appear to con...

Page 26: ...an level pass code is entered This level has visibility to all 3 levels NOTE The Shutdown button is available on all levels INITIAL SETUP Before operating the unit perform the initial setup described in the following sections Mapping Brands To map the valves to the available brands perform the procedure in Table 16 Table 16 Step Action 1 Display the keypad screen by tapping each corner of the vide...

Page 27: ... level technician and press Enter Figure 40 3 The Service UI screen is displayed Press the unit setup button as shown in Figure 41 Figure 41 4 Press the Brand Mapping button to open the Brand Mapping screen as shown in Figure 42 Figure 42 Table 16 Step Action 1 2 3 4 5 6 7 8 9 0 Enter Unit setup UNIT SETUP Bran BRAND MAPPING ...

Page 28: ...apped to the valve location Figure 44 7 Repeat Steps 4 6 for each location desired 8 When all the flavors or brands on the right are mapped press the left button and repeat Steps 4 and 6 for the left side or if the setup will be identical on the LH and RH side press the copy to other side button and confirm when prompted 9 When all the flavors or brands are mapped as desired press the Save button ...

Page 29: ... on initial setup only 2 Display the keypad screen by tapping each corner of the video screen Starting in the upper right cor ner 1 and continuing to tap each corner in a Counter clockwise direction in a sequence of 1 2 3 and 4 as shown in Figure 45 NOTE As each corner is touched a small confirmation rectangle may momentarily appear to confirm the touch Figure 45 3 Input the proper password for yo...

Page 30: ...4 syrup and 2 water at a time per side to purge NOTE 12 minute default if not turned off Figure 49 8 When the syrup flows and lines are purged press the same again to turn off or simply select the next valve needed and the first valve selected will stop pouring 9 Repeat Step 7 until all lines are purged When dispensing carbonated water make sure carbonator is purged 10 When all lines are purged pr...

Page 31: ...ot available the fittings from empty BIB bags can be cut from the bags and used These fittings open the disconnects so the sanitizing solution can be drawn through the disconnect 6 Place all the BIB disconnects with the sanitizing fittings in place into the pail of sanitizing solution Use the Purging The Syrup Lines section on page 25 to purge the lines Allow the sanitizer to remain in the lines f...

Page 32: ...nuing to tap each corner in a Counter clockwise direction in a sequence of 1 2 3 and 4 as shown in Figure 53 NOTE As each corner is touched a small confirmation rectangle may momentarily appear to confirm the touch Figure 53 2 Input the proper password for your access level technician and press Enter Figure 54 3 Press the Unit Setup button as shown in Figure 55 Figure 55 1 2 3 4 5 6 7 8 9 0 Enter ...

Page 33: ...e 10 oz 295 7 ml 12 Perform Steps 8 through 10 for the PW1 valve 13 Select CW3 and Pour to dispense 10 oz 295 7 ml 14 Perform Steps 8 through 10 for the CW3 valve 15 Select PW3 and press Pour to dispense 10 oz 295 7 ml 16 Perform Steps 8 through 10 for the PW3 valve 17 Place a graduated cylinder or brix cup under the valve 18 Select S1 and press Pour to dispense 2 0 oz 60 ml 19 If the rate is not ...

Page 34: ...ended rate could result in an overflow situation which may result in personal injury or damage to the equipment Table 20 Step Action 1 Remove the agitator assembly by unscrewing the thumbscrew and lifting the agitator assembly out of the hopper Figure 59 2 Using a nylon bristle brush or sponge clean the interior of the hopper top cover and agitator assembly with soap solution Thoroughly rinse the ...

Page 35: ...bly Take special care to ensure that the thumbscrew is tight Figure 61 4 Using a mechanical spray bottle filled with sanitizing solution spray the entire interior and the agitator assembly Allow them to air dry Figure 62 5 Open the display panel and remove the ice chute cover from the unit Figure 63 Table 20 ...

Page 36: ...ent To initially start up the unit for operation perform the procedure in Table 21 6 With a nylon bristle brush or sponge clean the inside of the ice chute gasket and cover with soap solution and rinse thor oughly to remove all traces of detergent Figure 64 7 Re assemble the ice chute assembly 8 Using a mechanical spray bottle filled with sanitizing solution spray the inside of the ice chute Allow...

Page 37: ...rner of the video screen Starting in the upper right cor ner 1 and continuing to tap each corner in a Counter clockwise direction in a sequence of 1 2 3 and 4 as shown in Figure 66 NOTE As each corner is touched a small confirmation rectangle may momentarily appear to confirm the touch Figure 66 2 Input the proper password for your access level technician and press Enter Figure 67 3 Select the Shu...

Page 38: ... restart the unit Figure 69 5 Red Black button on back of screen shown in Figure 70 To prompt screen push button select Restart or Shutdown To hard shutdown hold for 5 7 sec until screen get blank Wait for 10 sec and press once to restart Table 23 Step Action 1 Enter Service mode as described in Service Mode section on page 21 2 Open the display panel 3 On the back of the display unplug the USB co...

Page 39: ...the Update Software button as shown in Figure 71 Figure 71 5 The Update Software screen is displayed Press the Launch Software Updater button Figure 72 6 The Software Updater screen is displayed Press the Update Software button Figure 73 Table 23 Step Action Update Software UPDATE SOFTWARE ...

Page 40: ...tware updates contained on the USB stick When the proper version is highlighted press the Install Software button on the right side of the screen 9 When the update is complete press the Back button to revert to the previous screen then press the Restart Refresh button to restart the unit 10 Unplug the USB stick from the connector and reinstall the ADA cable 11 Close the display panel Table 24 Step...

Page 41: ...4 This will take you to the Service UI screen Figure 77 5 This is where you can access the videos Media Play list or sales information Marketing Data To start with changing the play list select the Media Play list button This brings you to this screen only the default play list appears initially Figure 78 Table 24 Step Action 1 2 3 4 5 6 7 8 9 0 Enter M MEDIA PLAYLIST ...

Page 42: ...ext screen will appear NOTE 2GB max video format mp4 H 264 size 1920 800 Figure 79 7 At the top is the name click on the white box and a keyboard will appear to allow you to change the name Below this are two lists of videos On the RH side is the play list that you are editing The videos will play starting at the top and repeat throughout its specified time To remove a video from the play list sel...

Page 43: ...videos that were added are now available to the play list by pressing the Back button File can also be copied from the machine to USB drive by selecting the files on the RH side and pressing the left facing arrow NOTE If attached files are deleted they will be deleted from the USB drive Figure 82 10 Important Note Please press save on the Play list Edit screen and again on the Media Play list scre...

Page 44: ...IDC Pro 255 Service Manual Publication Number 621058649SER 40 2016 Cornelius Inc PLUMBING DIAGRAM Figure 83 S Syrup Line F Flavor Line A Ambient Line ...

Page 45: ...IDC Pro 255 Service Manual 2016 Cornelius Inc 41 Publication Number 621058649SER WIRING DIAGRAM Figure 84 ...

Page 46: ...e to lower chute G Broken wire in the 2 wire harness leading to the reed switch H Bad connection at main control board I Door not closed or not making switch con nections to lid A Restore power or plug in unit B Check the upper ice chute assembly for proper assembly and operation C Replace reed switch D Replace main control board E Replace gear motor F Check to make sure tongue of upper chute enga...

Page 47: ...Pro 255 Service Manual 2016 Cornelius Inc 43 Publication Number 621058649SER NOTE Contact your local syrup or beverage equipment distributor for additional information and troubleshooting of beverage system ...

Page 48: ...IDC Pro 255 Service Manual Publication Number 621058649SER 44 2016 Cornelius Inc ...

Page 49: ......

Page 50: ...Cornelius Inc www cornelius usa com ...

Reviews: