background image

SuperDVR & TDF Cards 


38 

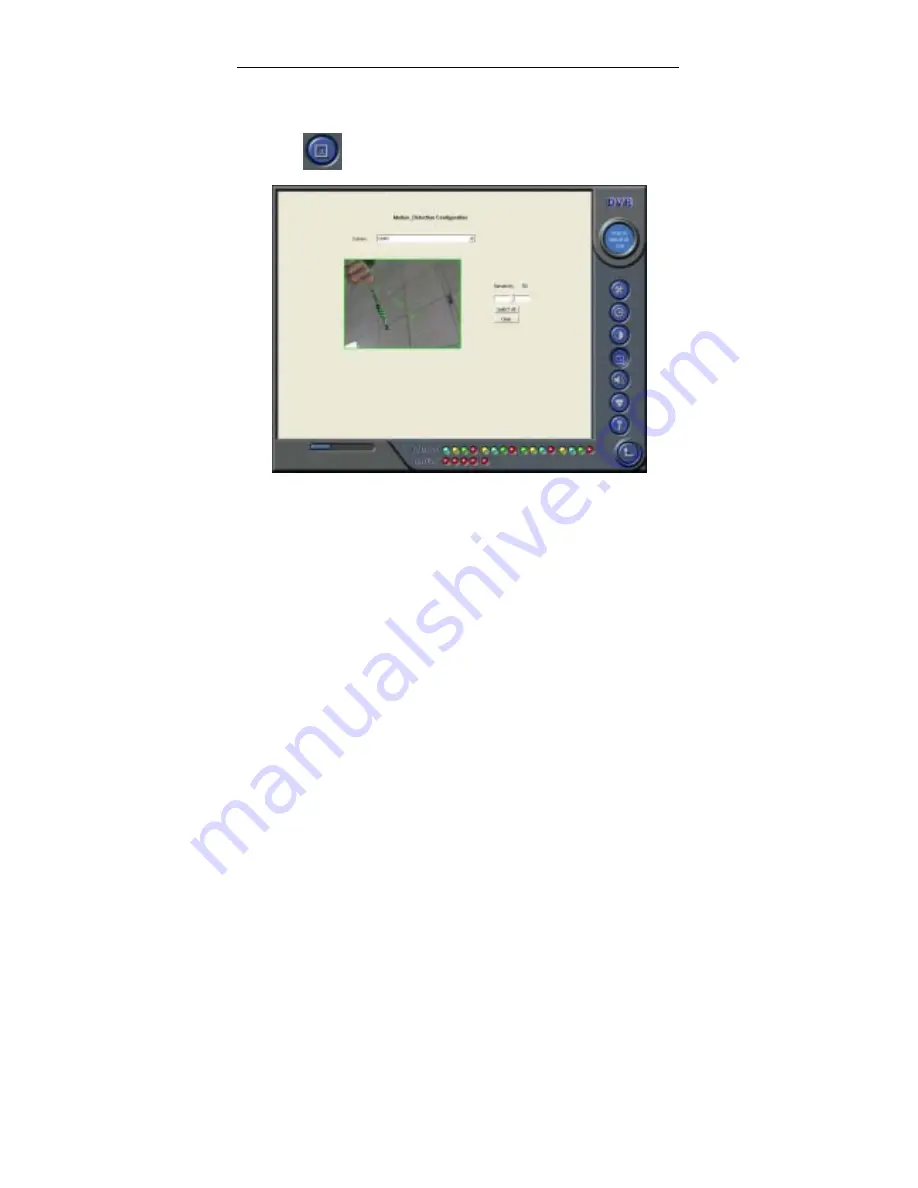
4.3  Motion Detection configuration 

Click 

  and enter Motion Detection Configuration page as below: 


Fig4.6 Motion Detection Configuration 

Definition of the setup items: 

[Sensitivity]: users can set motion detection sensitivity here.   

[Select All]: select all the area of the channel as detection area   

[Clear]: clear all the detection areas, and then users can select 

customized detection areas by cursor. 

4.3.1  Set Motion Detection Area 

In case users want to customize the detection areas for a certain channel, 

first select the camera, then select ‘Clear’ and draw the cursor in the box in the 

left side. At this time, users can see a green box appears, which shows the 

motion detection area. Users can select maximum 16 customized areas for 

Summary of Contents for DR30016F

Page 1: ... 1 Install 4CH Card Hardware 10 2 1 2 Install 8CH Card Hardware 11 2 1 3 Install 16CH Card Hardware 16 2 1 4 Connect Audio Signal 18 2 2 Install Video Capture Card Driver 18 3 MAIN DISPLAY INTERFACE 24 3 1 Display Control Panel 24 3 1 1 Display Control Panel 24 3 1 2 Display Modes 25 3 1 3 Flip Pages 25 3 1 4 Auto Dwell display Mode 25 3 1 5 Quick Switch 26 3 2 Login 26 3 3 Record 28 ...

Page 2: ...TUP 32 4 1 Basic Configuration 34 4 2 Video Configuration 37 4 3 Motion Detection configuration 38 4 3 1 Set Motion Detection Area 38 4 3 2 Set Motion Detection Sensitivity 39 4 4 Schedule configuration 39 4 5 Motion Detection Alarm Configuration 40 4 5 1 Alarm Triggering Conditions Configuration 40 4 5 2 Alarm Record 43 4 5 3 Alarm Output 44 4 6 P T Z Control Configuration 45 4 6 1 Protocol Setup...

Page 3: ...ile Backup 58 6 3 2 Delete Record Files 60 6 3 3 Capture Pictures 60 6 3 4 Image Zoom In Out 63 7 REMOTE SURVEILLANCE AND PLAYBACK 66 7 1 Remote Live Surveillance 66 7 1 1 Remote Surveillance Sever Configuration 66 7 1 2 Remote Surveillance Client end Setup 67 7 2 Remote Playback 74 7 2 1 Remote Playback server Configuration 74 7 2 2 Remote Playback Client end Setup 75 7 2 3 Remote Playback Config...

Page 4: ...he indicator lights 87 Appendix 3 2 2 How do the different record formats work 87 Appendix 3 2 3 How to set recycling record mode on the system 87 Appendix 3 2 4 How to set auto reboot function 88 Appendix 3 2 5 How to quickly use the schedule record function 88 Appendix 3 2 6 Why can t I select P T Z device s protocol 89 Appendix 3 2 7 What are the byte rates for different image qualities from hi...

Page 5: ... images 90 Appendix 3 3 4 What should I do if the Internet speed is quite slow 91 Appendix 3 4 Other questions 91 Appendix 3 4 2 Why can t I find the record files 91 Appendix 3 4 3 Why the screens display is unstable with dithering and water wave images 91 Appendix 3 4 4 Why it delays to play back and it s slow to close and open the driver 92 Appendix 3 4 5 Why can t I play back 92 Appendix 3 5 Fu...

Page 6: ...r software and how to setup the systems of this range of products Please make sure your operations with the products are strictly in accordance with the manual so as to keep the stability of the digital surveillance systems The following are standard functions of the products 1 Schedule record mode Users can choose any periods in a day to record and set up record modes i e sensor alarm record moti...

Page 7: ...f decoders Users can control multiple speed domes and integrative cameras including pan tilt zoom focus and iris adjustment for P T Z devices 6 Users management Different users have different purviews user names and passwords so as to ensure system security 7 Multi channel display Support different multi channel display modes full screen display and auto dwell display 8 Watch dog function The late...

Page 8: ...d storage resources saving by advanced technology 18 Remote Surveillance and P T Z control through LAN Intranet and Internet 19 Support both PAL and NTSC format 20 User friendly graphical user interface 1 2 System Requirements Applicable Platform Operation System Window2000 XP DirectDraw Microsoft DirectX 9 0 VGA cards GeForce2 GeForce4 FX5200 ATI Rage128 Chip Set Intel Series P3 P4 The following ...

Page 9: ...k Adaptor Special Notice After the system has run for a long time the system will create a lot of data fragments that may cause system runs slowly It s recommended to make disk defragmenter every 10 to 30 days 1 3 System Specifications Format NTSC PAL Resolution 352 288 PAL 320 240 NTSC Maximum Frame rate per channel 25 fps PAL 30 ftp NTSC Screen set resolution 1024 768 color quality 16 bits or 32...

Page 10: ...Video Capture Card Hardware 2 1 1 Install 4CH Card Hardware Fig 2 1 4CH Video Capture Card Pin Port Define Interpret 1PIN 5V Power Source 5V 2PIN ALARM_COM Alarm COM 3PIN ALARM_NC Alarm Normal Close 4PIN ALARM_IN1 Alarm Input 1 5PIN ALARM_NO Alarm Normal Open ...

Page 11: ... 8PIN ALARM_IN3 Alarm Input 3 9PIN GND Ground 10PIN ALARM_IN4 Alarm Input 4 Table 2 1 4CH card pins 2 1 2 Install 8CH Card Hardware Fig2 2 8CH Video Capture Card The functions definitions of J1 J2 J3 and J4 pin groups are as below 1 J1 Fig2 3 Pin group J1 of 8CH Card ...

Page 12: ... 1PIN ALI1 Alarm Input 1 2PIN ALI2 Alarm Input 2 3PIN ALI3 Alarm Input 3 4PIN ALI4 Alarm Input 4 5PIN 5V Power Source 5V 6PIN ALO1 Alarm Output 1 7PIN ALO2 Alarm Output 2 8PIN ALO3 Alarm Output 3 9PIN ALO4 Alarm Output 4 Table2 2 Pins definitions of J1 for 8CH CARD 2 J2 Fig2 4 Pin group J2 of 8CH Card Pin group J2 mainly does as video and audio input connector ...

Page 13: ... Video Input 6 7PIN VI7 Video Input 7 8PIN VI8 Video Input 8 9PIN AI1 Audio Input 1 10PIN AI2 Audio Input 2 11PIN AI3 Audio Input 3 12PIN AI4 Audio Input 4 13PIN AG Ground 14PIN AG Ground 15PIN AG Ground 16PIN AG Ground 17PIN AG Ground 18PIN AG Ground 19PIN AG Ground 20PIN AG Ground 21PIN AG Ground 22PIN AG Ground 23PIN AG Ground 24PIN AG Ground 25PIN AG Ground Table2 3 Pins definitions of J2 for ...

Page 14: ... Input 1 2PIN ALO1 Alarm Output 1 3PIN ALI2 Alarm Input 2 4PIN ALO2 Alarm Output 2 5PIN ALI3 Alarm Input 3 6PIN ALO3 Alarm Output 3 7PIN ALI4 Alarm Input 4 8PIN ALO4 Alarm Output 4 9PIN AG Ground 10PIN 5V Power Source 5V Table2 4 Pins definitions of J3 for 8CH Card 4 J4 Fig2 6 Pin group J4 of 8CH Card The definitions of J4 pins are as below in the table ...

Page 15: ...N AG Ground 9PIN VI5 Video Input 5 10PIN AG Ground 11PIN VI6 Video Input 6 12PIN AG Ground 13PIN VI7 Video Input 7 14PIN AG Ground 15PIN VI8 Video Input 8 16PIN AG Ground 17PIN AI1 Audio Input 1 18PIN AG Ground 19PIN AI2 Audio Input 2 20PIN AG Ground 21PIN AI3 Audio Input 3 22PIN AG Ground 23PIN AI4 Audio Input 4 24PIN AG Ground Table2 5 Pins definitions of J3 for 8CH Card Special Notes ...

Page 16: ... connector are damaged then users can utilize J3 and J4 to take the place of J1 and or J2 2 1 3 Install 16CH Card Hardware Fig2 7 16CH Video Capture Card circuit link for Watchdog function The pin definitions of 16CH Card are as below Pin Port Define Interpret Pin Port Define Interpret Pin1 Alarm_in 1 Alarm Input 1 Pin21 Alarm_out5 Alarm Output 5 Pin2 Alarm_in 2 Alarm Input 2 Pin22 Alarm_out6 Alar...

Page 17: ...arm_in 9 Alarm Input 9 Pin29 Alarm_out13 Alarm Output 13 Pin10 Alarm_in 10 Alarm Input 10 Pin30 Alarm_out14 Alarm Output 14 Pin11 Alarm_in 11 Alarm Input 11 Pin31 Alarm_out15 Alarm Output 15 Pin12 Alarm_in 12 Alarm Input 12 Pin32 Alarm_out16 Alarm Output 16 Pin13 Alarm_in 13 Alarm Input 13 Pin33 Alarm_Com Alarm COM Pin14 Alarm_in 14 Alarm Input 14 Pin34 Alarm_NO Alarm Normal Open Pin15 Alarm_in 15...

Page 18: ...he system will remind you Found new hardware Notice Just click cancel and ignore the pop up message Insert the CD that contains TDF series capture card driver into the CD tray and run Setup exe program to install the driver The default installation address is C Program Files SuperDVR Notice In case it warns that Can t find card when running the SuperDVR software please restart the computer 2 1 4 C...

Page 19: ...SuperDVR TDF Cards 19 Fig2 8 TDF series video capture card installation interface Fig2 9 Welcome page Select Next ...

Page 20: ...ormat Select Next Fig2 11 Rate of progress of driver installation There are some pop up windows will appear in the process and remind user if or not to go on with installation When users are using Windows XP system the pop up message is as below ...

Page 21: ...Cards 21 Fig2 12 Windows system warning notice 1 And in case users are using Windows 2000 system the pop up message is as below Fig2 12 Windows system warning notice 2 Select Continue Anyway on Windows XP system and ...

Page 22: ...DVR TDF Cards 22 select Yes on Windows2000 system After this process it begins to install the application package SuperDVR as below Fig2 13 Select installation pass Select the suitable option and click Next ...

Page 23: ...n installation finished Click Finish Now after all the processes restart the computer and begin to use the surveillance program It will create a shortcut on the desktop Fig2 16 Shortcut of SuperDVR Notice In case users cannot run the SuperDVR program users should have to restart the computer ...

Page 24: ...n SuperDVR program and the main display interface appears as below Fig3 1 SuperDVR Main Display Interface 3 1 Display Control Panel 3 1 1 Display Control Panel Fig3 2 Display control panel Display control panel includes Display Mode buttons Auto Dwell ...

Page 25: ...H CARD then only 1CH and 4CH buttons are valid In case the cards installed are 2 pieces of 4CH CARDS or a piece of 8CH card then only 1CH 4CH 6CH 8CH 9CH buttons are valid In case the cards installed are 4 pieces of 4CH CARDS or 2 pieces of 8CH cards or a 16CH card then 1CH 4CH 6CH 8CH 9CH 13CH and 16CH buttons are all valid 3 1 3 Flip Pages When the display mode is 1CH 4CH 6CH 8CH 9CH or 13CH cli...

Page 26: ...mode When the present display mode is 6CH 8CH or 13CH by clicking any image other than the bigger one users can change the position of the image with the bigger one By clicking the single image again it will return to the former display mode 3 2 Login Click and login window appears Input the user name and password the default user name is SYSTEM with no password users can access to the main interf...

Page 27: ...SuperDVR TDF Cards 27 Fig3 4 Main Interface Buttons Explain Search and Playback Configuration P T Z Control Exit Time Date Display Mode Setup System Status In ...

Page 28: ...anual record mode 3 Motion Detection record mode 4 Sensor Alarm record mode Motion Detection record mode and Sensor Alarm record mode are together called as Alarm Record Multiple cameras record In case users utilize multiple cameras to record every camera works separately and the record file also saved separately The parameters i e camera ID record date time and record mode are all saved together ...

Page 29: ...source Manual record By selecting the options the relative camera images will be recorded and saved all the while Manual recording frame rate Select the record frame rate for manual record mode Schedule Record Schedule record option Schedule Record Frame Rate Select Schedule Record frame rate Motion Detection By selecting the options users can set relative channels record mode as motion detection ...

Page 30: ...el and Alarm Output Status Panel Meanings of indicator light colors in row one are as below 1 Normal State 2 Manual Record State 3 Schedule Record State 4 Motion Detection Record State 5 Sensor Alarm Record State When the indicator light color turns into in row two it means there is sensor alarm output 3 3 4 Manual Record Mode Manual Record mode is the most commonly used record mode In case there ...

Page 31: ...rd and that s helpful for saving system resource and convenient for searching for event record file The indicator light color in the record status panel is red Note Users may need to setup in three places so as to enable motion detection record mode 1 Select Motion Detection for certain channels in Basic Configuration 2 Set the motion detection areas for certain channels in Motion Detection config...

Page 32: ...ording storage will automatically jump to the next partition when it s full In case all the partitions are full and recycling record mode has been enabled the new data will overwrite the former recorded data automatically Users can also set HDD minimum storage alarm Then once the present storage space is less then the minimum storage and recycling record mode hasn t been enabled the record will au...

Page 33: ...SuperDVR TDF Cards 33 Fig4 1 Basic Configuration The definitions of the buttons in Fig4 1 are as below Basic Configuration Schedule configuration Video configuration Motion Detection Configuration ...

Page 34: ...tion User Configuration Return 4 1 Basic Configuration Click and enter the basic configuration page where users can setup the system or just use the defaults Fig4 2 Channel Caption Dwell Interval In case users enable Auto Dwell function in the main interface ...

Page 35: ...tting the audio signal in certain channel Note input audio signal by microphone connector Call Monitor Only 16CH card has this function at present Users can connect another monitor to the card and select the display modes here The following is about record data storage Please check Fig4 3 Fig4 3 Record data storage precept Above SuperDVR system shows all the available HDD partitions for users User...

Page 36: ...VR system will also automatically restart Fig4 4 Computer System Reboot setups As the windows system may become unstable after a couple of days continues operating which will cause SuperDVR system unstable Then users should reboot the computer Select and choose the interval in days which will guide the system to reboot automatically according to the setups Click to return to the main display inter...

Page 37: ... bars Click Default and all the values will return to the default value Fig4 5 Video Configuration Definitions of the setup items Contrast set image color contrast Brightness set image brightness Hue set image hue Saturation set image Saturation Auto Gain users can set it as auto or manual Only 4CH Card and 16CH card have this function Default load defaults i e set the first four items value as 50...

Page 38: ...the area of the channel as detection area Clear clear all the detection areas and then users can select customized detection areas by cursor 4 3 1 Set Motion Detection Area In case users want to customize the detection areas for a certain channel first select the camera then select Clear and draw the cursor in the box in the left side At this time users can see a green box appears which shows the ...

Page 39: ...vity 4 4 Schedule configuration Click and enter Schedule Configuration page as below Fig4 7 Schedule Configuration Our TDF series system offers the users with powerful schedule configuration options Every channel has three kinds of record modes i e schedule record motion detection record and sensor alarm record We provide users to set schedules from Sunday to Monday separately for all of the three...

Page 40: ...s Click Add to add schedule for a certain channel Note the added schedule should not be reduplicate to the former settings Click Delete to delete schedule Click Clear All to delete all the schedules of a certain channel See the Fig4 8 and learn how to edit schedules for a certain channel Fig 4 8 Edit Schedule for a Channel 4 5 Motion Detection Alarm Configuration 4 5 1 Alarm Triggering Conditions ...

Page 41: ...buzzer rings Motion Holding Time Motion sensor may detect some movement only if the movement lasts for a period exceed the default time then the alarm record will begin and buzzer beeps Disk Shortage Alarm In case the HDD available space is less then the set value the buzzer will beep if Buzzer has been selected 2 Alarm output terminal in LAN Fig 4 10 Alarm output terminal in LAN Select Remote Ala...

Page 42: ... figure below Fig 4 11 Add alarm output terminal in LAN Find the terminal computer and click OK and users can see the name of the selected terminal will appear in the box as below Fig4 12 List of alarm output LAN terminals Note this function is only valid in LAN not in Internet ...

Page 43: ...uration Every sensor can trigger multiple channels to record For example in case users select CAM1 CAM4 and CAM5 for Sensor2 then once the sensor is activated CAM1 CAM4 and CAM5 will begin to record Users can also select the voltage high and low for alarm signals ...

Page 44: ...stem will give out related warning message to the terminals in List of alarm output LAN terminals refer to Fig 4 12 Disk Alarm when HDD available space is less than the set value refer to Fig4 9 it will trigger selected alarms Sensor 1 in case users have mounted sensors when the sensors have been activated then it will trigger the selected output alarms Sensor2 sensor16 4CH card has maximum 4 sens...

Page 45: ...16 motion alarms 4 6 P T Z Control Configuration Click and enter the following area 4 6 1 Protocol Setup Fig4 15 P T Z Protocol Setup Users can select different protocols serial port number Pan speed Tilt speed Focus speed and Zoom speed for P T Z devices Relative Definitions Port users can set port number Address P T Z device RS485 address ...

Page 46: ... Serial ports setup Users should first enable the P T Z control function of a certain camera and select a port number in P T Z Protocol Setup refer to Fig4 15 and then set corresponding parameters in the area below Fig4 16 P T Z Serial port Setup Relative explain Baud Rate set P T Z device Baud Rate default value is 9600 Data bits default value is 8 Parity Bit odd and even parity bit default Null ...

Page 47: ... values accordingly 4 7 Users Configuration Click and access the following area Fig4 17 User Configuration After installing the SuperDVR system it will automatically create an administrator user of which user name is SYSTEM with no password Users can use this user name to log in the system and Add Edit and or Delete users parameters ...

Page 48: ...Administrator this kind of user of the highest rights to change all the settings and playback Power user this kind of user cannot access Basic Configuration and change settings but has all the other rights of Administrator Normal this kind of user can only access SuperDVR main display interface refer to Fig3 1 Notice Administrators can change Power users and Normal users rights not other administr...

Page 49: ...er Input User name password confirm password and select user rights and then click OK 4 7 3 Delete User Select the user name in User Configuration refer to Fig4 17 and click Delete and confirm delete See below Fig4 20 Confirm Delete User ...

Page 50: ...P T Z control Click in the SuperDVR main display interface refer to Fig3 1 and access to the following area Fig5 1 P T Z Control Interface Users can control P T Z devices by the function buttons on the right side see as below ...

Page 51: ...crease and decrease the corresponding values When users need to utilize P T Z control first enter P T Z Control Interface refer to Fig5 1 and click the corresponding channel users can see a red fringe around the channel then users can begin to control the P T Z control enabled camera Notice After clicking any function button in P T Z Control Function Buttons Panel refer to Fig5 2 users must click ...

Page 52: ...n Display Interface refer to Fig3 1 and access to the following area Fig6 1 Search and Playback Interface This interface is divided into 4 parts i e record search area record playback area record play area and other functions area Press and return to the live surveillance state ...

Page 53: ...d original file C Search by record mode This is useful when user want to look through some important events Users can select one or more of the three searching methods to search for needed record file Search By Date Record Time Display Search Original Files Search Backup Files Search Manual Record Events Search Schedule Record Events Search Motion Detection Events Search Sensor Alarm Events ...

Page 54: ...SuperDVR TDF Cards 54 6 2 Record Playback and Control Fig6 3 Record Playback and Control Explain of the button function Play Pause Stop Play backwards Previous Section ...

Page 55: ... see the detailed time marks When searching for a certain section of the file users can draw the lever on the bar to the area where most likely contains the needed section If necessary click the bar once and see the magnified time marks for precise search The left side shows the available channels When a certain channel has been selected for playback the background color will change to highlight o...

Page 56: ...e system default playback mode is one channel That s Camera1 In case user need to change to other channels then click and the following channel configuration dialog window will appear as below Fig6 7 Channel Configuration Dialog for 1 Channel Playback Mode Note Take 16CH card for example But in fact 4 pieces of 4CH cards and 2 pieces of 8CH cards can make the same effect Users can select one chann...

Page 57: ...ct methods for users For example by selecting Third 4 Channels Camera9 Camera10 Camera11 and Camera12 will be quickly selected In case user need to play back 9 channels at the same time then click and the following channel configuration dialog window will appear as below Fig6 9 Channel Configuration Dialog for 9 Channels Playback Mode Users can select any 9 channels from all the available channels...

Page 58: ...ation dialog window will appear as below Fig6 10 Channel Configuration Dialog for 16 Channels Playback Mode Then click OK to play back Tips Click any channel and magnify it to see the single channel Click again to return to the former playback mode 6 3 Other Functions 6 3 1 Record File Backup Click and enter the following area ...

Page 59: ...m The interface is divided into four areas A Camera Selection Area B Time and Date Selection Area C Operation Area D Information Area In A area users can select one or more cameras In B area users can set start time date and end time date and then backup the files recorded by channels selected in A area in the time interval In C area users can set backup path Click Start to backup files ...

Page 60: ...rst select the channel on the left side and then select start time date and end time date of the record files click Start to delete files 6 3 3 Capture Pictures The definitions of the function buttons are as below Capture picture Print setup Print captured picture Notice Only in one channel playback mode refer to Fig6 7 that is ...

Page 61: ... Fig6 12 by which user can make color setup for the present channel including brightness contrast saturation and hue and press Default to recover to the original settings Fig6 13 Color Control Panel When in the single channel playback mode click and the following window will appear as below Fig6 14 Capture multiple images in a row ...

Page 62: ... 62 Select path and click Save to save the picture User can also print the images that have been captured Click and make corresponding print setup as below Fig6 15 Print Setup Click users can make print preview as below ...

Page 63: ...ver all the original settings Press Print in the print preview window users can print the image directly 6 3 4 Image Zoom In Out When in single channel playback state the zoom control icons will appear Select and click on the channel will zoom out the image By click continuously the image will be zoomed out continuously Select and do the some operations and get the opposite effect ...

Page 64: ...SuperDVR TDF Cards 64 Click and recover the original size Take the following three pictures for example Fig6 17 Example Original Size ...

Page 65: ...SuperDVR TDF Cards 65 Fig6 18 Example Zoomed out Fig6 19 Example Zoomed in ...

Page 66: ...net web cam server On any other computer that connects to Internet or the same LAN network input the SuperDVR server address in IE browser the end users can get high quality real time image from the server and also control the P T Z devices 7 1 1 Remote Surveillance Sever Configuration Users should first enable the Web Camera Services in Basic Configuration refer to Fig4 1 and set other settings a...

Page 67: ... should first install the WebCam program And the following is the detailed information Input the WebCam server IP address in Internet Explorer and the following page appears Fig7 2 Remote Surveillance and playback services selection Live Surveillance this option is for users to see remote live view Remote Playback this option is for users to play back recorded files Notice In case the HTTP port se...

Page 68: ...lick OK to install Remote Surveillance client end program as below In the next chapter we will learn more about Remote Playback If the user is the first time to connect to the server then the following window will pop up Fig7 3 Inquiry for installing WebCam Downloading component Notice In case users has already installed client end program before and SuperDVR version not changed on the server afte...

Page 69: ...SuperDVR TDF Cards 69 Fig7 4 Web Cam client end driver initializing After initialization has completed WebCam will be installed automatically ...

Page 70: ...SuperDVR TDF Cards 70 Fig7 5 WebCam installation Fig7 6 Default install path Users can set another path by clicking Browse Click Next to continue ...

Page 71: ...SuperDVR TDF Cards 71 Fig7 7 Register program folder name Click Next after input the folder name or select the default name and then Finish installation as below ...

Page 72: ...SuperDVR TDF Cards 72 Fig7 8 Installation success Then the WebCam main interface will appear as below ...

Page 73: ...SuperDVR TDF Cards 73 Fig7 9 WebCam main interface Click input user name and password as below Fig7 10 Login web cam Note ...

Page 74: ...djust screen mode just like SuperDVR bellow is the WebCam surveillance mode interface Fig7 11 WebCam surveillance state Alarm state monitor and PTZ control all same as SuperDVR we do not need give detail explanation here any more 7 2 Remote Playback 7 2 1 Remote Playback server Configuration For using our powerful remote playback function users should first enable Web Cam service and Remote Playba...

Page 75: ...R and activate MediaServer users can also enable the RPB service Once the remote playback service has enabled there will be an icon on the taskbar to remind users the service has been activated Fig7 12 Remote playback service activated 7 2 2 Remote Playback Client end Setup Users should also first download and install playback program This chapter will guide users how to make it Input server addre...

Page 76: ...SuperDVR TDF Cards 76 Fig7 13 Remote Surveillance and playback services selection Select Remote Playback and click OK Fig7 14 Installing remote playback program ...

Page 77: ...erDVR version not changed then no need to download and install it again it will go to Fig7 19 directly After initialization has completed users need to install the program First select installation path as below Fig7 15 Default install path Users can set another path by clicking Browse Click Next to continue ...

Page 78: ...SuperDVR TDF Cards 78 Fig7 16 Register program folder name Click Next after inputting the folder name or selecting the default name then the following figure appears ...

Page 79: ...nstallation process rate And then click Finish to finish installation as below Fig7 18 Installation success Then the playback client end main interface will appear as below Fig7 19 Remote Playback client end main interface Corresponding Explanations ...

Page 80: ...R TDF Cards 80 Log in Minimum Setup Exit Play Pause Synchronous Asynchronous play Begin Stop record Slower playing speed frames per second Accelerate playing speed frames per second Play at the original speed ...

Page 81: ...lick Advance and enter the advanced setting area Users can select different compression format 7 2 3 2 Log in Remote Playback System Click after making up certain configurations and the following window appears Fig7 21 Log in Remote Playback System Input the right user name and password and enter the remote playback IP Port No IP address Save path Record at original Speed Record Frame Rate ...

Page 82: ...ith no password Users can set user name and password on the server end refer to Fig4 17 Fig7 22 Remote Playback Main Interface 7 2 3 3 Control Select the time period for playback Once log in the system the setup button and login button are disabled Click and the following window appear ...

Page 83: ...ft bottom of the screen Play Control Click and begin to play the recorded files Press to pause Users can draw the lever as below to select time to play Fig7 24 Time control Lever The following area is for users to control the play speed Fig7 25 Play speed control module Notice The above area works like this the original recorded file is for example 4 frames per second then users select 24 frames p...

Page 84: ...k and begin to record remotely And the icon changes to Click it again and stop recording Users can select save path and compression format before logging in the system Synchronization Click and make every channel to playback synchronously Click this button again and return to asynchronous playback state ...

Page 85: ...s 85 Appendix Appendix 2 Differences Among 4CH Card 8CH Card and 16CH Card Item 4CH CARD 8CH CARD 16CH CARD Video Input 4 8 16 Alarm Output 1 4 16 Relay Output 1 0 1 Watch Dog N N Y Call Monitor N N Y Manual Gain Y N Y ...

Page 86: ...ot compatible with PC hardware Appendix 3 1 2 Unspecified error in the End of Installation Possible causes as below 1 On English version Window XP system by using driver below SuperDVR3 02 the unspecified error will appear as the databases are not well compatible 2 Microsoft Windows system database has been destroyed Reinstall windows system or try to install SuperDVR driver above SuperDVR3 1 1 to...

Page 87: ...hedule record state Note users can refer to Fig3 6 to learn more Appendix 3 2 2 How do the different record formats work Users can set more than one record mode in Record setup refer to Fig3 5 but actually there is only one valid record mode in a time The priority order of the record modes is Sensor Alarm Record Motion Detection Record Manual Record Schedule Record Appendix 3 2 3 How to set recycl...

Page 88: ...t Windows user name and password Note not SuperDVR user name and password and select time interval then the Windows system will automatically restart according to the set time In case the Windows system closed abnormally i e power supply is cut off and when computer reboot next time SuperDVR system will automatically restart and keep the settings as before Tips Users may don t need enable auto reb...

Page 89: ...s from highest to normal When on PAL system and the frame rate is 25 fps bitrate for the highest image quality is about 120K Byte s and for the lowest image quality is about 30K Byte s Appendix 3 2 8 The frame rate seems to be smaller than what I set There is frame loss in image switch therefore the real record frame rate is about 50 smaller than the theoretic value Appendix 3 2 9 Why can t I sele...

Page 90: ... end hasn t enabled web cameras service The default Http port is 80 It may be conflict with other Web servers for example IIS If true please change another port Windows XP SP2 will block the OCX download You should enable Internet Option Æ Security Settings Æ Download unsigned ActiveX controls Appendix 3 3 3 Why can t I see the images The possible causes The VGA card is too outdated Have not insta...

Page 91: ...ns Appendix 3 4 1 Why computer display doesn t work and why can t I access window system The capture card may not be well installed Unplug the card and try it again Note Please unplug the power plug of the computer so as to avoid damaging the motherboard chip set Appendix 3 4 2 Why can t I find the record files HDD space is not enough Appendix 3 4 3 Why the screens display is unstable with ditheri...

Page 92: ...ragments on the HDD therefore it takes time to search for the files you need delete the files that you don t need or need to make disk defragmenter now Capture card problem Computer hardware system is too outdated Appendix 3 4 5 Why can t I play back Windows media player has been damaged or decoder hasn t been installed properly It s suggested to reinstall the relative software system Computer pro...

Reviews: