background image

9

8.4 Self-Timer Mode 

To use the self-timer feature, press the Mode Button until 

 appears in the LCD then press the Shutter Button to start a 

9 second self-timer.  

Stylus 1000

 will issue a short beep every second and then a long beep just prior to a further short 

beep which indicates that the image has been successfully taken.


Important Notes:

The Self-Timer Mode cannot be selected when the 

Stylus 1000

 is full.

8.5 Clearing the Stored Images/Movie Clips  

When you wish to clear the memory of your 

Stylus 1000

, press the Mode Button until 

 appears on the LCD.  Pressing 

the Shutter Button once will cause the 

Stylus 1000

 to beep.  Pressing the Shutter Button again within 5 seconds will clear 

all the images/movie clips stored and reset the image counter.


Important Notes:

All images will be lost when the memory is cleared.  Please make sure you upload your wanted images before clearing your 

Stylus 1000

’s 

memory.

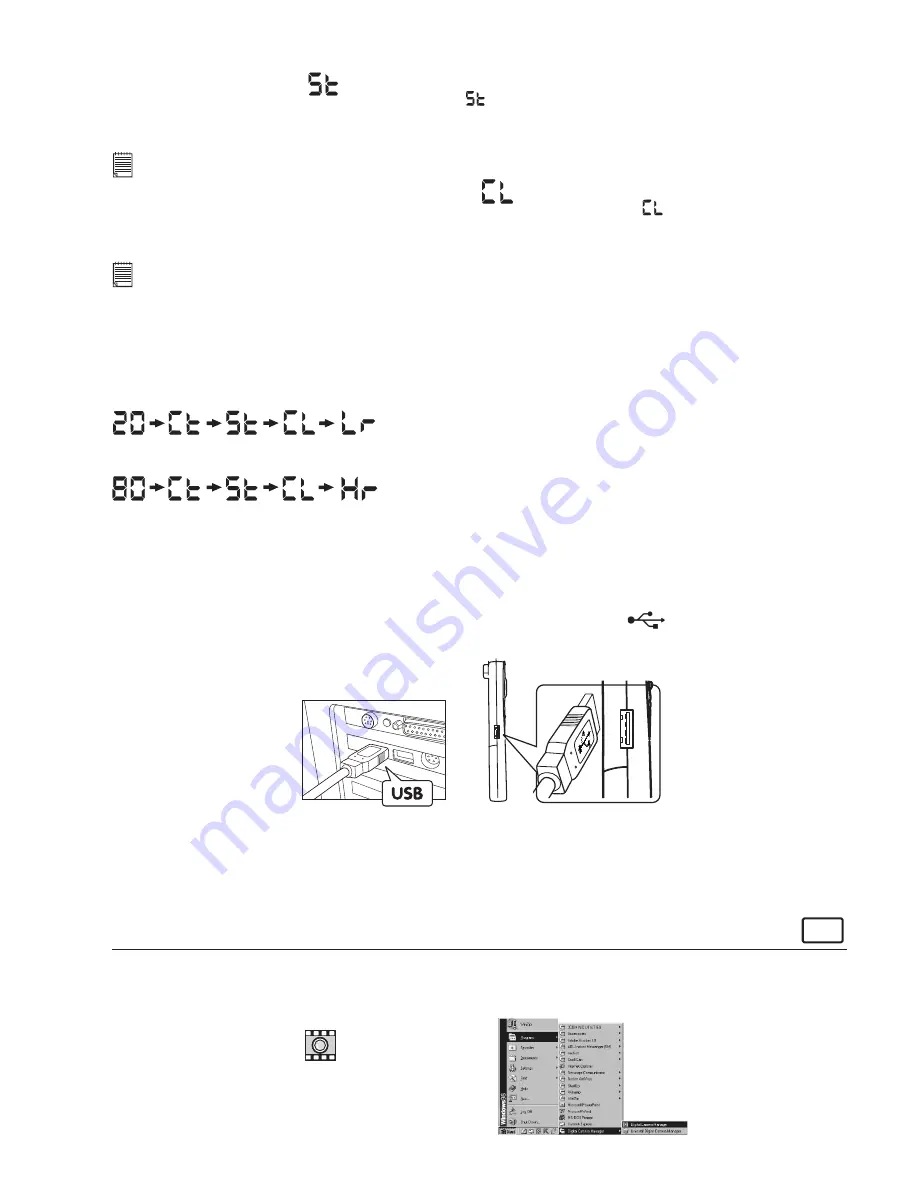
8.6 Changing the Image Resolution

Image resolution can be changed whenever you need.

1. Cycle through the Mode options by pressing the Mode Button.

2. Press the Shutter Button once to change to the alternative resolution.

For Example:

Changing from High Resolution Mode to Low Resolution Mode:-


Press the Shutter Button to Conrm                                  

(Available Images)

Changing from Low Resolution Mode to High Resolution Mode:-


Press the Shutter Button to Conrm                                  

(Available Images)

9. Connecting your 

Stylus 1000

 to Your Computer

The USB cable allows you to upload images from the 

Stylus 1000

 to your PC or Mac.  One end of the cable connects to the 

USB port on the side of the 

Stylus 1000

 and the other end connects to your PC’s or Mac’s USB port.  When your 

Stylus 

1000

 is connected to your PC or Mac, it will draw power from the PC in order to preserve your battery life.

The USB port can be found on the front or back panel of your PC or Mac. Look for this 

 symbol next to the connection 

port. (Also see your PC or Mac operating manual for the location of your USB connection port.)

USB Series “A” Plug Connects 

to your computer

USB Series “A” Plug Connects 

to your 

Stylus 1000

When you rst connect your 

Stylus 1000

 to your PC, a message appears on screen saying “New Hardware Found” and 

“Building Driver Information Database”.  After this, you can start to upload images!

10. Uploading Images to Your Computer

For Windows® Users:


PC

10.1 Running the Digital Camera Manager

• Select the 

Digital Camera Manager

 icon from the 

Digital Camera Manager

 program group on the Windows Start Menu 

or double-click the 

Digital Camera Manager

 short-cut icon on the desktop.

• You can now start to upload your images from your 

Stylus 1000

  by following the steps in Section 10.3:

Digital Camera Manager

short-cut icon

on desktop

Summary of Contents for CIC-101

Page 1: ...puter running Windows 98 and Windows Me or Macintosh running OS 8 6 9 1 via the USB Universal Serial Bus port You can also use your Stylus 1000 to capture not only snaps of your family and friends but also video of them in action Your Stylus 1000 can also be used as a Web Cam If you have an internet connection and microphone not supplied you can chat face to face with friends and colleagues confer...

Page 2: ... 9 8 6 Changing the Image Resolution 9 9 Connecting your Stylus 1000 to your Computer 9 10 Uploading Images to Your Computer 9 For Windows Users PC 10 1 Running the Digital Camera Manager 9 10 2 Quick Reference 10 10 3 Uploading Images 10 10 4 Creating Uploading Movie Clips 11 10 5 Creating Live Movie Clips 11 For Macintosh Users MAC 10 6 Uploading Images and movie clips 12 11 How to Use Other Sof...

Page 3: ...tallation For Windows Users PC 5 1 How to Install Digital Camera Software 5 1 1 How to Install Digital Camera Manager Software Your Digital Camera Manager should be installed rst 1 Insert the CD ROM disc into the CD ROM drive and close the CD ROM drawer 2 An installation wizard will automatically launch 3 Click Digital Camera Manager icon 4 Follow the instructions presented on the screen to comple...

Page 4: ... Web Visit http www arcsoft com for all your FAQ s tips and technical support see Section 12 for more details 5 2 1 How to Install ArcSoft Software 1 Re insert the CD ROM disc into the CD ROM drive and close the CD ROM drawer 2 An installation wizard will automatically launch 3 Click the ArcSoft Software icon 4 Select the language for the installation and click OK 5 Follow the on screen prompts 6 ...

Page 5: ...e STV0680 Capture Plug ins le in Hard Disk if you have not install any Photo retouching software If you already installed ArcSoft PhotoStudio 2000 and you want to use it as a default software to retrieve the images from Stylus 1000 go to Plug ins folder in the PhotoStudio 2000 folder and click Select 7 Click Quit to nish the installation 8 A folder named STV0680 Camera Snapshots will appear in you...

Page 6: ...er 2 Double click the CD ROM icon Digital Camera 3 Double click the VideoImp 1 5 installer icon in English folder 4 Follow the instructions presented on the screen to complete the installation 5 7 How to Install CU SeeMe CU SeeMe started the craze for videochat on the Internet and it s still the most popular full featured software for seeing hearing and sharing It can be used over the Internet or ...

Page 7: ...ton twice when you are in the Delete Clear Mode see page 9 7 1 6 Change Resolution The Shutter Button can be used to switch between High Resolution and Low Resolution settings see page 9 7 2 View nder The view nder is the window you look through when you aim the Stylus 1000 Make sure you center the subject in the view nder before taking an image 7 3 Mode Button The Mode Button has 3 primary functi...

Page 8: ...e Internet access To talk and listen you will require a sound card speakers and microphone not supplied 8 Getting Started 8 1 Switching the Stylus 1000 On from the Stand by Mode Pressing the Mode Button when the Stylus 1000 is in Stand by Mode LCD is blank will reactivate your Stylus 1000 Important Note If you cannot reactivate your Stylus 1000 by pressing the Mode Button this means your battery p...

Page 9: ...ailable Images Changing from Low Resolution Mode to High Resolution Mode Press the Shutter Button to Con rm Available Images 9 Connecting your Stylus 1000 to Your Computer The USB cable allows you to upload images from the Stylus 1000 to your PC or Mac One end of the cable connects to the USB port on the side of the Stylus 1000 and the other end connects to your PC s or Mac s USB port When your St...

Page 10: ...IF software enhanced to 640 x 480 pixels Select Yes or No Close Saved images s Adjust image Album 4 Create New Album 3 Select wanted image s 6 7 Save the selected image s into the album 3 All uploaded images will be shown on the left panel 4 During your Digital Camera Manager installation a folder called Album has been automatically created in the bottom right section of the Digital Camera Manager...

Page 11: ...er you want in your PC 3 If you have already created an album folder and you want to save image s in double click the album 4 Click the button to create a movie clip avi le with all the selected images by holding the CTRL key on your keyboard with the mouse click on each image 5 Select the video compression format Full Frames Uncompressed format is recommended 6 The movie clip created will appear ...

Page 12: ...ter the number of seconds you want for the video clip to run at frames per second You can adjust the frame rate number of frame per second by pressing the Frame Rate Button 1 Click the button 2 Enter the frame rate you want for your movie clip For example 80 frames at 10 frames per second 8 sec movie clip 80 frames at 5 frames per second 16 sec movie clip To adjust resolution You can adjust resolu...

Page 13: ... click on Get Photo 1 and click Acquire Select STV0680 Camera as the source The capture interface will show up To capture image s highlight the wanted image s and click Capture 4 The captured images will be shown in the window Select the image you want and click Capture 5 The selected image will shown within the mask on the selected template You can play with the image by using the function icons ...

Page 14: ...elect a le ending with mov video le the video will appear in the video templates Double click on the video and it will appear just like other video templates in the storyboard Now go to step 10 Alternatively you can produce a live video Ensure your Stylus 1000 is connected to the computer via the USB cable Click on the capture icon Step 7 And press the record icon Wait for the video link to go liv...

Page 15: ... Double click on Get Photo 1 and click Add Find the image you want which you have already saved in your hard disk and click Open The selected images will be shown on the left hand side Click OK 4 The selected image will shown within the mask on the selected template You can resize rotate or reposition the image by using the function icons show in the right hand side or reposition the image using y...

Page 16: ...Press the Save icon and name your le and then press save Video impression will ask you where you want to place your video Select video template Step 9 Select the album icon and your video clip you have just produced will appear in the video templates Double click on your video your video will now drop into the storyboard Running the video Step 10 Select the play movie icon which will assemble your...

Page 17: ... mail japan arcsoft com and E mail support arcsoft com support mds2000 com For China For South Central America ArcSoft China Support Center Beijing Tel 1 510 979 5520 Tel 8610 6849 1368 Fax 1 510 440 1270 Fax 8610 6849 1367 E mail latinsupport arcsoft com E mail china arcsoft com For Oceania For Europe Middle East Africa Rest of the World ArcSoft Australian Support Center ArcSoft Europe Support Ce...

Page 18: ...PC which is turned on via the USB cable which will then draw power from the PC whilst you insert fresh batteries or make sure there is suf cient power on the backup battery Check all cables connections are secured If you have any other camera installed on your computer remove the camera and it s driver completely from your system to avoid con ict with another camera or capture device Put Digital C...

Page 19: ...pload all images to your Mac and replace batteries Digital Camera Manager does not load You have lost power to your Stylus 1000 by either The installer for the Digital Camera Manager requires the Stylus 1000 be connected to the PC via the USB after the software has been installed the PC restarted Insuf cient battery power Battery power is too low to continue taking images Connection failure Removi...

Page 20: ...C Rules Operation is subject to the following two conditions 1 This device may not cause harmful interference and 2 This device must accept any interference received including interference that may cause undesired operation Warning Changes or modi cations to this unit not expressly approved by the party responsible for compliance could void the user s authority to operate the equipment NOTE This e...

Reviews: