


37
USING
THE
MAIN MENU
17. After the meter and pump are connected, you set your Send Options. This controls
how your meter sends blood glucose readings to your MiniMed insulin pump. Choose
the
Send Option that is best for you.
Your options are:
Always
Meter will always send results
Ask Me
Meter will ask you before sending results
Never
Meter will never send results
Automatically send
results to the Pump?
Always
Ask me
Never
SEND OPTIONS
OK
Send Options set.
Meter will always
send results.
18. The next screen confirms your Send Option choice.
Press
OK
.
In this step, you select how the date and time are displayed on your meter.
NOTE: Your pump automatically controls the date and time. If they need to be
changed on your pump, see your MiniMed insulin pump user guide. The date
format you choose on the meter applies to the meter only.
Month/Day/Year
Day.Month.Year
DATE FORMAT
SELECT
19. The
Date Format
screen appears. Choose your date
format.
20. After making your choice, a confirmation screen
appears. Press
OK
to confirm and return to the
Setup Menu.
OK
DATE/TIME
Date / Time is set by
Pump.
10:30 PM | 10/13/11
Meter Send Options
mmol/L
Active Insulin
0.0 u
Bolus
Basal
12:49
PM
16. Hold the back button on the pump until you see the home
screen. Put down the pump and pick up the meter.
Your choice can be changed later using Setup (see
page 42).
BG
81552940_CntrNextLINK2_4_UG_EN_FpBp_v5.indd 37
8/18/16 11:21 AM
USING
THE
MAIN MENU
36
Manage Devices
BGJ133333F
PUMP CONNECTED
MiniMed Pump
connected:
AA1234567B
Next
Delete
14. The confirmation screen briefly appears on your pump
followed by the Manage Devices screen.
®
Connecting to the Pump Using
Auto Connect
12. Check that the SN (serial number) on the pump screen
matches the
meter SN on the meter screen.
If they match, scroll to
Confirm on the pump.
Press Select button
.
Confirm Device SN
BGJ133333F found: SN:
BGJ133333F
Cancel
Confirm
Use Pump to confirm Device
SN:
BGJ133333F
CONNECT TO PUMP
13. Turn the pump over. Check that the SN on the back of
the pump matches the pump serial number now on the
meter screen.
When the pump links to the meter, the SN on the
meter screen will change to a different
serial number. This number is the
pump SN.
PUMP CONNECTED
MiniMed Pump
connected:
AA1234567B
Next
Delete
15. Then press
Next
on your meter.
NOTE: To remove this pump, press Delete. The Connect to Pump process starts
over to allow you to connect to a different pump.
81552940_CntrNextLINK2_4_UG_EN_FpBp_v5.indd 36
8/18/16 11:21 AM
37
USING
THE
MAIN MENU
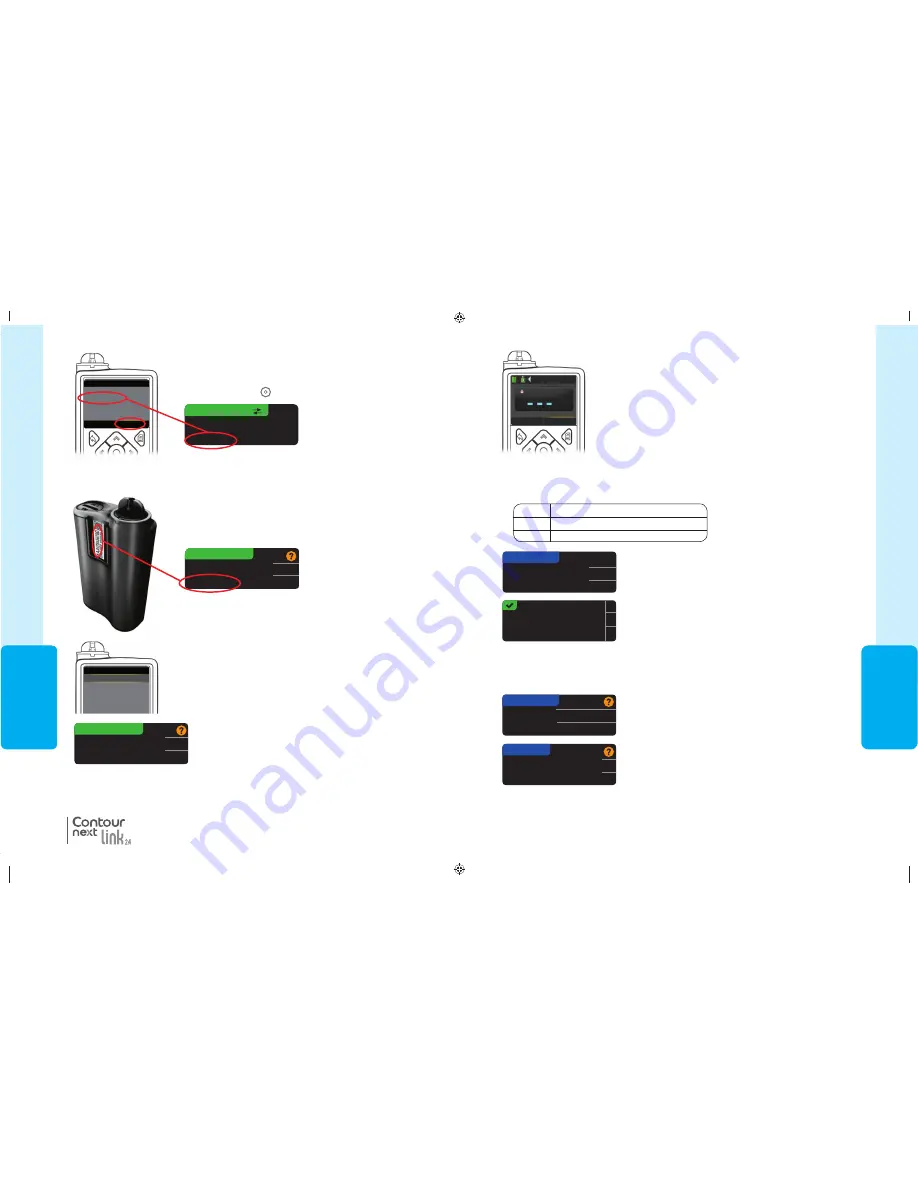
17. After the meter and pump are connected, you set your Send Options. This controls
how your meter sends blood glucose readings to your MiniMed insulin pump. Choose
the
Send Option that is best for you.
Your options are:
Always
Meter will always send results
Ask Me
Meter will ask you before sending results
Never
Meter will never send results
Automatically send
results to the Pump?
Always
Ask me
Never
SEND OPTIONS
OK
Send Options set.
Meter will always
send results.
18. The next screen confirms your Send Option choice.
Press
OK
.
In this step, you select how the date and time are displayed on your meter.
NOTE: Your pump automatically controls the date and time. If they need to be
changed on your pump, see your MiniMed insulin pump user guide. The date
format you choose on the meter applies to the meter only.
Month/Day/Year
Day.Month.Year
DATE FORMAT
SELECT
19. The
Date Format
screen appears. Choose your date
format.
20. After making your choice, a confirmation screen
appears. Press
OK
to confirm and return to the
Setup Menu.
OK
DATE/TIME
Date / Time is set by
Pump.
10:30 PM | 10/13/11
Meter Send Options
mmol/L
Active Insulin
0.0 u
Bolus
Basal
12:49
PM
16. Hold the back button on the pump until you see the home
screen. Put down the pump and pick up the meter.
Your choice can be changed later using Setup (see
page 42).
BG
81552940_CntrNextLINK2_4_UG_EN_FpBp_v5.indd 37
8/18/16 11:21 AM
USING
THE
MAIN MENU
36
Manage Devices
BGJ133333F
PUMP CONNECTED
MiniMed Pump
connected:
AA1234567B
Next
Delete
14. The confirmation screen briefly appears on your pump
followed by the Manage Devices screen.
®
Connecting to the Pump Using
Auto Connect
12. Check that the SN (serial number) on the pump screen
matches the
meter SN on the meter screen.
If they match, scroll to
Confirm on the pump.
Press Select button
.
Confirm Device SN
BGJ133333F found: SN:
BGJ133333F
Cancel
Confirm
Use Pump to confirm Device
SN:
BGJ133333F
CONNECT TO PUMP
13. Turn the pump over. Check that the SN on the back of
the pump matches the pump serial number now on the
meter screen.
When the pump links to the meter, the SN on the
meter screen will change to a different
serial number. This number is the
pump SN.
PUMP CONNECTED
MiniMed Pump
connected:
AA1234567B
Next
Delete
15. Then press
Next
on your meter.
NOTE: To remove this pump, press Delete. The Connect to Pump process starts
over to allow you to connect to a different pump.
81552940_CntrNextLINK2_4_UG_EN_FpBp_v5.indd 36
8/18/16 11:21 AM
81552940_CntrNextLINK2_4_UG_EN_FpBp_v6_placed.pdf:40


