Model CGS28BA
Easy Care 5000 Fabric Steamer
Page 1: ...Model CGS28BA Easy Care 5000 Fabric Steamer ...
Page 2: ...ediately Take care to avoid contact between the hot surfaces of the unit and the skin paying particular attention to the face neck and hands This appliance is not intended for use by persons including children with reduced physical sensory or mental capabilities or lack of experience and knowledge unless they have been given supervision or instruction concerning use of the appliance by a person re...
Page 3: ...mmended if an extension cord is absolutely necessary a 15 amp rated power cord should be used Cords rated for less amperage may overheat Care should be taken to arrange the power cord so that the cord cannot be pulled or tripped over Always ensure that the voltage to be used corresponds to the voltage marked on the unit For additional protection the installation of a residual device RCD with a rat...
Page 4: ...er Attachments may get hot during use Allow them to cool before storing When emitting steam this appliance may cause burns if it is used too close to the skin or eyes or if it is used incorrectly To reduce the risk of contact with hot water emitting from the steam vents test appliance before use by holding it away from the body Do not steam garments while on a person Burns could occur from touchin...
Page 5: ...Duo power control with 2 settings Advanced Pro steam setting with 1500 watts of power ideal for heavier garments bedding linen home fur nishings upholstery Normal 1200 watts setting ideal for cotton polyester nylon silk delicate non iron fabrics Automatic safety cut off system Valve on base of steamer for draining limescale Press attachment for creating professional creased results compared to a t...
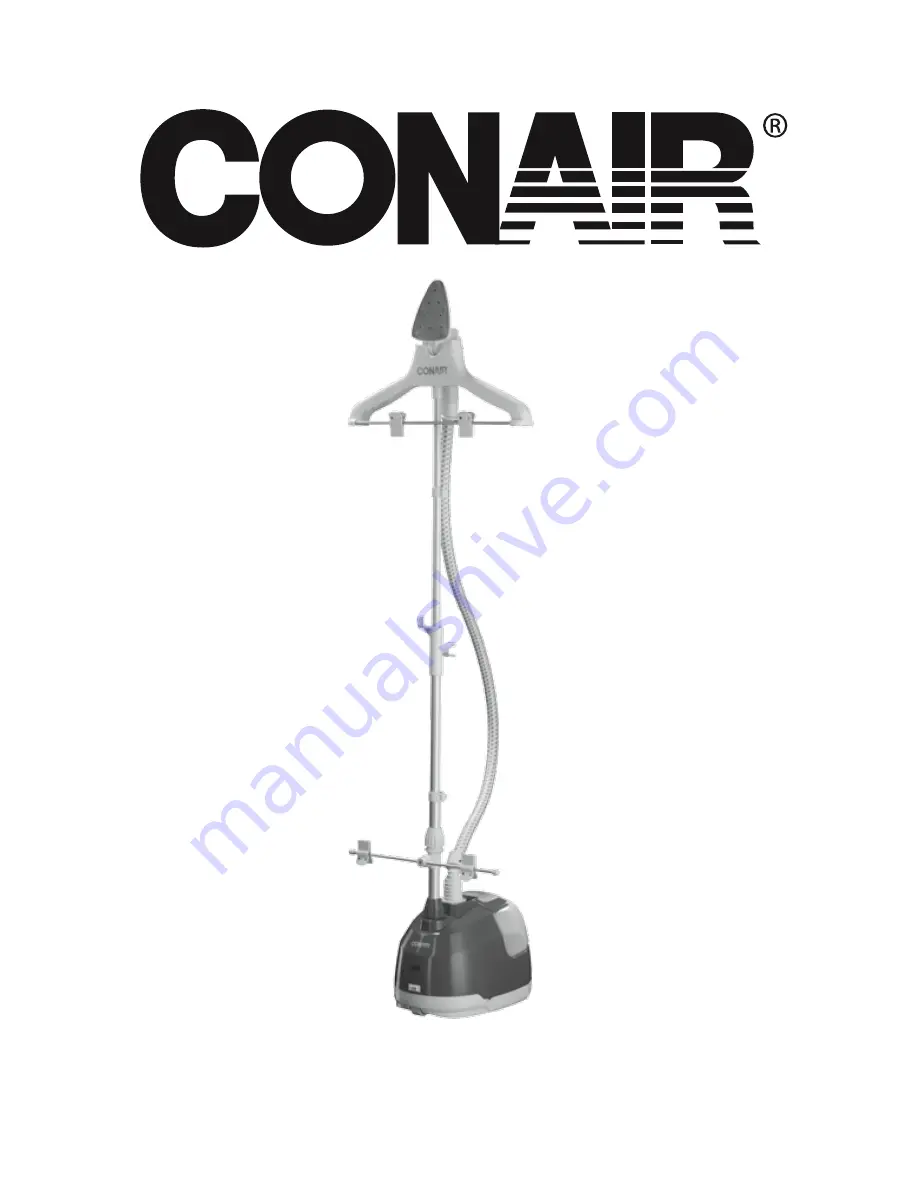
Page 6: ...d plastic connectors one is attached to the base of the steamer and the other is attached to the metal rod with pant clip system 5 One round plastic connector with hook 6 One 360 rotatable hanger with pant clip system 7 2 in 1 lint and bristle brush attachment 8 Press attachment 9 One woven hose cool touch handle triangular shaped nozzle 4 9 7 8 6 3 2 1 5 4 ...
Page 7: ... facing down into the connector and receptacle in base of the steamer Fig B Slide the pole into the base of the steamer and twist into place and then push the pole down as far as it can go until it clicks into place Screw tighly the grooved connector into place Step 3 Unscrew the grooved connector attached to the metal rod with pant clip system Slide the pant clip system to the desired position Fi...
Page 8: ...e on the garment steamer Fig D Push the round plastic connector down the pole until it cannot be pushed down any further Step 6 Take the extendable telescopic pole marked 2 and unclip the white plastic clip Fig E Extend the pole as far as required and secure desired height by closing the white plastic clip Fig F Fig F Fig E ...
Page 9: ...ready on the garment steamer Align the pole and then lightly push down into place Fig G Step 8 Place the rotatable hanger with pant clip system over the top of the pole NB The pant clips on the hanger should be at the front of the garment steamer Hold the pole and then push the hanger down into place Fig H Fig G Fig H ...
Page 10: ...Steamer Hose Ensure that the garment steamer has cooled down To remove the steamer hose turn slowly counter clockwise to release USING THE 360 ROTATABLE HANGER This garment steamer includes a 360 rotatable hanger To use the hanger simply hang your garment over the hanger and turn as you wish Each time you move the hanger around it will automatically click and secure itself in place for fast and ea...
Page 11: ... and release the grooved connector then move the metal rod as required Fig M NB Some pants may be too long to use the bottom of the pant clips Simply use the top clips on the hanger and let the bottom of the pants hang freely CONNECTING THE ATTACHMENTS Attachments should only be connected and removed from the nozzle when the unit is cool This garment steamer includes two plastic attachments 2 in 1...
Page 12: ...ith the bottom of the nozzle Push the attachment up until it clicks into place The press attachment should then be attached to the nozzle and is now ready to use To remove hold the clip on the bottom of the attachment and pull away from the nozzle USING THE STORAGE HOOK The storage hook included with this steamer has two uses 1 Use it to hold the steamer nozzle when changing garments on the hanger...
Page 13: ... pillows sofas rugs throws cushions curtains drapes and children s soft toys The mattress is the major breeding ground for dust mites Depending on its age a mattress may contain between 100 000 and 10 million dust mites and their eggs Using a steamer that emits steam hotter than 55 C is the best and most convenient way to eliminate dust mites from around the home This steamer emits steam to 100 C ...
Page 14: ... 5 Screw the valve and spring assembly cap back onto the water container and return the container to the upright position 6 Place the water container into reservoir in the base of the steamer and ensure that it is seated properly in the cavity OPERATING THE STEAMER 1 Ensure that the steamer is assembled correctly and that the hose is connected securely to the base of the steamer 2 Ensure that the ...
Page 15: ...longed contact HOW TO STEAM This steamer is suitable for use on all types of fabric including cotton polyester nylon elastane denim velvet leather wool cashmere silk and delicate non iron fabrics as well as fabrics with beading and embellishments This steamer is also great for all dry clean only items helping you to save time and money on expensive dry cleaner bills It is also great for use on all...
Page 16: ... the head has had a chance to drain back into the hose NOTE Test fabric for colour fastness in a small inconspicuous spot Drape linens towels handkerchiefs and napkins over a rod or place on a towel rack when steaming Heavier garments and fabrics may require repeated steaming Repeat steaming as necessary It takes some practice to gain speed and efficiency and to learn that some fabrics require mul...
Page 17: ...the O off position Unplug from the power outlet 2 Wait for the steamer to cool completely for at least 30 minutes 3 Coil power cord loosely around the appliance 4 Remove the steamer hose as per instructions in Step 2 Attaching the Steamer Hose 5 Remove the water container from the base of the steamer Unscrew valve and spring assembly and empty unused water Allow to air dry 6 Remove excess water fr...
Page 18: ...ch the steamer on to the HI position Run the steamer until at least half of the liquid has been steamed approx 1 litre Turn the steamer off to the O position unplug from the power outlet and allow to cool for 30 minutes To fully decalcify remove the water container from the steamer and drain the remaining liquid from the tank and cavity of the steamer Then unscrew the drain hole cap on the base of...
Page 19: ...nd allow water to drain back into unit Nozzle gurgles Condensation in hose Hold the nozzle and hose vertically and allow water to drain back into the unit Poor steaming performance 1 Steamer is not plugged in 2 Decalcification is necessary 1 Plug into power outlet 2 Follow steps for decalcification Note Minerals in water will vary in different areas To ensure continued operation of the steamer nev...
Page 20: ...LIMITED ONE YEAR WARRANTY This product is subject to the express warranty given on the warranty card included with the product as may be amended by reference to and in accordance with the terms of the warranty cards displayed on Conair website www conairaustralia com au To make a warranty claim you must retain your proof of purchase Further details can be found at www conairaustralia com au and cl...