Comtrend Corporation GMK4500 User Manual Download Page 8

STATIC IP Mode 

 
To access CT-402 features your computer must have an IP address within the same 
subnet.  Follow the steps below to configure your computer correctly. 
 

STEP 1:  

From the Network Connections window, open Local Area Connection (

You 

may also access this screen by double-clicking the Local Area Connection 
icon on your taskbar

).  Click the 

Properties

 button. 


STEP 2: 

Select Internet Protocol (TCP/IP) and click the 

Properties

 button.   


STEP 3:  

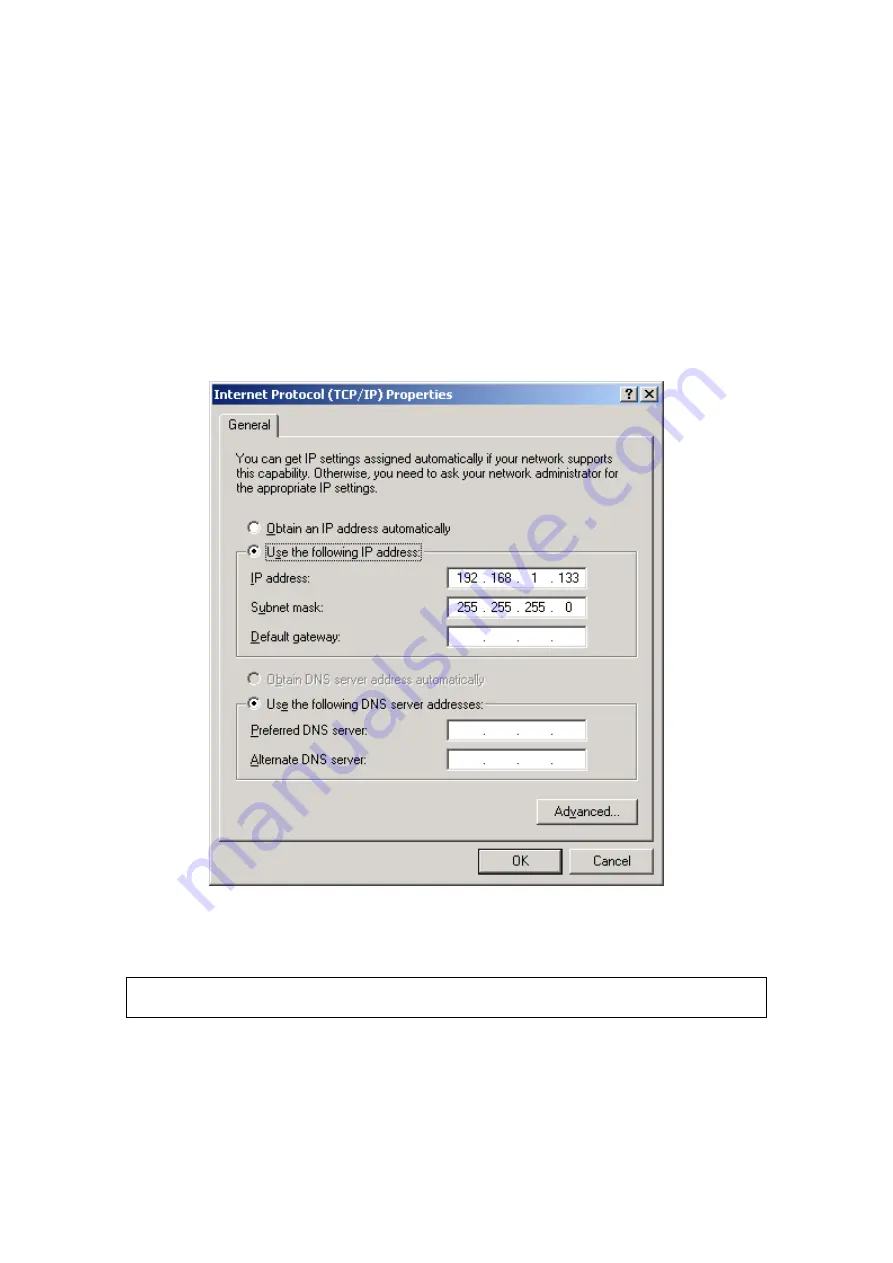
On the dialog box that appears, select the radio button labeled “Use the 
following IP address”.  Enter an IP address in this format {192.168.1.x
where x is any number greater than 2 and less than 254}.  Enter a subnet 
mask of 255.255.255.0.  The settings should be displayed as shown here.  


STEP 3:  

Enter the default gateway and DNS server settings as provided by your 
ISP or enter 192.168.1.1, which is the default IP address of the CT-402.


Click 

OK

 to submit these settings and thereby activate STATIC IP mode. 


NOTE:

  If you change the IP address of the CT-402 using the web user interface, 

you must also change the IP configuration of your networked computers. 


7

Summary of Contents for GMK4500

Page 1: ...CT 402 GPON Bridge User Manual Version A2 0 July 18 2008 261069 002...

Page 2: ...t all openings in the unit that offer exposure to air are not blocked Avoid using a telephone other than a cordless type during an electrical storm There may be a remote risk of electric shock from li...

Page 3: ...the plastic contained in the packaging and the parts that make up this device can be recycled in accordance with regionally established regulations Never dispose of this electronic equipment along wi...

Page 4: ...TTINGS 6 2 4 IP CONFIGURATION 6 CHAPTER 3 WEB USER INTERFACE 8 3 1 LOGIN PROCEDURE 8 3 2 DEVICE INFO 9 3 3 LAN INFO 9 3 4 BASIC CONFIGURATION 10 3 5 UPGRADE FIRMWARE 10 3 6 SETTING 12 3 6 1 Save 12 3...

Page 5: ...net LAN port The CT 402 is easily controlled by a remote system that is flexible enough to interoperate with the OLT units of different venders It also supports DBA Dynamic Bandwidth Allocation algori...

Page 6: ...aution 2 Before servicing or disassembling this equipment always disconnect all power cords and telephone lines from their outlets Reset Button Restore the default settings of the device by holding do...

Page 7: ...efault settings are as follows Local LAN access username root password 12345 LAN IP address 192 168 1 1 LAN subnet mask 255 255 255 0 Connection type Bridge mode NOTE At power on the device initialize...

Page 8: ...he dialog box that appears select the radio button labeled Use the following IP address Enter an IP address in this format 192 168 1 x where x is any number greater than 2 and less than 254 Enter a su...

Page 9: ...l administration i e LAN access the PC running the browser must be attached to the Ethernet and not necessarily to the device STEP 2 A dialog box will appear such as the one below Enter the default us...

Page 10: ...hows the CT 402 software version NOTE The software version can be changed see section 3 5 Upgrade Firmware 3 3 LAN Info Click Device Info on the main menu and select LAN Info from the Device Info subm...

Page 11: ...tton to immediately change the IP settings These new settings will remain until you reboot the device If you wish to keep the new IP configuration after power off or reboot you must save settings If y...

Page 12: ...ll take about a minute to complete After a successful upgrade you will see the following screen and the device will reboot NOTE1 The browser window will normally refresh to the default screen If it do...

Page 13: ...402 LAN IP address and password These settings will be burned to flash memory and will remain until you Erase them 3 6 2 Erase Click the Erase button to discard the current CT 402 LAN IP address and p...

Page 14: ...password for the CT 402 Use the fields in the screen below to change the password The new password must be entered twice When you click the Apply button the login dialog box will appear You must ente...

Page 15: ...nfigure the IP configuration while the device is rebooting For example the Static IP settings may need to be adjusted see section 2 4 IP Configuration for detailed instructions NOTE If you lose all ac...

Page 16: ...efinition 1 Transmit Receive Data Pair 1 5 Transmit Receive Data Pair 3 2 Transmit Receive Data Pair 1 6 Transmit Receive Data Pair 2 3 Transmit Receive Data Pair 2 7 Transmit Receive Data Pair 4 4 Tr...

Page 17: ...ass B Splitting ratio 1 by 64 within class B Ethernet Standard IEEE 802 3 IEEE 802 3u 10 100 1000 BaseT Auto sense MDI MDX support Yes Management Web based management with software upgrade function Br...

Reviews: