6
ASSEMBLING YOuR MARLIN EP RTR
❑
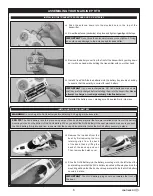
Push the antenna down into the moulded hole in the top of the
transmitter.
❑
Screw the antenna (clockwise) into place and tighten it
gently
until it stops.
IMPORTANT
Do not force the antenna into place or over-tighten it.
Doing
so could cause damage to the antenna and/or transmitter.
❑
Remove the battery cover from the front of the transmitter by pulling down
on it with one hand while holding the transmitter with your other hand.
❑
Install 6 fresh 'AA' Alkaline batteries into the battery tray, double-checking
to ensure that the polarity is correct for each battery.
IMPORTANT
If you use rechargeable 'AA' Ni-Cd batteries, make sure
that they are fully charged before installing them into the transmitter.
Never
attempt to charge or recharge ordinary Alkaline batteries.
❑
Reinstall the battery cover, making sure it's seated firmly into place.
❑
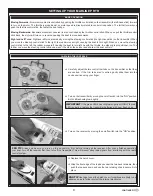
Remove the top deck from the
boat by first removing the two
retaining clips from the back
of the deck, then by lifting the
back of the deck up and out.
Then remove the hatch cover.
WARNING
Do not charge the Ni-Cd battery before installing it. Charging will be done later.
PRO TIP
The Ni-Cd battery is held in place using strips of hook and loop material that are pre-installed at the front of the battery
mounting slot and on the bottom of the Ni-Cd battery. When you install the Ni-Cd battery in the next procedure, make sure you push
the Ni-Cd battery firmly into position, to ensure that the hook and loop material holds the Ni-Cd battery securely in place.
❑
Slide the Ni-Cd battery into the battery mounting slot in the left side of the
boat, making sure that the Ni-Cd battery is pushed all the way back into the
mounting slot and that the hook and loop material holds the Ni-Cd battery
securely in place.
IMPORTANT
The Ni-Cd battery plug should be towards the front of
the boat.
CONTINuED
INSTALLING THE TRANSMITTER ANTENNA AND 'AA' BATTERIES
INSTALLING THE NI-CD BATTERY


