background image


26

Speed Send Settings 

The Speed Send Settings are accessed from the Fax 
Settings page. 


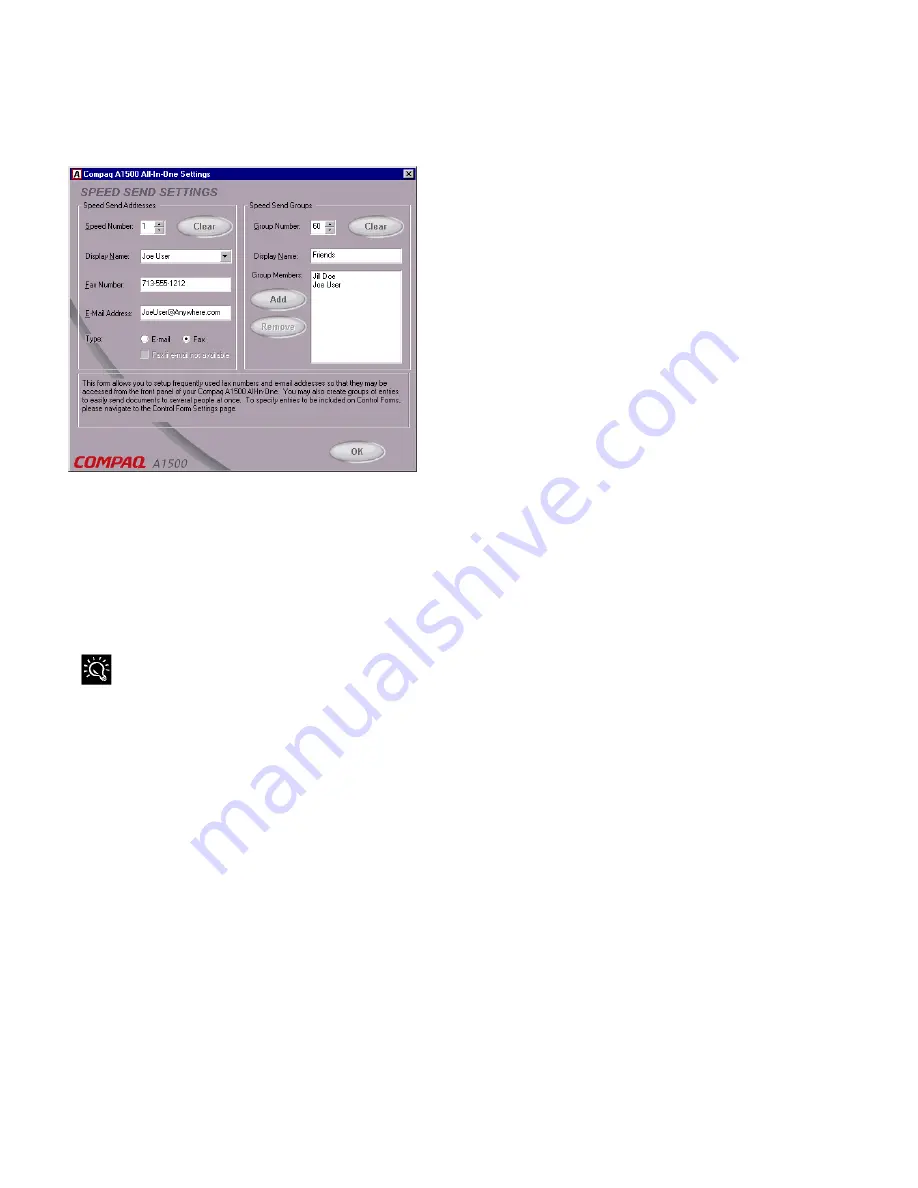
Speed Send Settings Window 

Your A1500 includes a Speed Send button (the # 
button). As the name implies, you can use this button 
to send faxes and emails quickly, to one person or to 
many people all at once. 

The Speed Send Settings window lets you maintain a 
list of fax numbers and email addresses. These are 
assigned to Speed Send numbers. 


To learn more about sending faxes and emails with the Speed 
Send button, see the 

Faxing

 chapter later in this manual. 


Speed Send Addresses 

You can store up to 59 individual names and numbers 
in your Speed Send list. Entries are numbered 1 to 59. 

Speed Number 

To store an entry, first select the number you wish to 
assign to that entry. This number will be used to send 
the fax later. The numbers do not have to be 
sequential, so you can pick numbers that are 
meaningful to you. 

Display Name 

Once you’ve chosen a number, give the entry a name. 
This name can be up to 14 characters, and will be 
displayed on the A1500 LCD panel. 

Fax Number 

If this person has a fax number, enter the number here. 
If you need to dial a number to access an outside line, 
be sure to include it. Use a comma or a “P” to pause 
the dialing. 

E-Mail Address 

If this person has an email address, enter it here. The 
A1500 can send faxes as email (see Type below). 

Sending a fax as an email requires a MAPI-enabled 
email program to be on your computer, such as 
Microsoft Outlook Express, an email account, and an 
internet connection. 

Type 

Chose whether faxes should be send as a normal fax, 
or as a fax via email. Use the checkbox to indicate you 
want the fax sent through normal means when the PC 
is not available for email. 

Clearing an Entry 

To clear an entry of all information, first select the 
speed send number you wish to clear and then press 
the 

Clear

 button. 

Selecting an Entry for Viewing or Editing 

There are three ways of selecting a Speed Send entry 
for viewing or editing: 

1.  Use the Speed Number. Type the number in the 

box, or scroll to it using the adjacent arrows. 

2.  Use the Display Name drop-down list. Click on 

the arrow to the right of the display name to 
display a listbox, then scroll to the name you wish 
to edit. 

3.  If the name is part of a group, simply double click 

on the name in the Group Members box to display 
the entry. 

Speed Send Groups 

You can create up to ten (10) Speed Send Groups. 
Group entries are numbered 60-69. 

Group Number 

To create a group, first select a group number. As with 
the individual entries, groups do not need to be 
sequential. 

Summary of Contents for Compaq A1500

Page 1: ...S WITH RECIPIENT IN NO EVENT SHALL COMPAQ BE LIABLE FOR ANY DIRECT CONSEQUENTIAL INCIDENTAL SPECIAL PUNITIVE OR OTHER DAMAGES WHATSOEVER INCLUDING WITHOUT LIMITATION DAMAGES FOR LOSS OF BUSINESS PROFITS BUSINESS INTERRUPTION OR LOSS OF BUSINESS INFORMATION EVEN IF COMPAQ HAS BEEN ADVISED OF THE POSSIBILITY OF SUCH DAMAGES THE FOREGOING SHALL APPLY REGARDLESS OF THE NEGLIGENCE OR OTHER FAULT OF EIT...

Page 2: ......

Page 3: ...ax Settings 25 Speed Send Settings 26 Copy Settings 27 Scan Settings 28 Control Form Settings 29 CONTROL FORM 31 Using the Control Form to Copy 32 Using the Control Form to Scan 32 Using the Control Form to Fax 32 PRINTING 33 Printing a Document 33 Changing the Printer Properties 33 Accessing the Control Program 34 FAXING 37 Preparing Documents for Faxing 37 Loading the Documents 37 Sending a Fax ...

Page 4: ......

Page 5: ...presents specific instructions commentary sidelights or interesting points of information CAUTION Text set off in this matter indicates that failure to follow directions could result in equipment damage or loss of information Locating Help Compaq provides you with several resources to help you learn about your Compaq A1500 A few of these resources are Basic Troubleshooting The Basic Troubleshootin...

Page 6: ...2 ...

Page 7: ...dge and 1 black cartridge 6 CD ROM contains the software drivers and application software required to operate the A1500 Not Shown One copy scan sleeve for faxing copying and scanning Protects photographs to be scanned Also allows you to scan irregular size paper Documentation provides the information required to set up operate and maintain the A1500 Your documentation also provides important safet...

Page 8: ...ms Tape Packing materials CAUTION For instructions on removing the packing material see the Compaq A1500 All In One setup poster Step 4 Set Up the Document Trays The A1500 uses several trays to support your paper documents Document Exit Tray To install the document exit tray 1 Align the latches on the tray with the slots on the front of the All In One 2 Slide the tray latches into the appropriate ...

Page 9: ... and Time in the Common Procedures chapter Compaq recommends that you leave the A1500 on at all times The A1500 goes into an energy saving mode when not in use However if you want to turn off the A1500 unplug the power cord Step 6 Install the Ink Cartridges 1 Lift the control panel by grabbing the panel along the top edge 2 Pull the control panel forward Lifting the control panel 3 Lift the ink ca...

Page 10: ...ures chapter of this guide for instructions on entering the alignment values Step 7 Connect the Telephone Line Cord This section shows you how to connect the telephone line cord to the A1500 You may also choose to add an extension telephone answering machine or computer modem If you have a single telephone line this allows you to use your telephone when you are not faxing For more information on c...

Page 11: ...er into the paper input tray you must change the default paper size Change the default paper size in the printer software and on the A1500 before printing on that paper See the Loading Different Sized Paper section of the Common Procedures chapter for instructions The software must be installed before the paper size may be set in the printer software Step 10 Connect the USB Printer Cable IMPORTANT...

Page 12: ......

Page 13: ... Paint etc Compaq A1500 Utilities The Compaq A1500 software allows you to control how you want to use your Compaq A1500 to print fax copy and scan With the utility software you can change your Compaq A1500 settings set your scanning applications enter your Speed Send lists and send faxes to email recipients You can also use the Compaq Control Form to automate common scanning copying and faxing tas...

Page 14: ...allation you MUST cancel the Add New Hardware wizard Windows detects that you have installed the Compaq A1500 and asks you for the Driver disk Select the Cancel button on the above dialog If you are starting Windows for the first time Windows asks you to select a printer Again select Cancel 4 Put the CD in the CD ROM drive The installation will start after a short period of time If the CD does not...

Page 15: ...e when pressed after the menu button 4 Stop Clear Halts an action or clears an incorrect value When multiple jobs are running use the Option button to select a job Press Stop to stop it or Start to let the job continue 5 Start Dial Begin a selected action such as faxing Press this button first for On Hook Dialing OHD 6 Form Feed Use to continue printing after reloading the paper tray when it runs ...

Page 16: ...12 Rear View Rear View Features 1 AC power cord connector 2 USB port top right 3 Extension EXT Line to telephone or answering machine 4 Telephone LINE to wall jack ...

Page 17: ...o to the appropriate chapter in this guide for example Faxing Copying or Scanning It is not necessary to have the A1500 Monitor Program running for any Print Copy or Scan operations initiated from your PC Once the printer is powered and connected to the PC by the USB cable and the software is installed the A1500 monitor program will start running when the system is powered up When the A1500 Monito...

Page 18: ... can automatically detect this condition and reset the date and time for you The date and time can be set from the computer using the Compaq A1500 Settings Utility or from the A1500 control panel Setting the Date and Time using the Settings Utility To change the date and time from the computer 1 Run the Compaq A1500 Settings Utility by clicking on the A1500 Monitor icon 2 Select the Fax button 3 S...

Page 19: ...nel 3 Press the Options button to select the log you want to print 4 Press the Start button to print the report Fax logs will be printed automatically if the Automatically print fax logs box is checked in the Advanced Fax Settings section of the A1500 Settings Utility Speed Send List The Speed Send List contains all of the current Speed Send names with their fax numbers and or email addresses To p...

Page 20: ...he control panel Press firmly on the top center of the control panel until it snaps into place 9 Click the button that indicates which cartridge is being installed If it is a new cartridge be sure to verify that the correct type is selected standard or high yield 10 Installing new cartridges requires an alignment check and an alignment pattern will automatically print Go to step 4 of Aligning Prin...

Page 21: ...Cartridges button The alignment test page will print and the Ink Cartridge Alignment dialog box will appear on your screen 4 Enter the alignment information 5 Depending on the cartridge combination you have installed on your printer the A1500 prints a test page with two or more alignment patterns similar to those shown below Each pattern has a number under it Your pattern may have more letters tha...

Page 22: ...he ink jet nozzles on the print cartridges improves the print quality There are several situations that can result in some of the nozzles not working properly If the cartridge is new it may take a couple of cleaning cycles to get all of the nozzles working If the printer has not been used for an extended period of time the cartridges may not function properly A build up of ink on the bottom of the...

Page 23: ...leaning the color print cartridge wipe the nozzles in one direction so the colors do not mix To dissolve dried ink hold a damp cloth against the nozzles for about three seconds Gently blot and wipe dry 1 Allow the copper colored area to dry 2 Reinstall the print cartridge and repeat the nozzle test Be sure that you select Old when re installing the cartridge This will ensure the current ink count ...

Page 24: ... drop down box 4 Close the Settings Utility Setting Paper Size using the Front Panel 1 Press Setup 2 Press the Menu button until the following message appears on the LCD panel 3 Press the Options button until the desired paper size appears on the LCD panel 4 Press Stop to return to the ready state The last paper size displayed is the size that will be used Setting the Paper Size for Computer Print...

Page 25: ...recommended after cleaning the document scanner See the Maintaining Your A1500 chapter in this guide To re initialize the scanner calibration complete the following steps 1 Place a clean white sheet of paper in the document input tray 2 Press Setup on the A1500 front control panel 3 Press the Menu button twice MAINTENANCE will appear in the top line 4 Press the Options button twice SCANNER INIT wi...

Page 26: ... feature for fax printing and standalone copy functions only The size of paper loaded into the paper input tray should always be selected here Ringer Volume Silent Low Mid High Select Silent for quiet fax reception When selected error tones are not generated Use these settings to adjust the ringer volume Fax Print Letter Quality Draft Quality Use Letter Quality for the best quality print Use Draft...

Page 27: ...ettings Utility There are a number of ways to access the A1500 Settings Utility From the Start button Click Start Programs Compaq A1500 All In One Compaq A1500 Settings Utility From the system tray left click on the A1500 Monitor icon as shown below From the system tray right click on the A1500 Monitor icon and select A1500 Settings from the menu that appears The A1500 Monitor Right Click Menu Mai...

Page 28: ...ion Print Quality When a fax is received it will be printed using draft or letter quality If you receive a lot of junk faxes you should use the Draft setting to reduce the amount of ink used Fax Contrast Lighten or darken your faxes with Fax Contrast Receive Mode The Receive mode controls how your fax answers incoming calls See the Faxing chapter later in this manual for a full description of the ...

Page 29: ...n the paper in your input tray Instead of printing a small amount of useless information on another page you can discard it Use the discard slider to set the amount of data you are willing to discard Fax Forwarding If you will be away from your home or office you can have your faxes forwarded to you while you are gone To have the A1500 forward your faxes select Forward or to forward your faxes and...

Page 30: ...e to include it Use a comma or a P to pause the dialing E Mail Address If this person has an email address enter it here The A1500 can send faxes as email see Type below Sending a fax as an email requires a MAPI enabled email program to be on your computer such as Microsoft Outlook Express an email account and an internet connection Type Chose whether faxes should be send as a normal fax or as a f...

Page 31: ...he people in your Speed Send list use group 70 Copy Settings The Copy Settings window controls how the A1500 makes copies Copy Type By default the A1500 makes normal resolution black and white copies You can change the default copy type to three different black settings and three different color settings Choose the type of copy you expect to usually make Copy Contrast The Copy Contrast setting con...

Page 32: ... used for Emails Your documents will be scanned converted by ReadIRIS and then placed into the body of your email message You can select a different default file type or change the file type when you scan Your scanned files will be attached to the email message Once scanned your email program will be run You can then select recipients from your email address book add a subject and type a message B...

Page 33: ...Form section later in this guide Speed Send Entries This box will list all of the Speed Send entries you currently have defined You must first set up your speed send list before you can add any entries to the Control Form See the Speed Send Settings section earlier in this chapter for help From List A Control Form supports up to eight 8 Fax From entries The From box displays the speed send entries...

Page 34: ......

Page 35: ...heck the scan box to store a scanned image on your hard drive in the format of your choice Check applicable boxes in the FAX section to automatically send a document to any previously defined Speed Send entry in the Control Form Check a combination of Fax Copy and Scan boxes on the Compaq Control Form to perform several operations at once Printing a Control From To print a Control From make sure t...

Page 36: ...section The FROM entry is used to show who the fax is from When sending a traditional fax this shows up on the cover page For a fax sent as email the FROM entry is used to enter the reply to email address Usually you check only one FROM box The TO entries determine who the fax is sent to Check the box next to each person s name Each person will receive a traditional fax or a fax sent as email depe...

Page 37: ... a print job looks such as page size paper orientation and margins Settings changed in the software application will override settings made in the printer driver The printer driver includes many of the settings mentioned above in case your software does not include them It also includes settings that determine how your printer will operate Changes you make to the printer properties from within an ...

Page 38: ... your document will be on top of the stack in the paper exit tray If you choose to collate your document multiple copies of a multi page document will be printed such that the documents are grouped together rather than the pages Document Quality The Document Quality tab controls the paper type such as plan coated and glossy It also controls the quality resolution of the printing Higher resolutions...

Page 39: ...arts and enabling or disabling sound effects Cartridges The Cartridges tab gives you access to several different cartridge functions From here you can install new cartridges change them clean your print nozzles align your cartridges or order supplies from the internet About The About tab provides you with additional information regarding the Control Program and the printer driver This is where you...

Page 40: ......

Page 41: ...cked paper Coated or glossy paper CAUTION Do not feed anything thicker than a normal sheet of paper into the scanner even if you use the Copy Scan Sleeve You cannot scan credit cards a driver s license etc Doing so will damage your sleeve and the A1500 Loading the Documents 1 Place the document s to be faxed face down and top down in the document input tray 2 Adjust the document guides to match th...

Page 42: ...or documents where color is important Note that large files will be generated resulting in the longest transmission times When color faxes are sent to a fax machine that does not support color they will be printed in black and white Fax Resolution Standard Use when the originals are black text or line art This mode provides the fastest fax speed but resolution is 203 x 98 dpi Standard is only avai...

Page 43: ...e preferred method of transmission To send a fax as email you must have an internet account and connection a valid email address and an email program that supports MAPI such as Microsoft Outlook Outlook Express Eudora etc Your fax pages will be sent as JPEG images attached to your email If the PC is not available but the entry has both fax and email addresses the fax number will be used If an emai...

Page 44: ...omputer using the A1500 Settings Utility or by pressing the Setup button on the front control panel While you are printing from the computer to the All In One an incoming fax will be received into memory The memory can store up to 80 pages However other tasks such as copying or sending a fax may temporarily reduce the amount of memory available Receiving Automatically in FAX Mode In FAX mode the A...

Page 45: ...l Panel To set up Fax Forwarding using the Control Panel 1 Press the Setup button 2 Press the Menu button until FAX FORWARDING appears 3 Press the Option button until FORWARD appears If you want to print a copy of the fax and forward it too press Option until PRINT FORWARD appears Press Start 4 Enter the fax number you wish to forward your faxes to Press Start 5 Enter the starting month day hour a...

Page 46: ...as described above and view the Advanced Fax settings page Using the Compaq Control Form to Fax You can use the Compaq Control Form to fax documents See the Compaq A1500 Settings Utility section for instructions on setting up your list of Fax FROM and Fax TO lists 1 Press the Control Form button A copy of the Control Form will print Default settings are identified with a triangle next to the setti...

Page 47: ...eeve and the A1500 Loading the Documents 1 Place the document s to be copied face down and top down in the document input tray If you are using the Copy Scan Sleeve place it top down the top is the closed end and clear side down 2 Adjust the document guides to match the width of the document if necessary 3 Slide the document down into the tray until the machine grips the first sheet The LCD panel ...

Page 48: ...aft but the resolution is better Black Photo Use Black Photo when the originals are photos or have color content Black Photo is faster than the color settings but it prints in grayscale Color Draft Use Color Draft to make quick color copies Color Normal Use Color Normal to make color copies with a better resolution than Color Draft Color Best Use Color Best to make color copies with the best quali...

Page 49: ...e Copy Scan Sleeve You cannot scan credit cards a driver s license etc Doing so will damage your sleeve and the A1500 Loading the Documents 1 Place the document s to be scanned face down and top down in the document input tray If you are using the Copy Scan Sleeve place it top down the top is the closed end and clear side down 2 Adjust the document guides to match the width of the document if nece...

Page 50: ...o the RTF format for word processing Or scan to a program like Media Browser and upload your images to the internet See the section Scan Settings in the Using the A1500 Settings Utility chapter for information on setting up your Scan To list To quickly perform a scan using the default settings simply load the documents enter the Scan To number and press the Scan button Scanning with the Computer T...

Page 51: ...d when the originals are photos or have color content Black Photo is slower than Black Normal but it captures grayscale information Color Draft This is the fastest color scan but the resolution is reduced Color Normal Used when you want a better quality color scan This is slower than Color Draft Color Best The best quality color scan This is slower than Color Normal and the slowest scan possible S...

Page 52: ......

Page 53: ... the scanner See Calibrating the Scanner in the Common Procedures chapter for more information Removing the white roller Cleaning the Cartridge Carrier If the ink cartridge is not printing from some nozzles as indicated on the test page the cartridge carrier contacts may need cleaning See Cleaning Print Cartridges in the Common Procedures chapter for more information 1 Lift the control panel by pu...

Page 54: ......

Page 55: ...ivities reducing the possibility of fax corruption Telephones When a telephone is connected directly or through an answering machine to the EXT connection on the A1500 you can instruct the A1500 to receive an incoming fax Press 9 star nine star if you pick up the handset and hear a fax tone A telephone connected to the EXT connection will not interfere with Fax transactions when it is off hook If ...

Page 56: ...cate a line to a specific function For example with two telephone lines you can fax and browse the Internet at the same time Devices and Connections This section describes four ways to connect the A1500 to a single telephone line with other equipment Additional equipment connected to other lines is not shown Find the Diagram that shows the devices that you wish to connect to the same telephone lin...

Page 57: ...The A1500 answers the learned ring pattern on 2 rings Make sure that the Answering Machine is set to answer after 4 or more rings if it does not recognize DRPD patterns C A1500 Computer Modem Internal or External and Telephone Telephone Telephone Wall Jack PC Modem A1500 Fax Receive Mode Selections Mode Selection Description FAX Receives faxes automatically Use if computer modem is not set up to a...

Page 58: ...utomatically The answering machine will answer the call and the A1500 will listen for fax tones It will intercept the call if fax tones are detected Set the answering machine to answer in 1 or less rings The A1500 will pick up after 6 rings The computer modem should be disabled from answering calls DRPD The A1500 answers the learned ring pattern on 2 rings Make sure that the computer modem is set ...

Page 59: ...ms 1 Open the front control panel 2 Carefully remove the jammed document Be sure to remove the entire document to prevent the jam from reoccurring 3 Ensure that the document input tray is clear 4 Close the control panel firmly until it clicks into place 5 Retry Clearing a Paper Jam Paper may get jammed in the printer exit If a paper jam occurs the following message displays on the LCD panel If you...

Page 60: ...se incoming faxes CLR DOCUMENT JAM A document jam or a very long document was scanned Open the cover and remove document or jam REMOVE PAPER JAM THEN PRESS CLEAR Paper jam occurred in printer paper path Clear paper jam then press CLEAR STOP See Clear Paper Jam instructions MEMORY TO PRINT A copy collate or incoming fax is in memory while the printer is busy A copy job will complete when printer be...

Page 61: ...EMORY FULL TO CONTINUE START Memory Full occurred after the first page of a document has been scanned into memory Press START and the A1500 will send completely stored pages Current and remaining pages will not be sent Pressing STOP CLEAR will cancel the job NO LINE CONNECTION beep warning tone and return to READY state Phone line disconnected while trying to send a fax Check the phone line connec...

Page 62: ... AVAILABLE displayed on the LCD panel with a beep warning tone and return to READY state Computer is not available for a copy task that required computer assistance multiple photo or color copies Verify that the computer is connected and available Make sure the cables are connected the computer is on and not in sleep mode Retry when the computer is available ADD PAPER THEN PRESS FORM FEED Making c...

Page 63: ...el port is in use by another task Verify that the computer is connected and available Wait for resource to become free then try again CLR DOCUMENT JAM A document jam or a very long document was scanned Open the cover and remove document or jam DOCUMENT OUT PLEASE WAIT Pressing STOP after document is loaded Wait for all document s in the document input tray to be fed to the document output tray PC ...

Page 64: ...d paper into the paper input tray CHANGE BLACK INK Trying to print a Control Form but Smart Ink has determined that the ink cartridge is empty Replace Black ink cartridge Replacing the Black ink cartridge and selecting NEW BLACK CARTRIDGE will reset the ink counting system Note that if you keep the old cartridge installed and tell the system you have installed new cartridges you may get some more ...

Page 65: ... see if there is paper in the paper input tray Insufficient memory to receive fax See Memory To Print Memory Full in Fax Messages Faxes can not be received manually Press START twice on the A1500 control panel or 9 on the EXT phone before you hang up the handset The machine will not send a fax Make sure the document is loaded face down Check the machine you are sending to for problems Incoming fax...

Page 66: ...do not have hard coded spaces at the left margin in your application The print cartridge may need to be cleaned See Cleaning Print Cartridges section The print cartridge may need to be aligned See Aligning Print Cartridges section Vertical straight lines in tables borders and graphs are not smooth The print cartridge may need to be aligned See Aligning Print Cartridges section The print cartridge ...

Page 67: ...wly You may be using High print quality Adjust your Print Quality settings to NORMAL or DRAFT Graphics print more slowly than text Color prints more slowly than black Special media prints more slowly than plain paper If printing in black make sure the photo cartridge is not installed Open applications affect print speed Close other running programs if they are not required The Control Panel does n...

Page 68: ... the paper input tray Load paper of only one type size and weight Do not force paper down into the printer when loading If multiple sheets have caused a paper jam clear the paper jam Paper skews or buckles in the paper bin Make sure there is not too much paper in the paper input tray Make sure the paper guide does not push the paper and cause it to bow Make sure you are using the correct type of p...

Page 69: ...y and push it down until the A1500 grips the document Scanner is busy receiving or printing data When the current job is completed try again message appears on the screen Your scanner may be busy with a copying or faxing job When the current job is completed try again The scanner driver is not installed or an operation environment is not set up properly Reinstall the scanner driver and try again m...

Page 70: ...d that any changes or modifications made to this device that are not expressly approved by Compaq Computer Corporation may void the user s authority to operate the equipment Cables Connections to this device must be made with shielded cables with metallic RFI EMI connector hoods in order to maintain compliance with FCC Rules and Regulations Declaration Of Conformity For Products Marked With The FC...

Page 71: ...is equipment complies with Part 68 of the FCC rules Located on the rear of the Compaq A1500 All In One is a label that contains among other information the FCC Registration Number and Ringer Equivalence Number REN for this equipment Upon request you must provide this information to your telephone company Ringer Equivalence Number The REN is useful to determine the quantity of devices you may conne...

Page 72: ...y the user to this equipment or equipment malfunctions may give the telecommunications company cause to request the user to disconnect the equipment Users should ensure for their own protection that the electrical ground connections of the power utility telephone lines and internal metallic water pipe system if present are connected together This precaution may be particularly important in rural a...

Page 73: ...trician to replace the obsolete outlet Power Sources The product should be operated only from the type of power source indicated on the product s electrical ratings label If you have questions about the type of power source to use contact your Compaq authorized service provider or local power company For a product that operates from battery power or other power sources refer to the operating instr...

Page 74: ...to the product have your Compaq authorized service provider perform safety checks to determine that the product is in proper operating condition Options and Upgrades Use only the options and upgrades recommended by Compaq Object Entry Never push a foreign object through an opening in the product Precautions for Products with Modems Telecommunications or Local Area Network Options In addition to th...

Page 75: ...bon Paper 37 43 45 Cartridge Carrier Cleaning 49 Cartridges 35 Aligning 17 35 Changing 16 Cleaning 18 19 35 Installing 5 Ordering 35 Photo 3 19 CD Installing 9 10 Changing Cartridges 16 Default Settings 23 Paper Sizes 20 Checks 37 43 45 Choosing Location for A1500 4 Cleaning Cartridge Carrier 49 Cartridges 18 19 35 Scanner 49 Clear button 11 Clearing Paper Jams 55 Coated Paper 37 43 44 45 Collate ...

Page 76: ...e Fax 25 Document Exit Tray 3 11 Input Guides 11 Input Tray 11 Installing Trays 4 Jams while Printing 55 Misfeeds 49 Printing 33 Replacing Separator Pad 49 Trays 4 Documents Fragile 37 43 45 Preparing to Copy 43 Preparing to Fax 37 Preparing to Scan 45 DRPD 22 40 41 52 53 54 57 Defined 40 DSL 51 E ECM See Error Correction Mode Electromagnetic Interference Compliance Notices 66 Email Scanning to 28...

Page 77: ...imated 13 Monitor Program 13 23 Red X 13 ID Fax 24 Illustrated Connecting Phone Line 6 Connecting the Power Cord 5 Connecting the Printer Cable 7 Front View 11 Inserting Paper 7 Installing 6 Lifting 5 Rear View 12 Side View 12 Wiping Cartridge 19 Imaging for Windows 46 Ink Buildup Correcting 18 Ink Cartridges See Cartridges Installing Cartridges 5 CD 9 10 Document Trays 4 Photo Cartridge 19 Softwa...

Page 78: ...ing with A1500 51 Photo Cartridge 3 Installing 19 Photographs 37 43 45 Posters 34 Power Cord 5 Safety 67 Print Quality 34 Print Problems Document Jam 55 Quality 62 Print Quality Fax 22 24 Printer Attaching Cable 7 Cable 3 Control Program 34 Defaults 33 Driver Description 9 Job Finishing 33 Options 35 Properties 24 33 Settings 33 Status 34 Printing Booklets 34 Control Form 29 31 Document 33 Fax Dat...

Page 79: ... Preparing Documents 45 Problems 65 Quick Mode 45 46 Setting Menu Entries 28 Settings 28 Type 29 47 using Control Form 32 46 Scan button 11 Scan Menu Number of Entries 28 Scanner Calibrating 21 Cleaning 49 Maintenance 49 Vertical Streaks 21 Driver Description 9 Scanning Advanced 47 Faxes to Memory 25 How To 45 to Applications 28 46 to Email 28 45 to User Folder 28 45 Self Test 15 Printing 22 Sendi...

Page 80: ...s of Printer 34 Stop button 11 Streaks Fixing 21 Support 1 Telephone 1 Supported File Formats 28 System Requirements 9 System Tray Menu 23 Red X 13 T Tape Removing 4 TEL 53 54 Telephone Connection 12 Sharing with A1500 51 Telephone Cord Connecting 6 Terminal ID Printing 25 Test Self 15 Thin Documents 37 43 45 Time Setting 14 25 To Entries Control Form 29 Torn Paper 37 43 45 Tranmission Log Printin...

Page 81: ...Index 7 V Vertical Streaks Scanner 21 Volume Ringer 25 Speaker 25 W Web Site 1 Wiping Cartridges 19 Wrinkled Paper 37 43 45 ...

Reviews: