


25
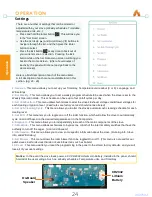
Settings Continued
Ignite On Time
(24 hour clock / Military time displayed)
Fire Off Time
(24 hour clock / Military time displayed)
Desired Temperature
Use Line Item
(Yes / No)
2: Set Weekly
-
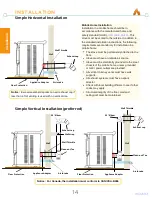
This menu allows you to set up a weekly run
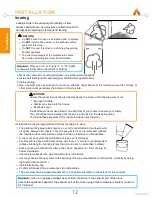
schedule for your stove
(for each day)
, and will have four
independent time blocks. Each block will have the following:
1.
2.
3.
4.
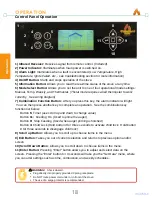
Press the Enter button to highlight the Day, press the Up or Down buttons to select the Day you wish to
edit, and then press Enter again to confirm your selection.
Press the Down button to move the cursor arrow down to your first program block.
Press the Enter button to highlight the "Ignite On time" Hour block, press the Up or Down buttons to
change the value, then press Enter again to confirm and highlight the "Ignite On time" minute block. Use
the Up and Down buttons to edit the value. Press Enter to confirm, and highlight the next block.
Press the Enter button to highlight the "Fire Off time" Hour block, press the Up or Down buttons to change
the value, then press Enter again to confirm and highlight the "Fire Off time" minute block. Use the Up and
Down buttons to edit the value. Press Enter to confirm, and highlight the next block.
Note: The earliest time you can turn the stove on is 00:00
(Midnight)
and the latest time you can turn the
stove off is 23:30
(11:30pm)
*This forces a minimum 30 minute shutdown between 23:30 and Midnight the
next day.
Press the Up and Down buttons to select the desired temperature while the stove is running.
(61°F - 82°F)
and press Enter to select and highlight the last block.
Use the Up and Down arrows to select either Yes or No.
(Yes means to use this line, No means to ignore
this line.)
Press the Enter button again to confirm.
Repeat this process for lines 2 - 4 as desired to set up your weekly schedule.
To replicate the same program for every day of the week, scroll up to the ALL item at the top right, and
press the Enter button twice. (The panel will beep twice to indicate that the program was copied to all days
of the week)
Operation
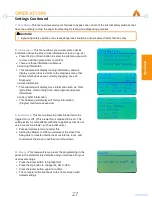
3: Set Combustion
-
This menu is reserved for authorized personnel to make changes as needed, on an
individual basis.
This menu is password protected to prevent creating a potentially dangerous situation.
Only Comfortbilt authorized dealers, repair technicians, or technical support representatives can alter
any combustion settings.
Temperature Units:
Press Enter to highlight. Use the Up and Down buttons to change between
temperature units
(C or F)
and then press Enter to confirm your selection.
Language: Press Enter to highlight. Use the Up and Down buttons to select your desired language, then
press Enter to confirm your selection.
Wifi Reset / On: Press Enter to highlight either the Reset or On option, press the Up or Down button to
change the value, and then press Enter again to confirm your selection.
(This option is reserved for future
expansion for a wifi adapter, that is not built into the control panel.)
Time and Day
Temperature Units
Language
Wifi Reset / On
Time and Day: Press Enter to select and highlight the block
you wish to edit, use the Up and Down buttons to change the
value, and then press Enter again to lock in your edits and
highlight the next block.
1: General
-
This menu has four internal settings.
1.
2.
3.
4.
Operation
Summary of Contents for HP22N
Page 2: ......
Page 38: ...Schedules Repairs Date Work Done Date Work Done...
Page 39: ...Schedules Repairs Date Work Done Date Work Done...


