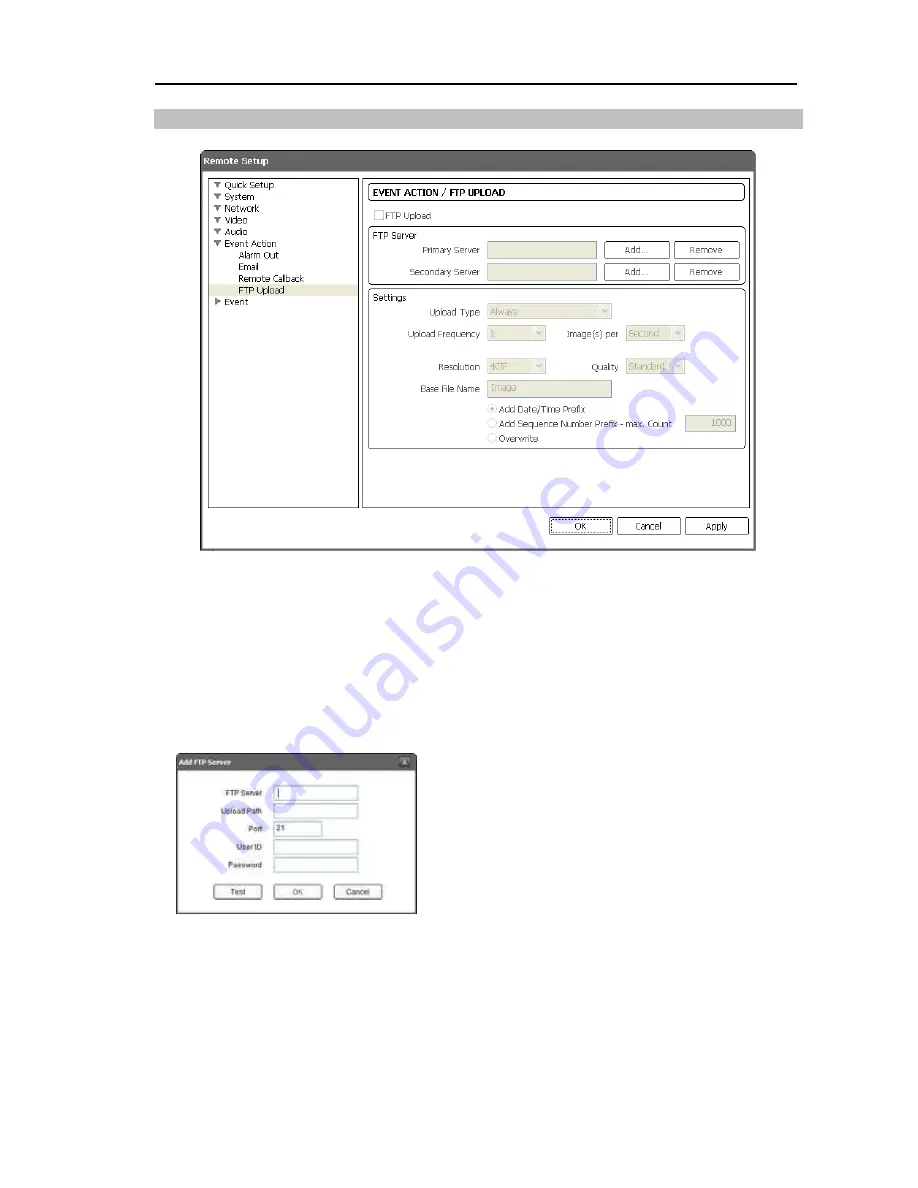
Comelit IPPTZ710A User Manual Download Page 33

Network Camera 

27 


 FTP Upload  


Check the 

FTP Upload 

box to upload event detected images in JPEG file format to an ftp 

server. 


FTP Server

: Click the 

Add 

button to register an ftp server.  Clicking the 

Remove 

button 

deletes the registered ftp server.  When an event is detected, the event detected images 
will be uploaded in JPEG file format to the ftp server registered as a primary server.  If 
images fail to be uploaded to the primary server, they are uploaded to the secondary server 
until uploading to the secondary server fails. 


   FTP Server

: Enter the IP address (or domain name) 

of the ftp server. 

   Upload Path

: Enter the folder path to upload files. 

It is not allowed to include the special characters 
(

\ # * | : " < > ?

) in the folder path. 

   Port

: Enter the port number of the ftp server. 

   User ID

Password

: Enter the user ID and password 

for the connection to the ftp server. 


Click the 

Test 

button to check the connection to the ftp server with the information set above. 

When the test succeeds, click the 

OK 

button. 


Settings

: Set up the image and upload settings for ftp upload. 


Upload Type

: Select the upload type.  When the upload type is set to 

Always

, images 

will be uploaded to the ftp server according to the settings below regardless of the event 
detection.  When the upload type is set to 

Event

, images will be uploaded to the ftp 

server according to the settings below when events are detected. 

Summary of Contents for IPPTZ710A

Page 1: ...F NETWORK CAMERA ART IPPTZ710A Please read this manual thoroughly before use and keep for future reference Via Don Arrigoni 5 24020 Rovetta S Lorenzo Bergamo http www comelitgroup com e mail export de...

Page 2: ......

Page 3: ...tion We are not responsible for any problems resulting from the use thereof The information contained herein is subject to change without notice Revisions or new editions to this publication may be is...

Page 4: ...tlets and extension cords as this can result in the risk of fire or electric shock 11 Objects and Liquids Never push objects of any kind through openings of this equipment as they may touch dangerous...

Page 5: ...strated Parts List 4 Cable Assembly 5 Factory Reset 6 2 3 Mounting 7 Chapter 3 Remote Setup 8 3 1 Quick Setup 9 3 2 System 9 General 9 Date Time 10 User Group 11 3 3 Network 12 IP Address 12 DVRNS 13...

Page 6: ...Module Setup 35 4 1 Function 36 Home Function 36 Preset 37 Pattern 37 Scan 38 Tour 39 4 2 Screen 40 Privacy Zone 40 North Direction 41 Zone Title 42 Camera Title 42 OSD Display 43 4 3 Camera 44 4 4 S...

Page 7: ...k recording Remote monitoring via web browser or remote software Automatic HTML code generation for webcasting on a user s website Up to 10 simultaneous connections to the camera for remote monitoring...

Page 8: ...User s Manual 2 1 3 Typical Applications Remote Monitoring Remote Recording...

Page 9: ...Network Camera 3 Webcasting...

Page 10: ...ASplus and iNEX Basic software iNEX Basic User s Manual User s Manuals Camera INIT RASplus Mount Kits 2 2 Illustrated Parts List Dome Cover Body Body Top Side View Body Bottom Side View 1 Waterproof P...

Page 11: ...cord video by running remote programs RASplus or iNEX Basic or a web browser Refer to the INIT User s Manual for details about network connection setup 5 RS485 Wires Peel the sheath of the wires and c...

Page 12: ...O NOT OVERLOAD THE CIRCUIT BY PLUGGING TOO MANY DEVICES INTO ONE CIRCUIT Factory Reset This switch will only be used on the rare occasions that you want to return all the settings to the original fact...

Page 13: ...se the mounting template sheet provided with the camera 2 Screw the dome cover to the bottom cover 3 Connect external devices network and power adapter 4 Apply power NOTE You might need to reinforce t...

Page 14: ...screen by selecting a camera clicking the right mouse button and selecting Remote Setup on the Main screen NOTE You can also change the settings by using remote programs RASplus or iNEX Basic or a we...

Page 15: ...import or export all settings and add users or groups General Language Choose the language to be used during remote setup Name Enter the camera name up to 31 characters including spaces Note Enter ad...

Page 16: ...the network settings Export Setup Click to save the current camera settings as a dat file format A setup screen appears allowing you to name the setup file NOTES The Load Default Setup and Import Set...

Page 17: ...st be set up properly when setting Network DVRNS User Group User Group Click the buttons to change the settings for a group or a user allowed controlling the camera remotely Add Group Click to add a g...

Page 18: ...l brightness contrast hue and saturation for cameras PTZ Control The user can control PTZ Pan Tilt Zoom Alarm Out Control The user can reset the output during an alarm System Check The user can view a...

Page 19: ...ll be issued a new IP address automatically DNS Server Enter the IP address of the DNS server If you set up the DNS server the domain name of the server can be used instead of the IP address during th...

Page 20: ...settings in the INIT program for the camera should match the settings registered on the DVRNS server Any changes on the DVRNS server might cause improper operation When LAN settings are changed set up...

Page 21: ...ra uses a NAT Network Address Translation device for network connection The UPnP function must also be enabled in the NAT device for this function to work Refer to the NAT device User s Manual for det...

Page 22: ...too When using the HTTPS protocol the ONVIF protocol might not work Bandwidth Control You can control the network bandwidth by limiting the network bandwidth depending on the network traffic Check th...

Page 23: ...data from the camera by using the SSL Secure Sockets Layer protocol When using the SSL function the camera cannot be connected with a program or a system that does not support the SSL function Remote...

Page 24: ...ngs Sets up EAP Extensible Authentication Protocol EAP Type Select the type of authentication to be used for network connection authentication The authentication type must be identical to the authenti...

Page 25: ...mera Assign an RS485 ID to the PTZ camera NOTE When you control a PTZ camera via RS485 connection the control device should be connected to the RS485 port properly See Chapter 2 Installation 2 2 Illus...

Page 26: ...solution Set the resolution of images for streaming A maximum of 4CTF resolution is supported and the resolution of the secondary stream cannot exceed that of the primary stream Quality Set up the qua...

Page 27: ...stream live video from the camera to a website Copy the HTML Code displayed on the screen and paste it in your web page code NOTE To use the webcasting service you must check the Allow Anonymous Logi...

Page 28: ...cted The frame rate of the secondary stream cannot exceed that of the primary stream and the frame rates supported for the secondary stream change depending on the frame rate of the primary stream The...

Page 29: ...io in Audio In Audio CODEC Select an audio codec Input Check the box to enable audio in and select the proper audio in device You can also adjust the volume 3 6 Event Action You can set up event actio...

Page 30: ...box to activate alarm out Dwell Time Select the alarm out dwell time An alarm out is activated for the preset dwell time after detecting an event Schedule Set up the period to enable alarm out An alar...

Page 31: ...main name instead of the IP address if you set up the DNS server when setting up the network Select Use SSL TLS if the SMTP server requires SSL Secure Sockets Layer authentication Authentication Enter...

Page 32: ...ox to send a callback message to remote systems Not supported for the WebGuard program IP Address Port Enter the IP addresses and port numbers of the remote systems to send a message Retry Select the...

Page 33: ...p server Upload Path Enter the folder path to upload files It is not allowed to include the special characters in the folder path Port Enter the port number of the ftp server User ID Password Enter th...

Page 34: ...Name Enter the common file name of the images to be uploaded to the ftp server and select the option to distinguish each image file It is not allowed to include the special characters in the file name...

Page 35: ...ail Check the box to send an email Selecting Image Attachment attaches an event detected image file JPG to the email Remote Callback Check the box and select the remote systems to send a message Not s...

Page 36: ...elect or Clear Click to select or clear a block for motion detection You can select or clear the several blocks of an area using the mouse dragging Motion Ignoring Interval Select the motion ignoring...

Page 37: ...me it considers it as an event Sensitivity Set the audio sensitivity Activation Time Adjust the duration that audio should last to be considered as an audio in event The camera will not consider any a...

Page 38: ...setting them up to enable event actions Refer to 3 6 Event Action Video Blind Check the Video Blind box to set up a video blind event When the camera detects that more than 70 of a camera is blinded...

Page 39: ...with a very noisy image especially when set for low Sensitivity values You must properly configure the settings related to each event action when setting them up to enable event actions Refer to 3 6 E...

Page 40: ...status Remote Callback Check the box and select the remote systems to send a message when there is no change of alarm in event status Not supported for the WebGuard program NOTE You must properly conf...

Page 41: ...ton and select On and the MAIN MENU is overlapped on the screen See the following explanation for details Move to Origin Selecting a number in the No list and clicking the button while setting up each...

Page 42: ...n The menu predefines a function to run when the PTZ camera is not controlled for the preset time FUNCTIONS HOME FUNCTION HOME FUNCTION PRESET PATTERN SCAN FUNCTION NUMBER TIME OPERATION DISABLE TOUR...

Page 43: ...M Manual B BLC Select O enable or X disable TITLE Enters a preset name by using the Zoom Focus or Direction icons Clicking the Enter or ESc button in the PTZ Advanced Menu screen saves or cancels the...

Page 44: ...clicking the Zoom icon 4 Move the camera in the desired path 5 Save the current path by clicking the Focus icon 6 Enter the title by using the Zoom icon 7 Move to the SAVE AND EXIT menu and click the...

Page 45: ...xxxxxxx Indicates the Tour number max 4 and name max 16 characters FUNC Sets a function to be executed PRST Preset PTRN Pattern max 8 NO Sets the function number to be executed Selecting a number in t...

Page 46: ...ws Preset 02 Preset 03 Preset 05 Preset 06 Preset 05 Preset 07 Pattern 01 Repeat Tour 04 in Tour 02 will be skipped in Tour 01 Tour 02 executes as follows Preset 05 Preset 06 Preset 08 Preset 05 Patte...

Page 47: ...oes not display video at all in the camera screen while the camera moves the area SAVE AND EXIT Saves the change and exits the menu 2 Move to the desired number and enter the Edit mode by clicking the...

Page 48: ...the zone title name Clicking the Enter or ESc button in the PTZ Advanced Menu screen saves or cancels the entering START END Sets the starting and ending position of the angle Starting position Ending...

Page 49: ...U OSD DISPLAY FUNCTION TITLE CAMERA TITLE ZONE TITLE NORTH DIRECTION DOME POSITION DOME ID ZOOM MAGNIFICATION EXIT MENU ON ON ON ON ON ON ON FUNCTION TITLE Enables or disables to display the Preset Pa...

Page 50: ...ormal use EXPOSURE SETUP Adjusts the exposure of images BRIGHT Adjusts the brightness IRIS Adjusts the IRIS automatically or manually IRIS VALUE Adjusts the IRIS value when the camera is set up to adj...

Page 51: ...when using the Direction icons and moving the camera manually PRESET FREEZE Pauses the previous image until the preset action is complete You cannot monitor video while the camera is moving to the Pr...

Page 52: ...camera name The DVRNS server address and the camera name registered on the DVRNS server NOTES Enter https instead of http if you have checked the Use HTTPS box during the WebGuard port number setup Cl...

Page 53: ...ed when using the Microsoft Windows Vista or later operating system In this situation it is recommended that you disable the Auto Tuning capability of your computer Run the Command Prompt with elevate...

Page 54: ...s a list of events that were detected in the camera Alarm In On Off Motion Detection Video Blind Audio Detection Screen Popup Menu Clicking the right mouse button on the screen displays the screen pop...

Page 55: ...Web Watch mode does not affect the camera name set up on the camera Leaving the Camera Title blank causes the camera name set up on the camera to display Aspect Ratio Half Size x0 5 to Aspect Ratio t...

Page 56: ...User s Manual Appendix Map of Screens Remote Setup 50...

Page 57: ...nection to the INIT program is not available because of wrong ID and password If you lost the administrator ID and password do a factory reset and customize all settings all over again The factory res...

Page 58: ...only 0 3A 125 VAC 1A 30 VDC Network Connectivity 10 100 Mbps Ethernet CONNECTORS Video Output BNC Audio In RCA Alarm In Out Wire Ethernet Port RJ 45 RS 485 Serial Port Wire GENERAL Dimensions x H 5 7...

Reviews: