background image

- 3 -

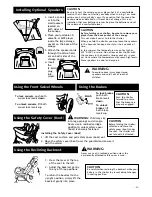
  Attaching the Canopy

Attaching the Canopy

1. Confirm the canopy is facing in the proper direction.
2. Fully insert the canopy holder (male) to the canopy holder 

(female) until a click is heard.

3. Fasten the canopy velcro on both sides around the handles 

to the seat back velcro (2 places.)

Removing the Canopy

Pull the velcro apart and squeeze the bottom of the canopy 
holder (male). Lift the canopy until it releases from the female 
holder.

CAUTION

Failure to fully secure the canopy holders can cause the holders to 
bend. When storing the stroller by laying it down, be sure the cano-
py is off the ground to prevent it from bending.

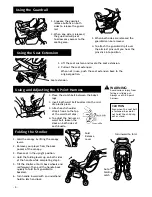
  Opening the Stroller

2. Grip the handle on each side  

and turn outward to open fully. 

3. Lift up the handle and snap 

the stroller away from you. 

Holding the  
handle from 
underneath will 
make it easier.

Lift up

Snap 

away

Auto
folding 
latch

  Attaching & Removing the Front Swivel Wheels

   Place front swivel wheel 

assembly on the swivel 
shaft.  The assembly is 
secure when it locks onto 
the shaft.

Removing the Swivel Wheels

Press in the square button located 
at the bottom of the wheel holder 
while pulling the assembly off of 
the swivel shaft.

Release Button

  Attaching the Rear Wheels

1. Stand behind the stroller.

2. Locate the small chrome pin on 

each rear stroller leg.

3. Locate the small opening on 

each rear wheel assembly.

4. Insert the leg into the wheel 

assembly until the small silver 
pin locks into the opening.

Note:  
Attach the rear wheel assemblies to 
each stroller leg with the wheel spacer 
facing inward.

Summary of Contents for Ultra Savvy PM

Page 1: ...wivel Lock Lever Back of Seat Rear Wheel x2 Front Wheel x2 Standard Guardrail 17 Infant Car Seat Carrier Locks 18 Travel System Guardrail 19 Perfect Match Guardrail Warranty Card Instruction Manual Ultra Savvy TS PM Stroller 2740 Series Instruction Manual Combi USA Inc 1962 HWY 160 W Suite 100 Fort Mill SC 29708 www combi intl com Consumer Affairs 1 800 992 6624 Be sure to carefully read this inst...

Page 2: ...tions personal injury or damage to the stroller 2 Completely remove all plastic bags and packing materials before using this product to prevent a possible choking hazard 3 Push the stroller at a normal walking speed only WARNING Excessive weight in basket or items placed in basket which overflow the top or side of basket may cause a hazardous condition to exist WARNING Do not load more than 11 lbs...

Page 3: ...le on each side and turn outward to open fully 3 Lift up the handle and snap the stroller away from you Holding the handle from underneath will make it easier Lift up Snap away Auto folding latch Attaching Removing the Front Swivel Wheels Place front swivel wheel assembly on the swivel shaft The assembly is secure when it locks onto the shaft Removing the Swivel Wheels Press in the square button l...

Page 4: ...r cords through the Velcro hold ers on both sides of the storage pocket 4 Insert the 2 8mm plug into player CAUTION Be sure to test the volume on your player Set it at a comfortable level so that it does not startle your baby when turning it on Loud volume can hurt your baby s ears If you notice that the sound has become weak or distorted or if tracks do not change this is an indication that your ...

Page 5: ...folding levers up on both sides of the handle while completing step 5 5 Tilt the stroller onto its back wheels and roll forward Then pull the handle back quickly to fold front guardrail to backrest 6 Turn handle inward with an underhand hold to latch and lock Fold Release Lever Auto Folding Latch Turn inward to fold Using the Seat Extension 1 Lift the seat cushion and locate the seat extension 2 P...

Page 6: ...ng Attaching the Seat Cushion CAUTION If seat cushion is ripped or torn do not use Do not use the stroller without the seat cushion Removing 1 Unbuckle the 5 point har ness and pull all the straps through the seat cushion 2 Grasp the seat cushion at the top and unfasten from the velcro Attaching 1 Pass the 5 point harness waist belt straps through the appropriate locations of the seat cushion 2 Fa...

Page 7: ...Pull on each side of Travel System Guardrail to make sure that it is completely attached ATTACHING THE TRAVEL SYSTEM GUARDRAIL 3 Lock the V slot of the Combi Infant Car Seat Carrier over the Travel System Guardrail 4 Rotate until the foot end of Combi Infant Car Seat Carrier locks into the Infant Car Seat Carrier Locks located on each side of the handle 5 Be certain that the Combi Infant Car Seat ...

Page 8: ...l 2 Lift up the front end of the Combi Infant Car Seat Carrier to release from the Carrier Locks located on either side of the handle 1 Locate the release lever and pull upward to unlock the back of the Combi Infant Car Seat Carrier from the Travel System Guardrail ...

Page 9: ...ssure safety for the baby please refer to Combi s instruc tions for use with your Combi Infant Car Seat Carrier If unable to securely attach Combi s Infant Car Seat Carrier using the Travel System Guardrail discontinue use and contact Combi Consumer Affairs Do not carry stroller by using Combi s Infant Car Seat Carrier handle Discontinue use if damage is noted on the Travel System Guardrail or the...

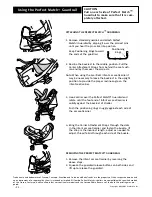
Page 10: ...ie Bauer as of the date this printing was prepared Copyright May 2004 Combi USA Inc WARNINGS When infant car seat carrier is in the stroller always fasten the Carrier Attachment Straps The Perfect Match Guardrail is only to be used when attaching infant car seat carri ers Do not use for any other purpose To assure safety for the baby please refer to the manufac turer s instructions for use of your...

Page 11: ...r the armrests Note When using the Evenflo infant car seat carrier it may be necessary to leave the backrest in the upright position to provide the proper recline angle on the infant seat carrier 3 Hook carrier over the Perfect Match Guardrail and rotate until the foot end of infant car seat carrier is solidly against the backrest of stroller Push the positioning rings snuggly against each side of...

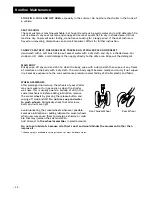
Page 12: ...k that the brakes are not in the locked position Clean and add silicone to wheels if necessary DIFFICULT TO GET UP CURBS Pulling stroller backward makes going up a curb difficult and could pose a safety hazard Pull the handle up to lift the rear wheels onto the curb then pull the stroller backward until the front wheels clear DIFFICULT GOING DOWN CURBS Turn stroller around bringing rear wheels tow...

Page 13: ...out any traces of moisture on the body with a dry cloth The main body might become moldy and musty if not wiped dry Excessive exposure to the sun could cause premature color fading of stroller plastic and fabric WHEEL ASSEMBLIES After prolonged normal use the wheels of your stroller may not swivel or turn as easily as when the stroller was new This is usually due to a buildup of dirt in the swivel...

Page 14: ... 14 ...

Page 15: ... 15 ...

Page 16: ...ight sides 20 00 set 12 Front Swivel Wheel Assemblies left and right sides 20 00 set Amount of Order ADD Shipping Handling Sales Tax 6 SC residents only Total 0105 Located near the rear right leg If you need to order other parts for your stroller please call us toll free at 1 800 992 6624 Shipping and Handling Fees Add 8 00 for orders 34 99 and under Add 13 00 for orders 35 00 and over Note Additi...

Reviews: