background image

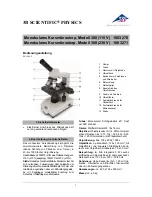
Preparing the microscope for use 

Carefully remove the items from its packaging and place them on a flat, firm surface. Please do not expose the 
microscope to direct sunlight, high temperatures, damp, dust or acute shakes. Make sure the table or surface is flat and 
horizontal

When moving the microscope, use the left hand to hold the transport handle and hold the base of the microscope 
with the right hand

Caution! 

Hold the microscope at the top of the stand 

arm when it is moved. Holding the microscope by its 
stage or focusing knobs will damage the microscope

 Caution! 

If the bacterial solution or water splashes over 

the stage, objective or head, pull out the power cord 
immediately and dry the microscope 

Assembling steps 

We always try to keep the number of assembly steps as low as possible but in some cases there are some steps to be 
taken. The steps mentioned below are often not necessary but described for your convenience nonetheless 

Mounting the objectives 

• 

 Rotate the coarse focusing knob to lower the stage to its lowest position 

• 

 Install the objectives into the objective nosepiece from the lowest magnification to the highest in a clockwise 
direction from the rear side of the microscope. When using the microscope, start using the low magnification 
objective (4X or 10X) to bring your specimen into focus and then continue with a high magnification objective 
to observe 

Placing the eyepieces 

• 

 Remove the cover of the eyepiece tube 

• 

 Insert the eyepiece into the eyepiece tube 

• 

 Lock the eyepieces with an Allen wrench 

8

Summary of Contents for 78904-00

Page 1: ...Installation and Operating Instructions MSU 200 Series Compound Microscope Model 78904 00...

Page 2: ...___________________________________________11 The field K hler diaphragm_____________________________________________________________________11 Adjusting the aperture diaphragm _______________________...

Page 3: ...cover glass never comes in direct contact with the microscope parts In that case prevention of contamination lies in the handling of the slides as long as the slides are decontaminated before use and...

Page 4: ...sed disinfection products for laboratories Before returning a microscope for repair or maintenance through a Cole Parmer dealer an RMA return authorization form together with a decontamination stateme...

Page 5: ...between 5 to 40 C and humidity should be within 20 to 80 RH Although the system is anti mold treated installing this product in a hot humid location may still result in the formation of mold or conde...

Page 6: ...and the slide The Numeric Aperture N A of the objective is an indication for the resolving power of the objective The total magnification can be calculated by multiplying the magnification of the eye...

Page 7: ...Safety device J Revolving nosepiece for 4 objectives C Tension adjustment K Objectives D Coaxial coarse and fine adjustment L Object stages mechanical stage or clips E On Off switch not visible M Cond...

Page 8: ...cord immediately and dry the microscope Assembling steps We always try to keep the number of assembly steps as low as possible but in some cases there are some steps to be taken The steps mentioned b...

Page 9: ...ied by Cole Parmer If it is lost or damaged choose one with the same specifications Replacement of the Power Cord If the power cord requires replacement ensure that it is suitably rated If in doubt co...

Page 10: ...to heavy according to your own preference Please note that when the specimen leaves the focus plane after focusing or the stage declines out of its own then you need to adjust the tension To tighten...

Page 11: ...ecimen 3 Rotate the field diaphragm adjustment ring to put the field diaphragm to the smallest position 4 Adjust the condenser to get the sharpest image 5 Adjust the center adjustment screw and center...

Page 12: ...per that is moistened with a drop of isopropanol 13 Clean the slide after use as well Caution Never put a drop of xylol or alcohol directly on the lens of the objective It may enter the objective and...

Page 13: ...ve the fuse compartment To do so insert a flat head screwdriver between the metal power tines and gently pry the fuse compartment loose with a slight downward and outward motion Insert the new fuse in...

Page 14: ...___________________________________________________ ___________________________________________________________________________________________________ ________________________________________________...

Page 15: ...15...

Page 16: ...2022 Cole Parmer Instrument Company LLC Toll free 1 800 323 4340 Phone 1 847 549 7600 Fax 1 847 247 2929 coleparmer com 1065Y62_M_CP_MSU 200_Series_Compound Microscope_Manual...

Reviews: