background image


PAGE  7

CODEX USER GUIDE - 

CODEX XL-SERIES 

27.07.17

•  Primary colour correction - play back, adjust and apply LUTs and CDL looks in Vault Review.
•  Synchronise audio, either with timecode or manually.
•  Add Quality Control (QC) notes and create PDF QC reports.
•  Transcode to common deliverable formats such as ProRes, DNxHR/DNxHD, DCP and H264 with LUTs, CDL, burn-ins  

  and masks.
•  VFS (Virtual File System) for fast, flexible and powerful deliverables creation.
•  Framings to allow customisable extraction of ‘region of interest’ from source image into deliverables.
•  Archive to disk or LTFS tape with md5 verification.

9. Loading and unloading media

Following the correct procedures for loading and unloading media is very important. Failure to do so may result in damage 

to the media and compromise data integrity.

Media will be unloaded automatically when the XL-Series is shut down.

WARNING: Do not unload media when it is reading or writing.

9.1. Transfer Drive

Loading –

 with the handle on the Transfer Drive lifted, gently insert it fully into the port on the front of the XL-Series. Lower 

the handle to lock the Transfer Drive in place and the loading process will begin. During this time the LED next to the 

Transfer Drive will flash blue. When the Transfer Drive has loaded the LED will turn green.

Unloading –

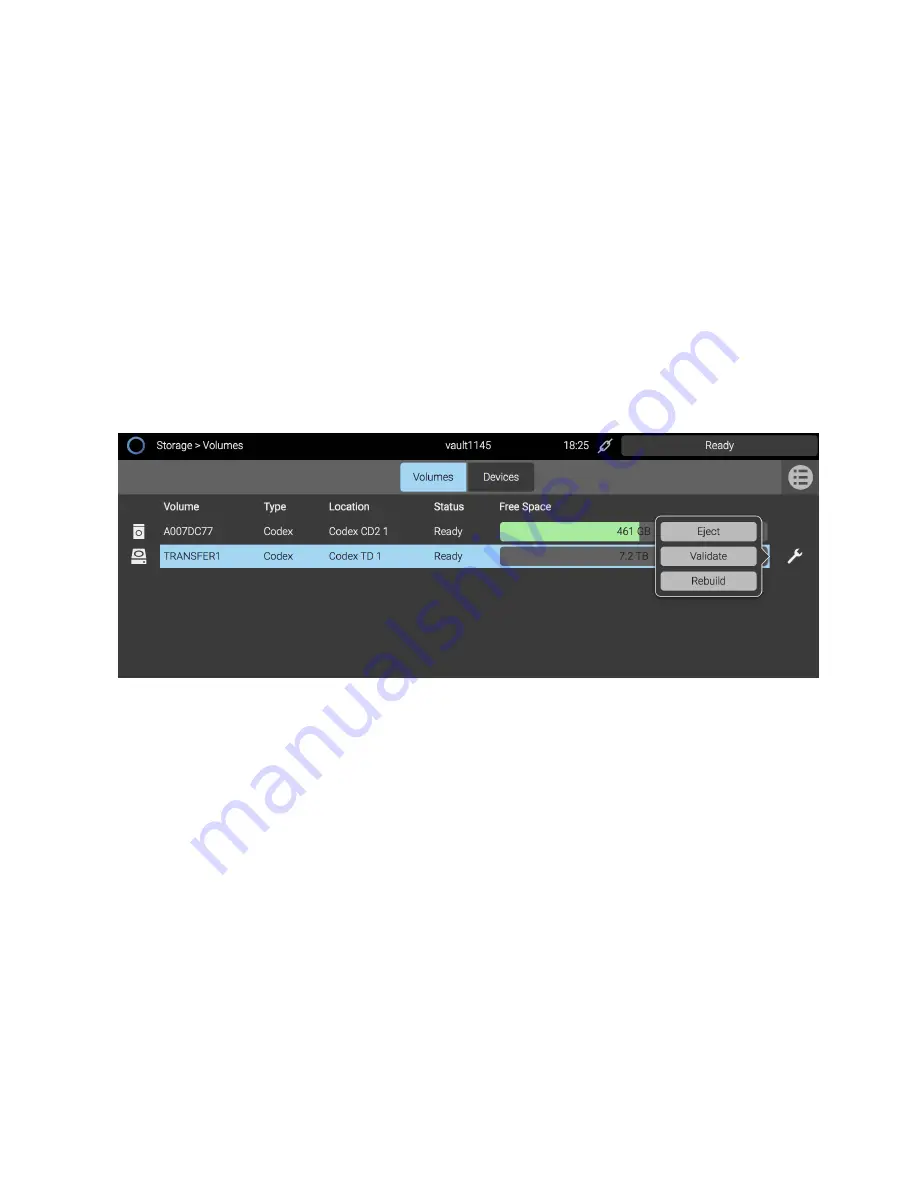
 go to the Storage screen of the software, select the Transfer Drive (“Codex TD 1”). Click the Wrench symbol, 

and then click Eject. While unloading the LED next to the Transfer Drive will flash blue, and become solid blue when 

unloading is complete. Push the locking latch to the left, then raise the handle on the Transfer Drive and pull gently to 

remove it from the XL-Series.

An alternate unloading method is to push the locking latch to the left, and raise the handle slightly. This will trigger the 

unload sequence. Wait until the LED stops flashing and becomes solid blue, then raise the handle fully and pull gently to 

remove the Transfer Drive.

9.2. Capture Drive

Loading –

 gently insert the Capture Drive fully into the port on the front of the XL-Series. The loading process will begin, 

and during this time the LED on the Capture Drive will flash blue. When the Capture Drive has loaded the LED will turn off.

Reading/writing -

 when the Capture Drive is reading or writing, the LED will be green.

Unloading –

 go to the Storage screen of the software, select the Capture Drive (“Codex CD2 1”). Click the Wrench symbol, 

and then click Eject. While unloading the LED on the Capture Drive will flash blue, and become solid blue when unloading 

is complete. Pull the Capture Drive gently to remove it from the XL-Series.

Summary of Contents for XL-SERIES

Page 1: ...PAGE 1 CODEX USER GUIDE CODEX XL SERIES 27 07 17 USER GUIDE CODEX XL SERIES 27 JULY 2017...

Page 2: ...ed to be error free Codex does not assume responsibility for issues or losses due to misinterpretation of the information in this document errors in this document or incorrect configuration or install...

Page 3: ...ogging In 6 8 Codex Production Suite 6 9 Loading and unloading media 7 9 1 Transfer Drive 7 9 2 Capture Drive 7 9 3 External Drives 8 10 Formatting the Transfer Drive 8 11 Network Setup 9 12 Network S...

Page 4: ...latest CodexOS operating system Some features detailed in the guide are not available in the previous Fedora based operating system 2 Product Diagrams 2 1 Front LOCKING LEVER TRANSFER DRIVE PORT POWER...

Page 5: ...ear of the machine is set to On Press the Power Button on the front panel to start the machine The boot up process is complete when the attached monitor displays the Login screen At the bottom left of...

Page 6: ...to 60fps depending on the video format setting The output setting can be changed when Codex Production Suite has clips loaded in Vault Review For full instructions on using Vault Review see the Codex...

Page 7: ...r Drive will flash blue When the Transfer Drive has loaded the LED will turn green Unloading go to the Storage screen of the software select the Transfer Drive Codex TD 1 Click the Wrench symbol and t...

Page 8: ...eries successfully 10 Formatting the Transfer Drive A Transfer Drive can be formatted with either a RAID 3 Codex or RAID 5 XFS filesystem The option selected will determine which types of material can...

Page 9: ...that if one disk has a problem the data will not be compromised When a RAID 5 XFS filesystem is created it can be used immediately but the parity information takes several hours to build During this...

Page 10: ...area of Production Suite SMB user codex pw codex ro user root pw codex rw codexuser This share contains folders for User luts burnins and filecards Copy files here to use in Production Suite SMB user...

Page 11: ...shown Open the Vault Platform software on the Mac At the Login screen click the icon Enter the network IP address of the XL Series and click OK Click Login to access the XL Series Note only one User...

Page 12: ...edia history From the same Preferences screen select Clear media history This will remove the record of media names used on the last project and prevent warnings being shown if a media name on the new...

Page 13: ...erables Jobs and VFS This is where the XL Series is configured for your workflow Refer to the Codex Production Suite User Guide for full details on the options available and how to configure the syste...

Page 14: ...s the Preferences area and cannot delete clips in the Library 15 Remote Connection TeamViewer From the Main Menu click Preferences and then click the System tab There is a Remote Connection section cl...

Page 15: ...r support line 44 7985 467 665 CODEX 60 POLAND STREET LONDON ENGLAND W1F 7NT UK TEL 44 203 7000 999 CODEX ONLINE INFO CODEX ONLINE Codex reserve the right to alter the specification at any time and wi...

Reviews: