background image


10 


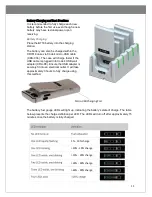
Inserting Batteries into the Charger 

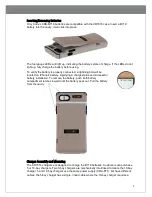
The B718 batteries can only be inserted one direction. Ensure the metal contacts on the 
battery meet with the metal contacts within the charger.  

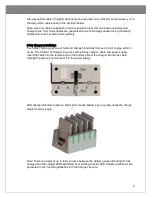
LED indicators and meaning: 

1.  Blinking 

– battery is charging  

2.  Solid 

– battery is fully charged  

3.  Colorless 

– there is no battery present or, if a battery is inserted, a fault may have 

occurred. If a battery is securely inserted into the charger, and the LEDs do not light 
up, try reinserting the battery or insert it into a different bay to verify if the issue 
resides with the battery or the charger bay.   

Note: The charger LEDs may take up to 5 seconds to respond after inserting a battery.   

Vertical Mount  

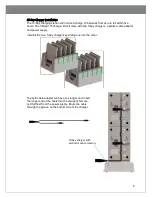
The 5 or 10-bay charging stations can be used in conjunction with the vertical mount 
accessory. The vertical mount accessory uses the same mechanical interlinking system as 
the 5 and 10-bay chargers. Simply slide the chargers into the vertical mount to secure. To 
see how this is done, watch the 

CR7018 Completely Sealed Battery Backup Case for 

Healthcare

 video.  


Wall Mount  

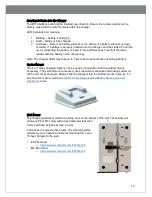
The charging stations maintain mounting slots on the bottom of the unit. These slots will 
allow any #6 or M3 screw with a head diameter less than 
9 mm and head height less than 2.5 mm.  

Code does not provide these tools. The following URLs 
will direct you to options suitable for mounting the 5 and 
10-bay chargers to the wall.  

•  #6 Pan Head  

o


https://www.mcmaster.com/90272a148


•  M3 Pan Head  

o


https://www.mcmaster.com/92005a122


Summary of Contents for CR7018

Page 1: ...MANUAL VERSION 01 RELEASE DATE MARCH 2019 iPhone is a registered trademark of Apple Inc Dragontrail is a trademark of Asahi Glass Limited D032263 CR7018 User Manual ...

Page 2: ...ans on the go The DragonTrail glass screen provides another layer of quality for the highest level of protection on the market Easily swappable batteries keep your case running as long as you are Don t wait for your device to charge again unless that s how you prefer to use it of course Made for enterprises the CR7018 product ecosystem provides a durable protective case flexible charging methods a...

Page 3: ...d Installation 4 Inserting iPhone 4 Inserting Removing Batteries 7 Charger Assembly and Mounting 7 Battery Charging and Best Practices 11 Maintenance and Troubleshooting 12 Approved Disinfectants 12 Routine Cleaning and Disinfection 12 Troubleshooting 12 Contact Code for Support 12 Warranty 13 Legal Disclaimer 13 Statement of Agency Compliance 14 ...

Page 4: ...ower Supply CRA A175 CR7018 10 Bay Charging Station and 3 3 Amp US Power Supply CRA A176 Code Reader Accessory for CR7018 Charger Upgrade Package Split Cable Adapter 5 Bay Battery Charging Station Cables Part Number Description CRA C34 Straight cable for CR7018 USB to Micro USB 3 ft 1 m CRA C70 Split Cable Adapter Accessories Part Number Description CRA B718 CR7018 Battery CRA VM718 Vertical Mount...

Page 5: ... houses Apple s iPhone 7 and 8 models Please note that the top plate will vary depending on the iPhone model The CR7018 case will arrive with the top and bottom carriage connected With a thumb on the right and left side of the speaker opening push up approximately 5 millimeters to clear the lightning connector iPhone 7 top plate with fitted insert iPhone 8 top plate ...

Page 6: ...OT try to slide it all the way up Before inserting the iPhone thoroughly clean the iPhone screen and both sides of the glass screen protector Screen responsiveness will be hindered if the screens are dirty Insert the iPhone into the top plate it will click into place ...

Page 7: ...ning connector and seal the case Do NOT try to slide it down from the top Your CR7018 case will come with two screws and a 1 3 mm hex key For larger deployments it is recommended to procure a specialized tool for quick assembly Insert the screws to secure phone and case The following URLs will direct you to recommended tools for installing the provided screws Ultra Grip Screwdriver o https www mcm...

Page 8: ... iPhone s battery signifying a charge status and successful battery installation To remove the battery push both battery compartment latches inward until the battery pops out Pull the battery from the cavity Charger Assembly and Mounting The CR7018 chargers are designed to charge the B718 batteries Customers can purchase 5 or 10 bay chargers Two 5 bay chargers are mechanically interlinked to creat...

Page 9: ... batteries from zero to full charge within 3 hours The CRA A172 charger kit comes with a 5 bay charger cable and power supply Insert the cable into the female port on the bottom side of the charger Route the cable through the grooves and connect it to the power supply LED charge indicators reside on both sides of each battery bay to quickly check the charge status from any angle Note There is a de...

Page 10: ...ay chargers a splitter cable adapter and power supply Interlink the two 5 bay chargers by sliding one into the other The split cable adapter will have one longer end Insert the longer end of the cable into the charger s female port furthest from the power supply Route the cable through the groove on the bottom side of the charger 10 bay charger with vertical mount accessory ...

Page 11: ...spond after inserting a battery Vertical Mount The 5 or 10 bay charging stations can be used in conjunction with the vertical mount accessory The vertical mount accessory uses the same mechanical interlinking system as the 5 and 10 bay chargers Simply slide the chargers into the vertical mount to secure To see how this is done watch the CR7018 Completely Sealed Battery Backup Case for Healthcare v...

Page 12: ... case will charge faster if the USB cable is plugged into Code s USB wall adapter CRA P4 Ensure the USB adapter is securely fit into an electrical outlet It will take approximately 3 hours to fully charge using this method The battery fuel gauge LEDs will light up indicating the battery s state of charge The table below presents the charge definition per LED The LEDs will turn off after approximat...

Page 13: ...background For maximum battery usage exit unneeded applications and dim the screen to approximately 75 For long term storage or shipping remove the battery from the case Maintenance and Troubleshooting Approved Disinfectants Please review the approved disinfectants Routine Cleaning and Disinfection The iPhone screen and screen protector should be kept clean to maintain device responsiveness Thorou...

Page 14: ... from the furnishing performance or use of this material Code Corporation does not assume any product liability arising out of or in connection with the application or use of any product or application described herein NO LICENSE No license is granted either by implication estoppel or otherwise under any intellectual property rights of Code Corporation Any use of hardware software and or technolog...

Page 15: ...he following measures Reorient or relocate the receiving antenna Increase the separation between the equipment and receiver Connect the equipment into an outlet on a circuit different from that to which the receiver is connected Consult the dealer or an experienced radio TV technician for help Industry Canada IC This device complies with Industry Canada licence exempt RSS standard s Operation is s...

Reviews: