background image

Seite 5 von 6

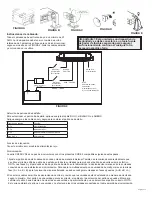
MUSTER AUSWÄHLEN

EIN - FARBE 2

AUS
EIN - FARBE 1

Auswahl des Leuchtmusters(ZIGARETTENADAPTER):

Summary of Contents for CD5051VDL Series

Page 1: ...artment doors people vehicles or other obstructions 6 The use of this or any other warning device does not ensure all drivers can or will observe or react to a warning signal Never take the right of w...

Page 2: ...Once desired angle is achieved gently tighten the fastener using a 10mm wrench or socket 8 Clean mounting surface with supplied alcohol wipe for extra adhesion see notes below 9 Remove the second adhe...

Page 3: ...kets 3 Install each suction cup to each bracket using the existing screws as shown on Figure D 4 Insert bracket as shown on Figure B 5 Clean mounting surface with supplied alcohol wipe 6 Apply the pro...

Page 4: ...le of syncing with other compatible CODE 3 products by following these steps 1 Set the desired flash pattern on each unit individually It is also strongly recommended that the same style of flash patt...

Page 5: ...C N C N C N C N C N C N C N C N C 33 Double Flash Simultaneous Color 2 A 120 Class 1 Class 1 Class 1 Class 1 N C N C N C N C N C N C N C N C 34 Double Flash Simultaneous Color 2 B 120 Class 1 Class 1...

Page 6: ...PPLY TO THE PRODUCT BUYER S SOLE AND EXCLUSIVE REMEDY IN CONTRACT TORT OR UNDER ANY OTHER THEORY AGAINST MANUFACTURER REGARDING THE PRODUCT AND ITS USE SHALL BE THE REPLACEMENT OR REPAIR OF THE PRODUC...

Page 7: ...tivo de advertencia no garantiza que los conductores puedan respetar la se al de alarma o reaccionar ante ella o vayan a hacerlo Nunca d por hecho que tiene prioridad de paso Es responsabilidad del op...

Page 8: ...miento del adhesivo sujete el producto en la ubicaci n deseada Afloje y apriete con la mano la tuerca seg n sea necesario para ajustar el ngulo del cabezal de luz Una vez que logre el ngulo deseado ap...

Page 9: ...que se muestran en la Figure A 2 Retire las ventosas de los soportes de montaje de la cubierta 3 Instale cada ventosa en cada soporte con los tornillos existentes como se muestra en la Figure D 4 Inse...

Page 10: ...s cables azul y negro para cambiar el patr n de destello Funci n de atenuaci n Conecte el cable azul al cable de alimentaci n rojo Sincronizaci n La serie CD5051VDL es capaz de sincronizarse con otros...

Page 11: ...P gina 5 de 6 SELECCIONAR PATR N ENCENDIDO COLOR 2 APAGADO ENCENDIDO COLOR 1 Selecci n de patr n de parpadeo Adaptador de cigarrillos...

Page 12: ...N CUALQUIER SUPUESTO EN CONTRA DEL FABRICANTE RESPECTO AL PRODUCTO Y SU USO SER EL REEMPLAZO O LA REPARACI N DEL PRODUCTO O EL REEMBOLSO DEL PRECIO DE COMPRA PAGADO QUE HAYA PAGADO EL COMPRADOR POR E...

Page 13: ...utilisation de ce dispositif ou de tout autre dispositif d avertissement ne garantit pas que tous les conducteurs seront attentifs aux signaux ou qu ils r agiront cons quemment un signal d urgence Ne...

Page 14: ...SANS retirer le deuxi me film adh sif maintenir le produit l emplacement souhait Desserrer et serrer la main l crou selon les besoins pour r gler l angle de la t te d clairage Une fois l angle souhait...

Page 15: ...ue ventouse sur chaque support l aide des vis existantes comme indiqu la Figure D 4 Ins rer le support comme indiqu la Figure B 5 Nettoyez la surface de montage avec la lingette base d alcool fournie...

Page 16: ...fil d alimentation rouge Synchronisation La s rie CD5051VDL est capable de se synchroniser avec d autres produits CODE 3 compatibles en suivant ces tapes 1 R gler le sch ma de clignotement souhait sur...

Page 17: ...Page 5 sur 6 S LECTION DE MOD LE ON COULEUR 2 DE ON COULEUR 1 S lection du mod le de clignotement ADAPTATEUR CIGARETTE...

Page 18: ...SELON TOUTE AUTRE TH ORIE EN CE QUI CONCERNE LE PRODUIT ET SON UTILISATION SE LIMITERONT LA DISCR TION DU FABRICANT AU REMPLACEMENT OU LA R PARATION DU PRODUIT OU AU REMBOURSEMENT DU PRIX D ACHAT PAY...

Page 19: ...n Personen Fahrzeuge oder andere Hindernisse blockiert wird 6 Durch die Verwendung dieser oder anderer Warnvorrichtungen kann nicht gew hrleistet werden dass alle Verkehrsteilnehmer das Notfallwarnsig...

Page 20: ...tter vorsichtig mit einem 10 mm Schrauben oder Sechskantschl ssel an 8 Reinigen Sie die Montagefl che mit dem mitgelieferten alkoholgetr nkten Tuch F r zus tzliche Haftung siehe Hinweise unten 9 Entfe...

Page 21: ...gn pfe wie in Abb D dargestellt an den Halterungen mit den vorhandenen Schrauben 4 Bringen Sie die Halterung wie in Abb B dargestellt an 5 Reinigen Sie die Montagefl che mit dem mitgelieferten alkohol...

Page 22: ...g Die CD5051VDL Serie kann mithilfe der folgenden Schritte mit anderen kompatiblen CODE 3 Produkten synchronisiert werden 1 Stellen Sie das gew nschte Leuchtmuster f r jedes Ger t einzeln ein Es wird...

Page 23: ...Seite 5 von 6 MUSTER AUSW HLEN EIN FARBE 2 AUS EIN FARBE 1 Auswahl des Leuchtmusters ZIGARETTENADAPTER...

Page 24: ...WENDUNG BESTEHEN NACH ERMESSEN VON DER HERSTELLER IM ERSATZ ODER IN DER REPARATUR DES PRODUKTES ODER IN DER R CKERSTATTUNG DES KAUFPREISES DEN DER K UFER F R DAS NICHT KONFORME PRODUKT BEZAHLT HAT UNT...

Reviews: