MANUALE INSTALLAZIONE
GLOBE 3100
4
INTRODUZIONE
Questo manuale contiene tutte le informazioni relative alle operazioni che sono richieste per installare
il sistema di allarme e per configurarlo come richiesto dal cliente e/o dalle disposizioni normative
del Vostro Paese. Per la descrizione delle singole funzioni fare riferimento al manuale utente.
Dovrà essere Vostra cura indicare sul manuale utente la programmazione eseguita.
Ribadiamo che la descrizione delle singole funzioni è riportata nel manuale utente, mentre in
questo manuale sono riportate alcune note cui fare riferimento durante l’installazione.
Elenco delle funzioni standard (non programmabili)
Di seguito sono elencate le caratteristiche funzionali principali dell’allarme, che non è
possibile attivare/disattivare e personalizzare.
• Inserimento/disinserimento per mezzo di radiocomandi a codice dinamico.
• Protezione volumetrica dell’abitacolo con sensore ad ultrasuoni che non necessita di
regolazioni della sensibilità.
• Protezione perimetrica. Ad allarme inserito, dopo 40 s., la sirena suona se una porta, il
cofano o il baule viene aperto.
• Protezione da tentativi di avviamento. Ad allarme inserito il motore è bloccato ed il tentativo
di avviamento genera allarme.
• Quando si verifica un allarme la sirena suona per 30 s. ad una potenza maggiore di 115 dB
(@ 1 m). Gli indicatori di direzione lampeggiano.
• Comando del sistema originale di chiusura centralizzata di porte e baule.
• LED di indicazione dello stato del sistema con funzione di memoria avvenuti allarmi
• Segnalazione batteria del radiocomando scarica
• Un circuito di sicurezza impedisce l’inserimento del sistema a motore in moto.
• Allarme panico
• Esclusione ultrasuoni e/o di un eventuale sensore esterno da radiocomando
• Autoapprendimento di radiocomandi
• Disinserimento di emergenza con pin-code
• Protezione taglio cavi
• Funzione garage
Elenco delle funzioni base (programmabili)
Sono le funzioni che richiedono di essere programmate in funzione del modello di vettura e
delle modalità di funzionamento dell’allarme desiderate.
Fate riferimento alla TABELLA FUNZIONI BASE delle tavole di programmazione.
• Tempo chiusure centralizzate
• Chiusura vetri confort controllata
• Segnalazione porte/cofano/baule aperti
• Blinker inserimento/disinserimento
• Inserimento automatico allarme
• Inserimento automatico antiavviamento
• Allarme antiavviamento
GLOBE 3100
FITTING INSTRUCTION
25
mod. 7777
A
B
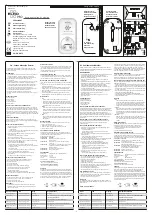
Carry out the test operations in the indicated
sequence.
FUNCTIONAL TEST OF THE
PERIMETRIC PROTECTION
Insert a hand into the passenger
compartment and wave it about,
in the areas you want to test, if
the sensor is working correctly
the LED will stop flashing while
it detects movement.
Arm the system pressing "A" button
of the radio control. Verify that in the
passengers compartment there is no
moving obiect. Close doors, bonnet
and boot leaving two windows
opened by around 10 cm..
Rearm the alarm and slap the
windows with the palm of your
hand. The LED must continue to
flash, uninterupted.
Disarm the alarm pressing "A"
button and close the windows.
Wait 40 s..
Open a door with the key.
The siren will sound and the turn
indicators will flash.
Close the door.
Arm the alarm by pressing button
A button of the radio control. The
turn indicators will flash twice, the
buzzer will beep twice (if
activated).
The doors will lock.
The LED will flash.
Disarm the alarm by pressing
button A on the radio control.
The turn indicators will flash four
times (alarm memory).
The doors will unlock and the LED
will switch to flashing the alarm
memory display.
FUNCTIONAL TEST FOR THE
VOLUMETRIC ULTRASONIC SENSOR
(IF FORESEEN)
mod. 7779
A
B
Repeat the test for the other
doors, bonnet and boot.
Carry out the test operations in the indicated
sequence. An alarm status will be generated
(siren and blinker) once this time has elapsed.