M03I40M7-03 15/11/07
page
25
START-UP
ALL THE EQUIPMENT MUST BE COMMISSIONED BY AUTHORISED SERVICE CENTRES.
THIS SERVICE IS LIMITED TO START-UP OF THE UNIT ONLY AND NOT THE CONNECTIONS OR INSTALLATION OF
THE SYSTEM.
ONLY QUALIFIED TECHNICIANS MUST PERFORM THE FOLLOWING OPERATIONS.
PRELIMINARY CHECKS
Before checking, please verify the following
1. the unit should be installed properly and in conformity
with this manual.
2. the electrical power supply line should be sectioned at
the beginning.
3. the sectioning device is locked and the proper warning
“not to operate” sign is placed on the handle.
4. make sure no tension is present
REFRIGERANT SYSTEM
Carefully check the refrigerating circuit: the presence of oil
stains can mean leakage caused by transportation,
movements or other).
Open the cocks of the refrigerator circuit, if there are any.
Using the unit manometers, if present, or service
manometers, verify that the refrigerating circuit is in
pressure.
Make sure that all the service outlets are closed with proper
caps; if caps are not present a leak of refrigerant can be
possible.
WATER SYSTEM
Ensure that the plumbing system has been washed. Drain
the wash water before connecting the unit to the system.
Check that the water circuit has been filled and pressurised.
Perform a seal check at max. working pressure checking
that no leaks are present.
Check that the shut-off valves in the circuit are in the
"OPEN" position.
Check that there is no air in the circuit. If required, bleed it
using the vent valves in the system.
Check that there are no ARIES EFFECTS in the transient
(pump and / or valve activation/deactivation)
When using antifreeze solutions, make sure the glycol
percentage is suitable for the type of use envisaged.
% weight of ethylene glycol
10 %
20 %
30 %
40 %
Freezing point
- 4 °C
- 9 °C
- 15 °C - 23 °C
Safety temperature
- 2 °C
- 7 °C
- 13 °C - 21 °C
Check that the circulator pumps are not blocked. In fact,
their motor shaft may seize up, especially after long
shutdowns. Unblocking can be accomplished with a
screwdriver using the purge hole.
ELECTRICAL SYSTEM
Check the proper tightening of the screws that fix the
conductors to the electrical components in the board
(during handling and transportation, the vibrations could
have loosened them).
Verify that the unit is connected to the ground plant.
Control that all panels and protection devices of the unit are
repositioned and blocked.
Charge the unit by closing the sectioning device, but leave
it on OFF.
Make sure that the tension and net frequency values are
within the limit of:
230 +/- 6% single phase unit; 400/3/50 +/- 6% three-phase unit
Control the unbalancing of the phases: it must be lower than 2% .
Example:
L1 - L2 = 388 V, L2 - L3 = 379 V, L3 - L1 = 377 V
average of the measured values = (388 + 379 + 377) / 3 = 381
maximum deviation from the average = 388-381= 7V
Unbalancing = (7/381) x 100 = 1.83% = ACCEPTABLE
Operating out of the indicated limits causes the loss of the
guarantee as well as very serious damages.
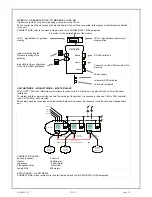
IF THE CRANKCASE RESISTANCES ARE FITTED
when the unit is started up for the first time and following all
prolonged periods of inactivity is OBLIGATORY to connect
the oil resistances on the compressor crankcase at least 8
hours before the compressor is to be starter.
BEFORE POWERING THE RESISTANCES, OPEN THE
COMPRESSORS COCKS, IF PRESENT.
To supply the resistances is necessary to switch off the
isolator switch on the unit.
To make sure that hte resistances are working, check the
power input with amperometic pliers.
At start-up the compressor cranckase temperature on the
lower side must be higher at least of 10°C than the outside
temperature.
DO NOT START THE COMPRESSOR WITH THE
CRANKCASE OIL BELOW OPERATING TEMPERATURE.
VERIFY TENSIONS – ABSORPTIONS
Check that the temperatures of the fluids are included in the
WORKING LIMITS.
If the controls of the previous paragraphs are positive, it is
possible to restart the unit.
For information on the control panel, refer to the paragraph
CONTROL.
While the unit is working (ATTENTION ELECTRIC RISK:
WORK SAFETLY) check:
•
Power supply tension
•
Phase unbalance
•
Total absorption of the unit
•
Absorption of the single electric loads
REMOTE INPUT CONFIGURATIONS
Check used remote inputs are activated (ON-OFF etc.) as
given in the instructions in the ELECTRIC WIRING chapter.
SETTING THE SET-POINT
Check if it is necessary to modify the set-points shown in
the CONTROL chapter


