


- 17 -
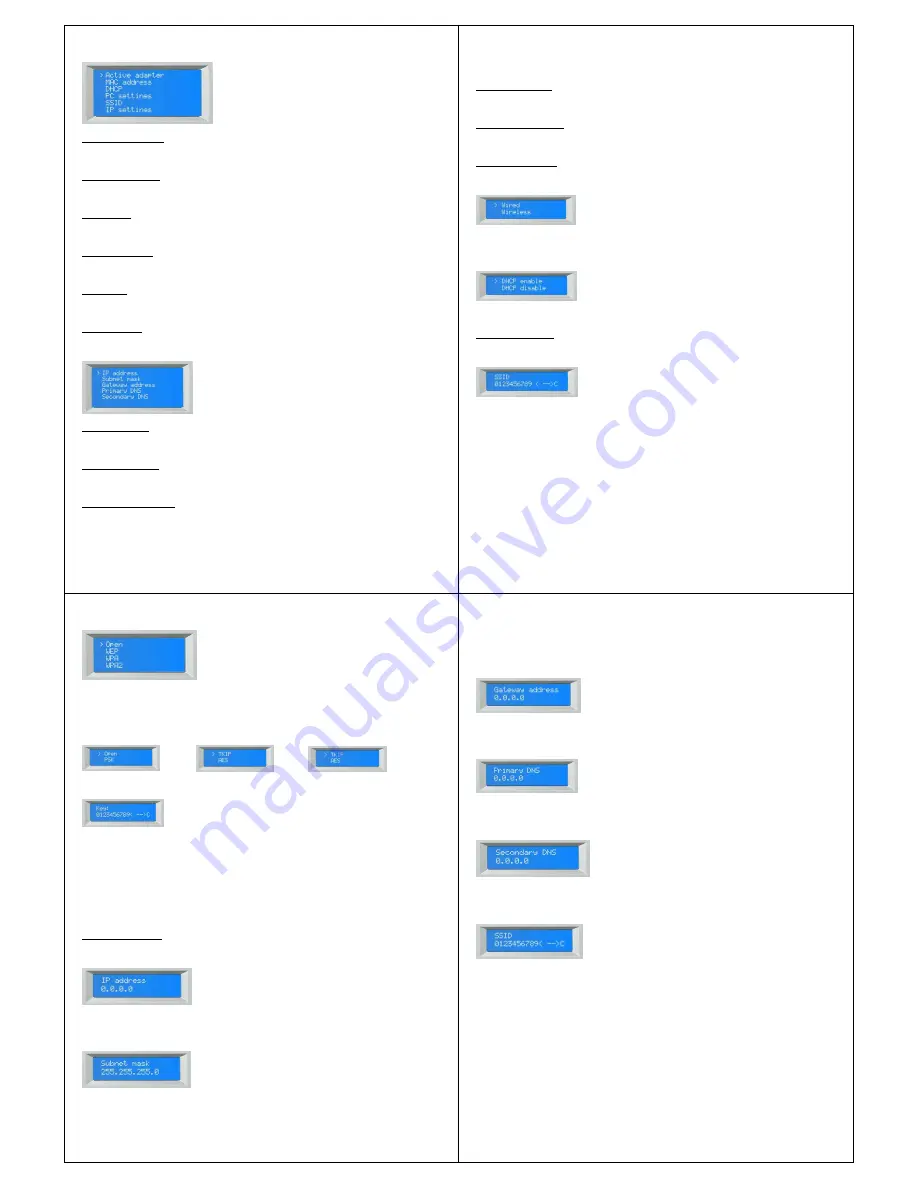
10.3.1 Active adapter
Choose this to view the active adapter (WLAN or WIRED).
10.3.2 MAC address
Choose this to view the MAC address of the BT-H1503/BT-H1506.
10.3.3 DHCP
Choose this to view the DHCP setting. (Enabled or disabled).
10.3.4 PC settings
Choose this to view User name or Password set for Music player.
10.3.5 SSID
Choose this to view SSID.
10.4 IP settings
Choose this to view PC settings. Display will show:
10.4.1 IP address
Choose this to view the IP address.
10.4.2 Subnet mask
Choose this to view the Subnet mask.
10.4.3 Gateway address
- 18 -
Choose this to view the Gateway address.
10.4.4 Primary DNS
Choose this to view Primary DNS.
10.4.5 Secondary DNS
Choose this to view Secondary DNS.
10.5 Manual settings
Choose this to manually setup your network. Display will show:
Note! Wired is an optional feature and may not be available for your BT-H1503/1506.
Choose wireless. Display will show:
Choose your desired setting.
10.5.1 DHCP enable
Display will show:
Enter “SSID” by using navigation keys on remote or turning “TUNE” knob on front panel.
Use navigation keys “UP/DOWN” on remote or turn “TUNE” knob to choose between
numbers, letters, capital letters or special characters.
Enter SSID using navigation keys on remote or >>| <<| buttons on front panel to choose
correct number/letter and press “ENTER” on remote or “TUNE” knob on front panel to
confirm.
When whole SSID is entered correctly choose
to proceed. Choose “<” to clear and “C”
to cancel.
Display will show:
- 19 -
Choose your Security. If Open is chosen (No security) radio will connect. However having
No security is not recommended. If any other security (WEP, WPA, WPA2) is chosen,
display will show:
If WEP is chosen: If WPA is chosen: If WPA2 is chosen:
Choose your desired setting. Display will show:
Enter “Key” by using navigation keys on remote or turning “TUNE” knob on front panel.
Use navigation keys “UP/DOWN” on remote or turn “TUNE” knob to choose between
numbers, letters, capital letters or special characters.
Enter key using navigation keys on remote or >>| <<| buttons on front panel to choose
correct number/letter and press “ENTER” on remote or “TUNE” knob on front panel to
confirm.
When whole key is entered correctly choose
to proceed. Choose “<” to clear and “C” to
cancel.
Radio will connect.
10.5.2 DHCP disable
Display will show:
Enter desired IP address by using the navigation buttons on the remote or turn”TUNE”
knob on front panel. Press “ENTER” or “LEFT” on remote or press “TUNE” knob to go to
next number. When fully entered display will show:
- 20 -
Enter desired Subnet mask by using the navigation buttons on the remote or turn”TUNE”
knob on front panel. Press “ENTER” or “LEFT” on remote or press “TUNE” knob to go to
next number. When fully entered display will show:
Enter desired Gateway address by using the navigation buttons on the remote or
turn”TUNE” knob on front panel. Press “ENTER” or “LEFT” on remote or press “TUNE”
knob to go to next number. When fully entered display will show:
Enter desired Primary DNS by using the navigation buttons on the remote or turn”TUNE”
knob on front panel. Press “ENTER” or “LEFT” on remote or press “TUNE” knob to go to
next number. When fully entered display will show:
Enter desired Secondary DNS by using the navigation buttons on the remote or
turn”TUNE” knob on front panel. Press “ENTER” or “LEFT” on remote or press “TUNE”
knob to go to next number. When fully entered display will show:
Enter “SSID” by using navigation keys on remote or turning “TUNE” knob on front panel.
Use navigation keys “UP/DOWN” on remote or turn “TUNE” knob to choose between
numbers, letters, capital letters or special characters.
Enter SSID using navigation keys on remote or >>| <<| buttons on front panel to choose
correct number/letter and press “ENTER” on remote or “TUNE” knob on front panel to
confirm.
When whole SSID is entered correctly choose
to proceed. Choose “<” to clear and “C”
to cancel.
Display will show:
Mit FinePrint gedruckt - bitte bei www.context-gmbh.de registrieren.