Clemco PULSAR IX Manual Download Page 24


PULSAR

®

 IX SUCTION BLAST CABINET 

Page 23


© 2019 CLEMCO INDUSTRIES CORP.  

  www.clemcoindustries.com  

  Manual No. 23425, Rev. C, 07/19 

7.6.5

  Using  5/32

-thick  strip  gasket,  repeat  the 

process on the underside of the window frame. 


7.6.6

  Trim  around  the  window-frame  bolt-slots,  as 

needed. 


7.7 

Light Assembly – Figure 31 


WARNING 

Use an approved stepladder when servicing the 
light assembly. Do not climb on top of the 
cabinet. The cabinet top will not support the 
weight of a person. Failure can result in injury 
and property damage.


7.7.1  Remove light-mount cover 


7.7.1.1

  Turn OFF electrical power.  


7.7.1.2

  Remove the four nuts and washers that attach 

the  light-mount  cover  to  the  cabinet  and  remove  the 
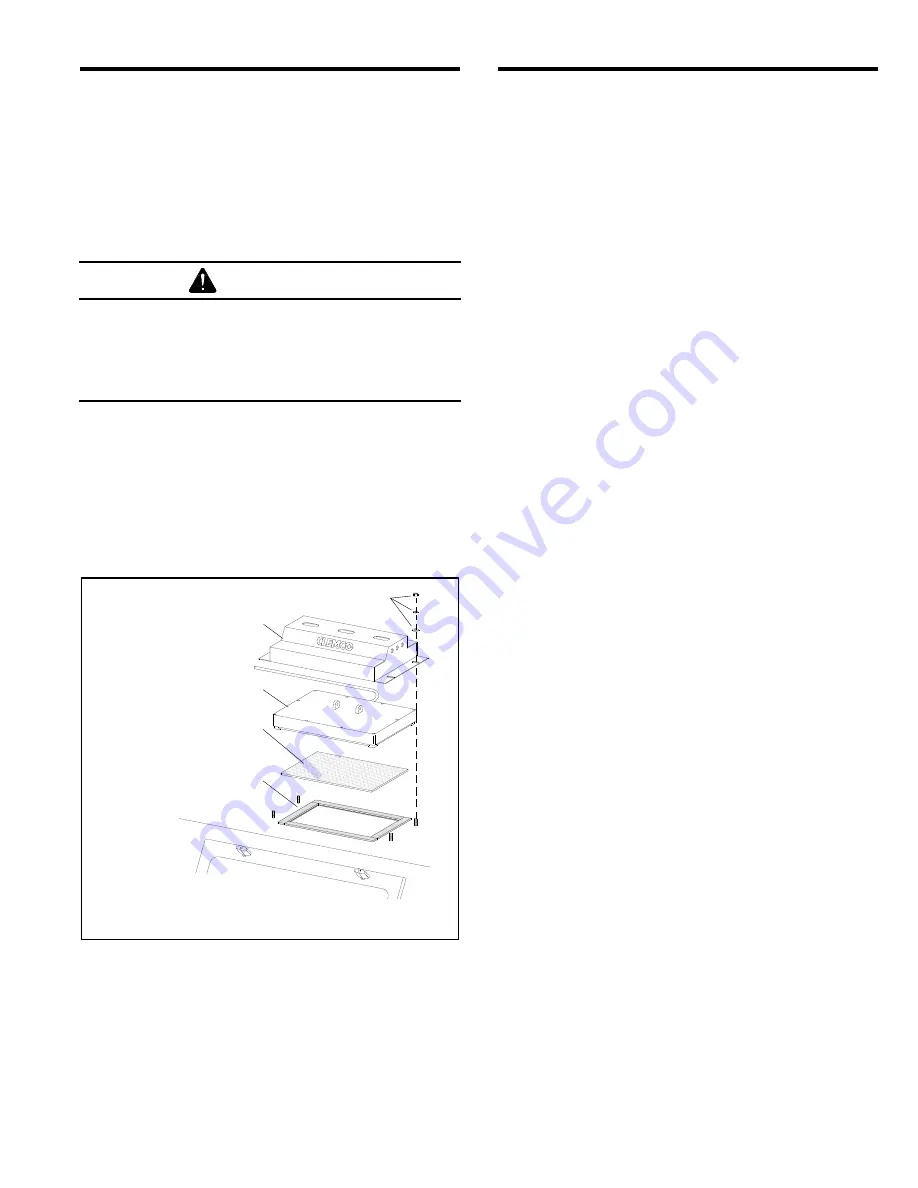
cover, as shown in Figure 31. 


Figure 31 


7.7.2


Gasket replacement 


7.7.2.1

  Remove the four nuts and washers that attach 

the  light-mount  cover  to  the  cabinet  and  remove  the 
cover, as noted in Section 7.7.1. Move the light module 
off the diffuser lens and remove the lens. 
 

7.7.2.2

  Remove  all  the  old  gasket  material  and  clean 

the surface of the cabinet. 
 

7.7.2.3

  Lay a section of strip gasket along the edge of the 

opening and cut to length, allowing 3/4

 overlap on each 

end. Peel a short section of adhesive backing and adhere 
the  strip  gasket  to  the  top  edge  of  the  light  opening,  as 
shown in Figure 31. Press the gasket to bond. Repeat the 
process for each side, compressing the ends to seal. 


7.7.3


Diffuser lens replacement 


7.7.3.1

  Remove the four nuts and washers that attach 

the  light-mount  cover  to  the  cabinet  and  remove  the 
cover, as noted in Section 7.7.1. Move the light module 
off  the  diffuser  lens  and  remove  the  lens.  Inspect  the 
gasket  and  replace  it,  per  Section  7.7.2,  if  it  is 
compressed  or  otherwise  damaged,  before  centering 
the new diffuser (smooth side up) over the gasket. 


7.7.3.2

  Set  the  light  module  on  the  diffuser  and 

reattach the cover.


7.7.4


LED light module replacement 


7.7.4.1

  Turn OFF electrical power and perform lockout 

and tagout procedure to power supply.  
 

7.7.4.2

  Remove the light-mount cover, per Section 7.7.1. 


7.7.4.3

  Remove  the  junction-box  cover  and  note  the 

wire connections. Current connections are as follows: 

  Brown wire  .......................... Hot 

  Blue wire  ............................. Neutral 

  Yellow w/green stripe  .......... Ground 


If color coding is different from that shown above, make 
note of the color code before disconnecting the wires. 
 

7.7.4.4

  Loosen  the  strain-relief  compression  nut  and 

remove the cord from the junction box. 
 

7.7.4.5

  Place  the  new  module  in  position  on  the 

cabinet and route the cord through the strain relief and 
into the junction box.  
 

7.7.4.6

  Cut the cord to length and wire as follows: 

  Brown wire  .......................... Hot 

  Blue wire  ............................. Neutral 

  Yellow w/green stripe  .......... Ground 


7.7.4.7

  Apply power to test the light. 


7.7.4.8

  Tighten  the  strain-relief  compression  nut,  set 

the  light  module  on  the  diffuser,  and  reattach  the 
cover. 


Light-Mount Cover 

 Holds down light module. 

LED Light Module 

Nut and Washers

Gasket 

Diffuser Lens 

Smooth side up. 

Summary of Contents for PULSAR IX

Page 1: ... possible that the products described in this material may be combined with other products by the user for purposes determined solely by the user No representations are intended or made as to the suitability of or engineering balance of or compliance with regulations or standard practice of any such combination of products or components the user may employ This equipment is only one component of a...

Page 2: ...te injury WARNING Warning indicates a hazardous situation that if not avoided could result in death or serious injury DANGER Danger indicates a hazardous situation that if not avoided will result in death or serious injury 1 3 Table of Contents SUBJECT SECTION LOCATION INTRODUCTION 1 0 Scope of Manual 1 1 Safety Alerts 1 2 Table of Contents 1 3 General Description 1 4 Theory of Operation 1 5 Nozzl...

Page 3: ... Static shocks 8 14 Dust leaking from cabinet 8 15 Dust leaking from dust collector 8 16 Dust collector does not pulse 8 17 One cartridge not pulsing 8 18 Steady stream of air is heard within collector 8 19 Exhauster motor not running 8 20 Excessive differential pressure on optional gauge 8 21 ACCESSORIES AND REPLACEMENT PARTS 9 0 Optional Accessories 9 1 BNP Gun Assembly 9 2 Plumbing and Cabinet ...

Page 4: ...o BNP blast gun Refer to Figure 2 and Figure 3 Pulse Pressure Regulator From inlet plumbing assembly under cabinet hopper Refer to Figure 2 Pilot Regulator Blast pressure Lifting Eye On Off Switches Pilot Operated Regulator Blast Pressure Blow off Nozzle Door Interlock Valve Door Interlock Actuator 6 Flex Hose Connects to reclaimer inlet Attachment for compressed air supply Foot Pedal Connects to ...

Page 5: ...ust collector filter cartridges are cleaned by a pulse of high velocity compressed air expanding against the inner surface of the cartridges The expanding air momentarily reverses air flow through the cartridges releasing trapped dust The dust particles fall away from the cartridges into the hopper for removal 1 5 2 3 The pulse interval is controlled by a timer located inside the sequence panel Th...

Page 6: ...ional Reclaimer Liners 1 8 1 Replaceable rubber reclaimer liners prolong service life of the reclaimer They should be installed when using silicon carbide aluminum oxide or other aggressive media as noted in Section 1 9 4 Rubber reclaimer liners are shown in Section 9 1 Optional Accessories Figure 40 1 9 Blasting Media Always use media specifically manufactured for blasting and those which are com...

Page 7: ... and similar lightweight and or nonaggressive media are generally not recommended for suction style cabinets because the lower blast velocity of suction blasting combined with the softer and lighter weight media do not provide the media impact for productive blasting Best performance from plastic media is achieved with pressure blasting requiring a pressure vessel with a 60 degree conical bottom R...

Page 8: ...TION 2 1 General Installation Notes 2 1 1 Select a location where compressed air and electrical service are available The cabinet location must comply with OSHA and local safety codes Position the cabinet and power module to allow for full access around the operator station all doors service areas and for efficient handling of large parts Ideally the cabinet and power module are positioned so the ...

Page 9: ... of order so that the control panel and wiring is supplied accordingly Unless specified otherwise the motor and control panel are wired for 230 volts A wiring schematic for the cabinet and accessories is stowed in the panel 2 5 Check Motor Rotation 2 5 1 After the wiring is completed observe the subsequent warning and check the motor rotation To check rotation jog the starter momentarily turn swit...

Page 10: ...r lens becomes pitted or frosted replace it 3 0 FIELD INSTALLED ACCESSORIES 3 1 Aluminum Oxide aggressive media Kit 3 1 1 An optional aluminum oxide kit is available factory installed or may be field installed later Factory installed Alox kit consists of rubber curtains for doors front and walls rear walls curtain hardware and boron carbide nozzle Refer to Section 3 2 for curtain installation Fiel...

Page 11: ...binet to protect the threads from abrasion should the armrest need to be removed later Figure 11 3 4 4 Match drill the remaining four bracket holes and install the remaining fasteners 3 4 5 Loosen the fasteners on the slotted bracket and raise or lower the armrest to a comfortable position 3 5 Turntable with Workcar and Track Installation note The track may be placed on either side of the cabinet ...

Page 12: ...s are aligned and level and that the workcar moves smoothly on all tracks tighten the leveling pad lock nuts and anchor the support table to the floor through the holes in the leveling pads Figure 14 3 6 Dust Collector Differential Pressure Gauge 3 6 1 The differential pressure gauge measures pressure drop across the filter cartridges The gauge reading is the best way to monitor cleaning efficienc...

Page 13: ...ble blockage in the conveying hose 4 2 2 Media Loading With the exhauster OFF add clean dry media by pouring it into the reclaimer hopper through the reclaimer door Do not fill above the reclaimer hopper Do not pour media directly into the cabinet hopper as overfilling may occur Overfilling will result in media carry over to the dust collector and possible blockage in the conveying hose Refill onl...

Page 14: ...en 4 5 6 Adjust the pilot pressure regulator to the required blast pressure per Section 5 1 The regulator is located on the top left side of the cabinet 4 5 7 Insert hands into blast gloves 4 5 8 To blast hold the gun firmly point the gun toward the object to be blasted and apply foot pressure to the top of the foot pedal blasting will begin immediately WARNING Shut down the cabinet immediately if...

Page 15: ...e air jet should be screwed 4 1 2 to 5 full turns into the gun body Doing so will leave 3 1 2 to 4 threads exposed past the lock nut Tighten the lock nut to maintain the setting Refer to Section 9 2 Item 16 for optional air jet adjusting tool which correctly positions the jet Figure 18 5 3 Media Air Mixture media flow Figure 19 5 3 1 Check the media stream for correct media air mixture media flow ...

Page 16: ...1 2 Alox 60 to 80 mesh 4 to 5 Alox 80 to 180 mesh 3 to 4 5 4 4 After adjusting the damper and carry over or excessive dust in the media continues adjust the vortex cylinder per Section 5 5 Vortex cylinder adjustment is usually required only when using 180 mesh and finer media or lightweight media 5 4 5 As dust accumulates on the outer surface of the cartridges static pressure drops requiring addit...

Page 17: ... inside the cabinet may cause the doors to flex inward Tests should be performed with the exhauster running Point the nozzle away from the door during the tests and open the door only enough to disengage the interlock switch The interlocks should stop the blasting when either door is open and permit blasting when the doors are closed 5 7 Dust Collector Pulse Pressure Figure 23 NOTICE Do not pulse ...

Page 18: ... static pressure in the cabinet enclosure Do not confuse cabinet static pressure with reclaimer static pressure which is controlled by the outlet damper per Section 5 4 Reclaimer pressure must be set before cabinet pressure In rare circumstances cabinet pressure may need to be slightly higher or lower 5 9 2 A manometer as noted in Section 5 10 and listed in Section 9 1 1 is the most accurate metho...

Page 19: ... The fitting should be capable of being capped when the manometer tube is removed Sealing the fitting will prevent leaks that alter the reclaimer s separation efficiency Air drawn into the reclaimer will cause carry over of good media to the dust collector 5 10 7 Adjust the slide rule to align the zero with the fluid level Refer to the upper part of Figure 25 5 10 8 Open cabinet doors and turn the...

Page 20: ...FF 6 1 1 Check media level Check media level in reclaimer and refill as necessary 6 1 2 Inspect reclaimer debris screen and door gasket Check reclaimer debris screen for debris The screen is accessible through the reclaimer door With the exhauster OFF remove the screen and empty it daily or when loading media Empty the screen more often if part blasted causes excessive debris Do not operate the ma...

Page 21: ...er lens Inspect the window cover lens Replace as needed per Section 7 3 6 3 2 Inspect gloves Inspect gloves for wear The first sign of deterioration may be excessive static shocks Replace as needed per Section 7 1 6 3 3 Inspect BNP gun assembly Inspect internal parts of the BNP Gun for wear Inspection and replacement of the air jet cover before it wears through will prolong the life of the jet Rep...

Page 22: ...nge gloves are held in place using spring rings sewn into the attachment end of the glove To install insert the glove into the arm port so one spring is on the inside of the port and the other is on the outside sandwiching the arm port between both spring rings 7 2 BNP Gun and Hose Assembly Figure 28 Figure 28 7 2 1 Replace the nozzle when its orifice diameter has worn 1 16 larger than its origina...

Page 23: ... 7 5 5 Replace the frame in reverse order Slide the frame as necessary to align the top bolt holes with the bolts 7 5 6 Set the window squarely over the window opening making sure that all edges of the window are centered and overlapping the window gasket and that the window is resting on the window support tabs 7 5 7 Swing the window frame into place and tighten the frame nuts 7 6 Window Gasket R...

Page 24: ...pressing the ends to seal 7 7 3 Diffuser lens replacement 7 7 3 1 Remove the four nuts and washers that attach the light mount cover to the cabinet and remove the cover as noted in Section 7 7 1 Move the light module off the diffuser lens and remove the lens Inspect the gasket and replace it per Section 7 7 2 if it is compressed or otherwise damaged before centering the new diffuser smooth side up...

Page 25: ...ner to the lid and latch the lock ring making sure the lid and clamp are secure Replacement liners are shown in Section 9 10 7 8 6 Remove the dust collector access door 7 8 7 Loosen the cartridge retaining nut at the bottom of the hanger rod as shown in Figure 33 and rock the cartridge to loosen it from the cartridge plate 7 8 8 Swing the bottom of the cartridge out through the access door and rem...

Page 26: ...ly 150 lbs When installing or removing the reclaimer it must be adequately supported and secured to appropriate lift equipment Failure to secure and use proper lift device can result in injury or death When using a ladder to service the reclaimer make sure it is approved for the application and that appropriate fall protection is used Failure to use appropriate ladder and fall protection can resul...

Page 27: ...that appropriate fall protection is used Failure to use appropriate ladder and fall protection can result in injury Installation Notes Make sure enough 2 adhesive backed gasket stock no 13089 is available to replace the compressed or damaged gasket on the reclaimer upper flange The Pulsar IX reclaimer requires 7 feet The inner cone and cone ring are glued in place Make sure a multi purpose contact...

Page 28: ...aligned with the side liner cutout Reposition the inlet side liner as needed While pushing or clamping the liner against the weldment secure the wall liner with self drilling screws at each existing hole location NOTE To field install a new first time wall liner use self drilling screws to secure it at the seam and an inch or two from the top and bottom at each quadrant Remove the clamps after the...

Page 29: ...raph 1 9 6 good media may be carried over to the dust collector To prevent lightweight media carry over the reclaimer inlet baffle can be removed Review the following process before beginning to make sure all parts are available Installation Notes Depending on conditions such as height and accessibility it may be easier to replace the inlet baffle if the reclaimer is removed from the cone and stan...

Page 30: ... cause poor visibility 8 1 5 Dust collector outlet damper closed too far restricting air movement through the cabinet Adjust static pressure per Section 5 4 8 1 6 Cabinet air inlet damper closed too far restricting air movement into the cabinet Adjust damper per Sections 2 9 and 5 9 8 1 7 Reclaimer door open 8 1 8 Hole worn in flex hose between cabinet hopper and reclaimer inlet or reclaimer outle...

Page 31: ...sting 8 5 3 Moist compressed air may be due to a faulty compressor that overheats or pumps oil or moisture into the air line too long an air line permitting moisture to condense on the inside and from high humidity Drain the air filter and receiver tank regularly Ongoing problems with moist air may require the installation of an air dryer or aftercooler in the air supply line 8 5 4 Absorption Some...

Page 32: ...age if no blockage replace the valve 8 13 Media buildup in cabinet hopper NOTE Do not pour media directly into the cabinet hopper as overfilling may occur Overfilling will result in media carry over to the dust collector and possible blockage in the conveying hose 8 13 1 Exhauster motor rotating backwards The motor should rotate as indicated by the arrow on the exhauster housing If it does not rot...

Page 33: ...tion 8 18 2 Check the diaphragm pulse valve With compressed air turned OFF remove the four cover screws inspect the diaphragm and clean the bleed port 8 18 3 Check for blockage in the tubing between the diaphragm valve and solenoid 8 19 Steady stream of air is heard within collector 8 19 1 Check for a leak in the tubing between the diaphragm valves and solenoids 8 19 2 Solenoid remaining in open p...

Page 34: ...er curtains set black curtains 22998 white curtains 22999 HEPA filter assembly 22807 Lock pins pkg of 25 for twist on hose couplings 11203 Safety cable 1 2 OD to 1 1 4 OD hose 15012 Manometer kit 12528 Noise reduction arm port covers pair 29456 Anti fatigue floor mat for front of cabinet 24744 Boron carbide nozzle No 5 11935 No 6 11936 No 7 11937 No 8 12894 Wide spray nozzle Tungsten carbide No 6 ...

Page 35: ...e 39 Item Description Stock No Armrest assembly 24900 1 Armrest replacement 24899 2 Bracket armrest cabinet each 24896 3 Support bar adjustable each 24895 4 Cap screw 3 8 NC x 1 03252 5 Washer 3 8 lock 03318 6 Cap screw 5 16 NC x 1 03152 7 Nut 5 16 NC hex 03211 8 Washer 5 16 flat 03216 9 Washer 5 16 lock 03217 Figure 39 9 1 4 Rubber Reclaimer Liners Figure 40 The reclaimer must be designed to acce...

Page 36: ...ing 11939 6 Tip side angle extension 12173 7 Snap ring side angle extension 12040 8 O ring side angle extension 08977 Figure 41 9 1 6 Differential Pressure Gauge Assembly Figure 42 Item Description Stock No Differential pressure gauge assembly 23356 1 Gauge differential pressure 10188 2 Snubber fitting 15786 3 Tubing 1 4 OD specify feet required 15892 4 Filter in line dust 23415 5 Bushing 1 4 x 1 ...

Page 37: ...5 12343 No 6 12344 No 7 12345 No 8 12346 7 Fitting hose 3 8 NPT x 1 2 barb 06369 8 Hose end 1 2 barb x 1 2 fem swivel 15002 9 Nozzle ceramic No 5 11930 No 6 11931 No 7 11932 Nozzle boron carbide No 5 11935 No 6 11936 No 7 11937 No 8 12894 Nozzle tungsten carbide No 5 13118 No 7 12882 No 8 11942 10 Hose 1 2 air specify ft required 12472 11 Hose media clear specify ft required 12476 12 Wide spray no...

Page 38: ... assembly 3 8 x 10 ft coupled 04926 11 Adaptor 1 2 NPT x 1 2 flare 11351 12 Hose end 1 2 barb x 1 2 female swivel 15002 13 Hose end 1 2 barb x 3 8 male NPT 06369 14 Blow off nozzle 06368 15 Air hose 1 2 specify ft required 12472 16 Gun assembly BNP No 5 standard Refer to Section 9 2 for other sizes 12302 17 Hose media clear specify ft required 12476 18 Regulator 1 2 pilot operated pressure 11345 1...

Page 39: ...late hopper hose 21656 13 Air valve 3 way door interlock 12202 14 Over travel stop door interlock 20004 15 Detent sleeve door interlock 15042 16 Bracket door interlock actuator 19152 17 Gasket universal adaptor pipe 6 for 6 adaptor for standard use 23233 5 for 5 adaptor for use steel media 23242 18 Adaptor pipe universal flex 6 for standard use 23219 5 for use with steel media 23220 19 Clamp flex ...

Page 40: ...e Assembly Figure 47 Item Description Stock No Metering valve complete 12417 Metering stem assembly includes items 1 2 3 23889 1 Stem metering adjusting 23097 2 Screw adjusting 23098 3 Nut adjusting stem lock 23099 4 Body metering valve 11532 5 Fitting hose 3 8 NPT x 1 2 barb 06369 6 Plug metering valve 12011 Figure 47 9 7 Light Assembly Figure 48 Item Description Stock No 1 Cover LED light mount ...

Page 41: ...522 10 Tubing 1 8 ID twin specify ft required 19577 11 Tie nylon wire 12139 Figure 49 9 9 Filter Regulator Inlet Piping Assembly Figure 50 Item Description Stock No 1 Filter 1 2 manual drain air 01308 2 Regulator 1 2 pilot operated pressure 11345 3 Bracket 1 2 regulator assembly 19231 4 Nipple 1 2 x 2 01734 5 Cross 1 2 NPT 10254 6 Lock nut 1 2 12713 7 Bushing 1 2 NPT x 1 8 11350 8 Adaptor 1 2 NPT ...

Page 42: ...ot specify feet required 00186 12 Sequence control panel assembly 15788 13 Sequence control board 10261 14 Solenoid 23869 15 Switch toggle 12127 16 Boot toggle switch 14228 17 Hose 7 flex light lined per foot 5 ft required 12469 18 Clamp 8 5 11576 19 Fitting straight 1 8 NPT x 1 4 tube 11214 20 Tubing 1 4 OD specify feet required 15892 21 Fitting straight 1 4 NPT x 1 4 tube 11737 22 Gauge pressure...

Page 43: ...et and latch 14271 7 Gasket door 11745 8 Latch assembly door 12263 9 Gasket 2 adhesive backed per foot specify feet required 13089 10 Vortex cylinder assembly adjustable 900 cfm 23046 11 Top assembly 23040 12 Eye bolt 3 8 NC 00430 13 Hopper cone w bell reducer 23073 14 Bell reducer 2 x 1 13395 15 Nipple 1 x 2 01702 16 Metering valve 12417 17 Hose support inlet optional 6 for standard use with 6 ho...

Reviews: