background image

ClearOne Communications 

~ www.clearone.com

31

Configuration

~ Audio Settings

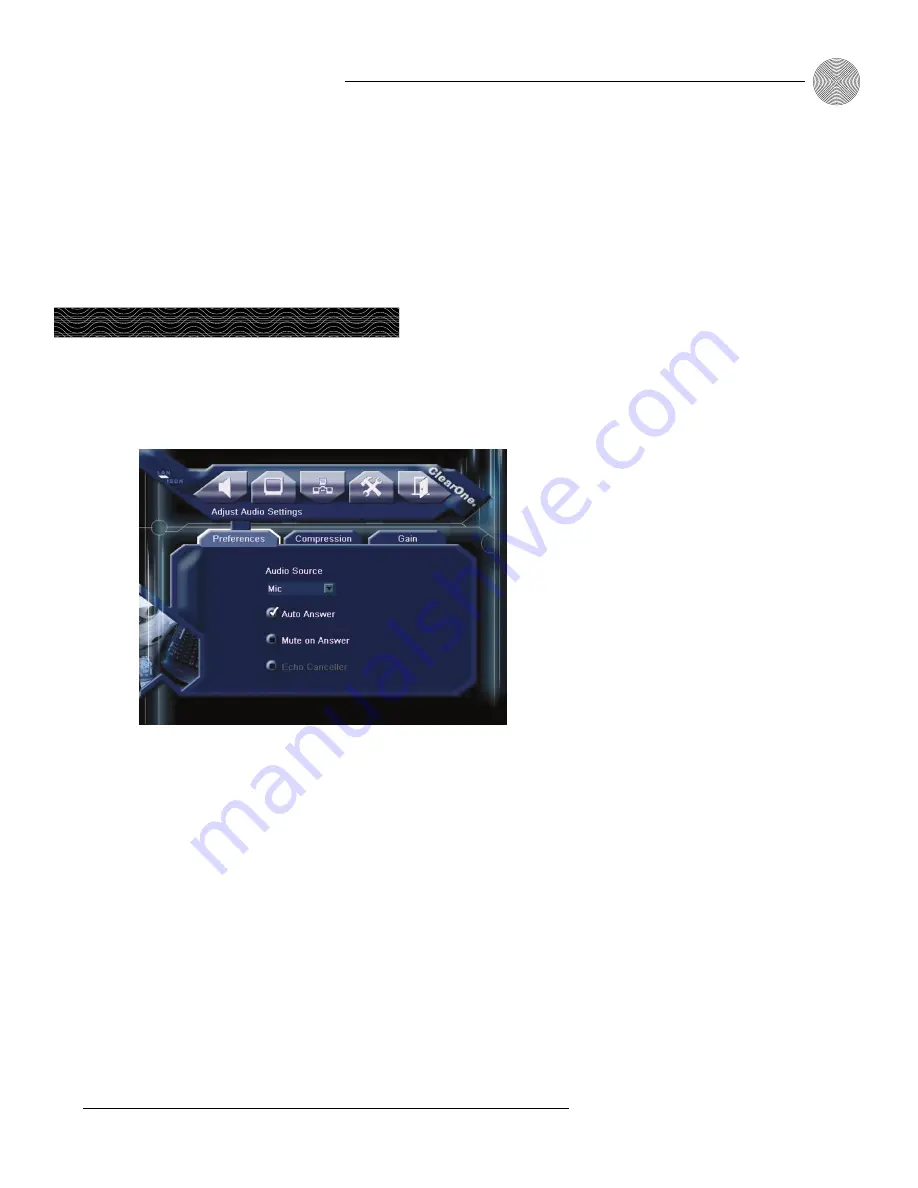
To adjust audio preferences

1.

In the Preferences tab, navigate to the Audio Source drop-down list and

select either Mic or Line as the input source (default is Mic). Select Mic if

you are using a microphone. Select Line if you are using another audio

source. Press Enter.

2.

Select Auto Answer if you want the unit to automatically answer calls

(default is On).

3.

Select Mute on Answer if you want the unit to mute your outgoing audio

whenever a call is answered. You would then use the Mute button to unmute

the system when you are ready to speak. Default is Off.

Figure 5.9  Audio

Settings Preferences

screen

The Adjust Audio Settings screen allows you to tailor the audio settings to optimize

audio quality in your conferencing venue. There are three sections in the Adjust

Audio Settings: Preferences, Compression, and Gain.

To delete a presentation

1.

Highlight and select the presentation you want to delete in the Presentation

Entries window.

2.

Highlight the Delete button and click it. You will be asked to confirm the

deletion.

Audio Settings

Summary of Contents for V-There 2000

Page 1: ...Installation Operation Manual Audio Products V There 2000 2100 and 2200 Video Conferencing System...

Page 2: ...in any form or by any means without written permission from ClearOne Communications Inc Printed in the United States of America ClearOne Communications Inc reserves specific privileges Information in...

Page 3: ...registration 2 Product returns 2 Using this manual 3 Scope of the manual 3 Terminology 3 CHAPTER 2 Getting Started 5 Unpacking 5 North American users 6 Positioning the V There 6 Before you install 6 H...

Page 4: ...uring V There 21 LAN setup 22 Optimal settings for LAN calls 22 Video quality on the first call 22 Required information 23 To configure LAN DHCP 23 To configure LAN non DHCP 24 Gatekeeper H 323 setup...

Page 5: ...ss Mode 43 Placing a call 43 DTMF tones 45 CHAPTER 7 Sending Data and Images 47 Preparing a file 47 PCMCIA cards 47 To install a PCMCIA card 47 Sending and receiving images 48 Annex D images 48 Presen...

Page 6: ...9 Appendix C Re programming V There via serial line 59 Appendix D Compliance statements and warranty 60 North American users 60 FCC Part 68 requirements 61 Canadian users 61 European users 62 Australi...

Page 7: ...ll This enables you to share web pages and documents and make presentations while in a call The included AccuMic II delivers clean high quality conferencing audio with Gentner Distributed Echo Cancell...

Page 8: ...and serve your needs If you need to return your V There unit to ClearOne for service please call the Technical Services Group to obtain a return authorization number ClearOne Communications 1825 Rese...

Page 9: ...Icon The word icon always refers to an element on the V There interface that you can highlight and select Highlighting Highlighting an icon or option on a drop down list involves using the arrow butt...

Page 10: ...ClearOne Communications www clearone com 4...

Page 11: ...tomers only Audio Video Products CD includes an electronic version of the V There Installation and Operation Manual Camera extension cable 830 170 132 Remote control and batteries AccuMic II XFMR mini...

Page 12: ...place the main unit in direct sunlight or near sources of direct heat We recommend that you place the V There on top of the video monitor This gives a more natural appearance to a video conference si...

Page 13: ...ectors on the rear panel ClearOne Communications www clearone com You can also connect other devices to the V There For more information see the connection information on the following pages Connector...

Page 14: ...e Mic connector Connect the powered audio speakers to this connector using the 3 5 mm phono cable If the monitor has internal speakers connect directly to the monitor using the black connector on the...

Page 15: ...yellow video connector on the SCART block and the black cable connector to the Audio L Mono connector of the SCART block Connect the SCART block to the SCART connector on the television ClearOne Comm...

Page 16: ...from the V There system no external power supply is needed 3 Place the mic pad on a table or desk in the middle of your conference area away from walls and corners for best acoustical performance The...

Page 17: ...om walls and corners for best acoustical performance When two mic pads are used they share mic gating information for optimum audio clarity Pressing the Mute button on either mic pad will mute both mi...

Page 18: ...ClearOne Communications www clearone com 12...

Page 19: ...keyboard CHAPTER 3 Controlling V There ClearOne Communications www clearone com Using the Remote Control Navigating with the remote control The handheld remote see Figure 3 1 page 14 control is factor...

Page 20: ...he cursor forward in a text field Also moves the browser forward to a previously selected web page Zoom Zooms the camera in and out Pressing Zoom makes image larger while pressing Zoom makes it smalle...

Page 21: ...is used for placing calls and making presentations Expert Mode is used for configuring the system in addition to making calls and accessing presentations Far Near Switches the camera control between...

Page 22: ...owser Operates like the left button on a PC mouse Navigation This round gray button is used for navigating the web browser Back Is used as a backspace key in text fields Zoom Zooms the camera video in...

Page 23: ...r example space is limited Detaching the camera 1 Remove the cable cover by lifting up on the rear portion of the cover as shown in Figure 4 1 The type of camera supplied is either NTSC or PAL compati...

Page 24: ...e desired location If you are in a call refer to the picture in picture as you position the camera 3 Use the Zoom and Zoom keys to adjust the video magnification Camera Camera Control 4 Connect one en...

Page 25: ...cameras 1 Press Video to display the Video Source list 2 Navigate to the auxiliary camera source and press Enter to select the source This feature is available only if it is also supported by the vid...

Page 26: ...eys navigate to the preset you want to use and press Enter The camera moves to the selected preset Camera Camera Presets Figure 4 4 Camera screen 2 Navigate to the number of the preset you want to set...

Page 27: ...ments in the Expert Mode of the user interface To enter the Expert Mode press the Expert Novice Mode button on the keyboard to display Expert System Setup There are several occasions when you will use...

Page 28: ...acket delivery Good quality Cat 5 cable should be used Poor quality cabling will not cause problems with normal operations as packets are re sent but on a LAN call lost packets will show up as blocky...

Page 29: ...ateway The IP address of the Domain Name System DNS server if you want to use a DNS server for name lookup The IP address of the Windows Internet Naming Service WINS server if you want to use a WINS s...

Page 30: ...u do not need external access from your local subnet this field can remain as 0 0 0 0 3 Enter the subnet mask to be used in the Subnet field If you are using a static IP you must use a default gateway...

Page 31: ...lects the gatekeeper or Explicit you enter the IP address of the gatekeeper 2 If you selected the Gatekeeper Mode of Explicit enter the IP address of the gatekeeper in the Address field If using a gat...

Page 32: ...your V There unit to your ISDN connection using the supplied ISDN cable s The number of cables that you need will depend on the number of ISDN channels that are available to you and are supported by...

Page 33: ...6 button appears Click it to open the SPIDs screen see Figure 5 6 on page 28 Select the Auto Detect SPIDs check box the unit detects your SPIDs automatically unless you know that your SPIDs are an un...

Page 34: ...ant to make calls To configure the Phone Directory Navigate to the Place a Call button in the Expert Mode toolbar and click it This opens the Directory screen This screen allows you to place calls add...

Page 35: ...Enter the phone number s in the Line field s 6 Click Save to save the settings To edit a directory entry 1 Select the phone book entry you want to edit 2 Click the Edit button This opens the Phone Bo...

Page 36: ...he web page address or file location of the presentation you want to add 2 Click OK to save the addition and return to the Presentations screen For presentations located on a PCMCIA card 1 Insert the...

Page 37: ...you want the unit to mute your outgoing audio whenever a call is answered You would then use the Mute button to unmute the system when you are ready to speak Default is Off Figure 5 9 Audio Settings...

Page 38: ...at the far end doesn t support the algorithm the V There automatically selects a compatible algorithm Figure 5 10 Audio Compression screen 4 Select Echo Canceller if you want to use the V There s bui...

Page 39: ...call and adjusting the level during the call Below each slider is a meter that references the level of the input or output Figure 5 11 Audio Gain screen All of the settings on the Video Setting Prefer...

Page 40: ...rightness Contrast Hue and Saturation are ideal for most situations Leave these at the factory settings unless you need to tailor them to suit your venue 2 Click the More button to view the following...

Page 41: ...he VGA monitor to access the V There Menu screen When you are not in a call the Main screen is displayed on both monitors The text Dual Monitor Mode is overlaid on the picture in picture PIP display t...

Page 42: ...ferences screen 3 Video Source The Video Source field allows you to select among video sources such as the local and remote cameras When using Single Monitor Mode Dual Monitor is not selected you can...

Page 43: ...ra for information about how to configure and use the camera and camera presets Figure 5 15 PIP screen The Adjust Various Advanced Settings screen allows you to adjust the date and time as well as do...

Page 44: ...hes the designated call length an onscreen prompt asks you if you want to continue the call which resets the timer and begins a new countdown or end it If you do not respond to the prompt within 60 se...

Page 45: ...Type and Rate of the call from their respective drop down lists 2 Click Call The unit initiates the loop back call 3 Press Hang Up to end the call If there are problems with any settings during the c...

Page 46: ...Adjust Various Advanced Settings window to open the Download window Figure 5 18 Download screen Below are descriptions of each field and check box Download LAN Address The Download LAN Address field...

Page 47: ...n the PCMCIA slot on the back of the unit Select this check box if you want to remove all files on the flash card prior to download Boot from Flash Card The Boot from Flash Card check box directs the...

Page 48: ...orming you of the progress of the update When the update is complete and you exit the menu you are asked if you want to reboot the unit answer yes To download to flash card Instead of updating the uni...

Page 49: ...trol remote control buttons 1 Press the Call button The Phone Book Directory appears CHAPTER 6 Making Calls ClearOne Communications www clearone com Express Mode Figure 6 1 Phone Directory screen 2 Na...

Page 50: ...so highlight Manual Dial click the Enter button and enter the number or numbers in the Manual Dial window then click the Enter button 3 Press Enter again The unit dials the call and the video image of...

Page 51: ...screen V There will automatically answer incoming calls If the Auto Answer check box is deselected V There will not answer the call automatically The Incoming Call dialog box is displayed If you don...

Page 52: ...ClearOne Communications www clearone com 46...

Page 53: ...e back of the V There has a plastic cover that can easily be removed and put back when you have finished using the flash card CHAPTER 7 Sending Data and Images ClearOne Communications www clearone com...

Page 54: ...en while the Annex D image is being sent The Sending Image icon is displayed To receive an Annex D image When V There receives an image during a call a message is displayed informing you that an Annex...

Page 55: ...Wizard The V There Application Conversion Wizard is a plug in that converts Microsoft Word PowerPoint and Excel files into VTT ClearOne proprietary compression files giving you the flexibility to shar...

Page 56: ...n Wizard The conversion wizard opens and displays the Select File window see Figure 7 2 Figure 7 2 Select file window 3 Use the Browse button to select the file you want to convert If you opened the d...

Page 57: ...ot check box if you want a snapshot of each slide in the presentation automatically sent to the far end as you move through the presentation default is On 7 Click Finish to save the new VTT file The S...

Page 58: ...kward Stop and Refresh Each menu contains several menu options To select a button point the cursor at the button and press the Select key The web browser cannot be used during LAN calls About the Web...

Page 59: ...20x576 PAL Video Format NTSC PAL auto detect Picture In Picture Auto on auto off moveable Video Features Far end camera control H 281 H 224 FECC for H 320 2100 and 2200 only and H 323 Single or dual m...

Page 60: ...nging the switch type it is sometimes necessary to power down V There this depends on the vendor of the ISDN PBX or telecom supplier The cause codes are divided by the ITU T into classifications to as...

Page 61: ...numbers dialed Cause 17 User busy Cause 17 Some long distance carriers require a prefix for the ISDN number you are dialling If it isn t entered properly you ll get a busy tone This means the far end...

Page 62: ...ns that the far end cannot accept the ISDN call correctly maybe the number dialed is a voice line or a dedicated FAX machine instead of a video conferencing system Cause 30 Response to status inquiry...

Page 63: ...ISDN line or it is not properly configured Cause 44 Requested circuit channel not available Cause 44 This indicates that the local ISDN network could not supply what V There requested This indicates e...

Page 64: ...use 69 Requested facility not implemented Cause 69 Cause 70 Only restricted bearer capability available Cause 70 Cause 79 Service or option not implemented Cause 79 These cause codes are very similar...

Page 65: ...nsuccessful configuring of the ISDN switch type They are listed for completeness Cause 96 Mandatory information element missing Cause 96 Cause 97 Message type non existent Cause 97 Cause 98 Message no...

Page 66: ...or modifications to the unit not expressly approved by the party responsible for compliance could void the users authority to operate the equipment This equipment has been tested and found to comply...

Page 67: ...ment is connected to their lines inform them of A The telephone number to which it is connected B The USOC jack required C The FCC registration number In the event of equipment malfunction an authoriz...

Page 68: ...em if present are connected together This precaution may be particularly important in rural areas Caution Users should not attempt to make such connections themselves but should contact the appropriat...

Page 69: ...tion The V There contains a lithium battery Danger of explosion if battery is incorrectly replaced Replace only with the same or equivalent type recommended by the manufacturer Dispose of used batteri...

Page 70: ...or repair 2 Return to Manufacturer a An RMA return merchandise authorization number must be issued to the end user from ClearOne technical support b The end user must return the product to ClearOne wi...

Page 71: ...of such notice the Manufacturer will give instructions respecting the shipment of the product or such other matters as it elects to honor this warranty as above provided This warranty does not cover...

Page 72: ...as shown above 7 Select the Update Firmware check box Make sure the Download to Flash Card and Boot from Flash Card check boxes are not selected 8 Click the Start Download button 9 A Download in Progr...

Page 73: ...s The first 64K of the first line are used for voice transmission and the rest for data transmission Each line has a separate ISDN number which you would normally have to enter when making a call Ther...

Page 74: ...hey re easier to remember DTMF tones Dual tone multi frequency assigns a specific frequency or tone to each button on for example a remote control so that it can easily be identified by a microprocess...

Page 75: ...le users to participate in the same conference even though they are using different video conferencing applications HTML Hyper Text Markup Language It is the authoring language used to create document...

Page 76: ...vice that lights up when electricity is passed through it LEDs are usually red Line input Anything with an audio output can be attached For example you can connect a CD player so that when you are sho...

Page 77: ...ITU H 261 video conferencing standard Sending QCIF 176 x 144 pixels will increase the frame rate sent on a low bandwidth call See also CIF QWERTY keyboard The arrangement of buttons on a standard Engl...

Page 78: ...uttons and scroll bars on their web pages See also Java VGA monitor Video graphics array is a graphics display system for PCs All PCs made today support VGA See also Composite monitor V There network...

Page 79: ...dual monitor mode 47 E E164 25 68 echo canceller 32 Ethernet 5 7 59 68 Expert Mode 14 15 21 23 28 30 43 44 Express Mode 15 16 43 44 52 F flash card inserting 47 G gatekeeper 25 delimiter 68 IP address...

Page 80: ...esentations 47 dual monitor mode 47 presentation mode 49 sending 47 proxy server 71 Q QCIF 71 R remote control 5 S SCART 5 9 71 snapshot 14 16 35 SPID 71 U URL 72 V VGA monitor 9 72 video out 8 W web...

Reviews: