background image

7


T-Desk Reference Manual


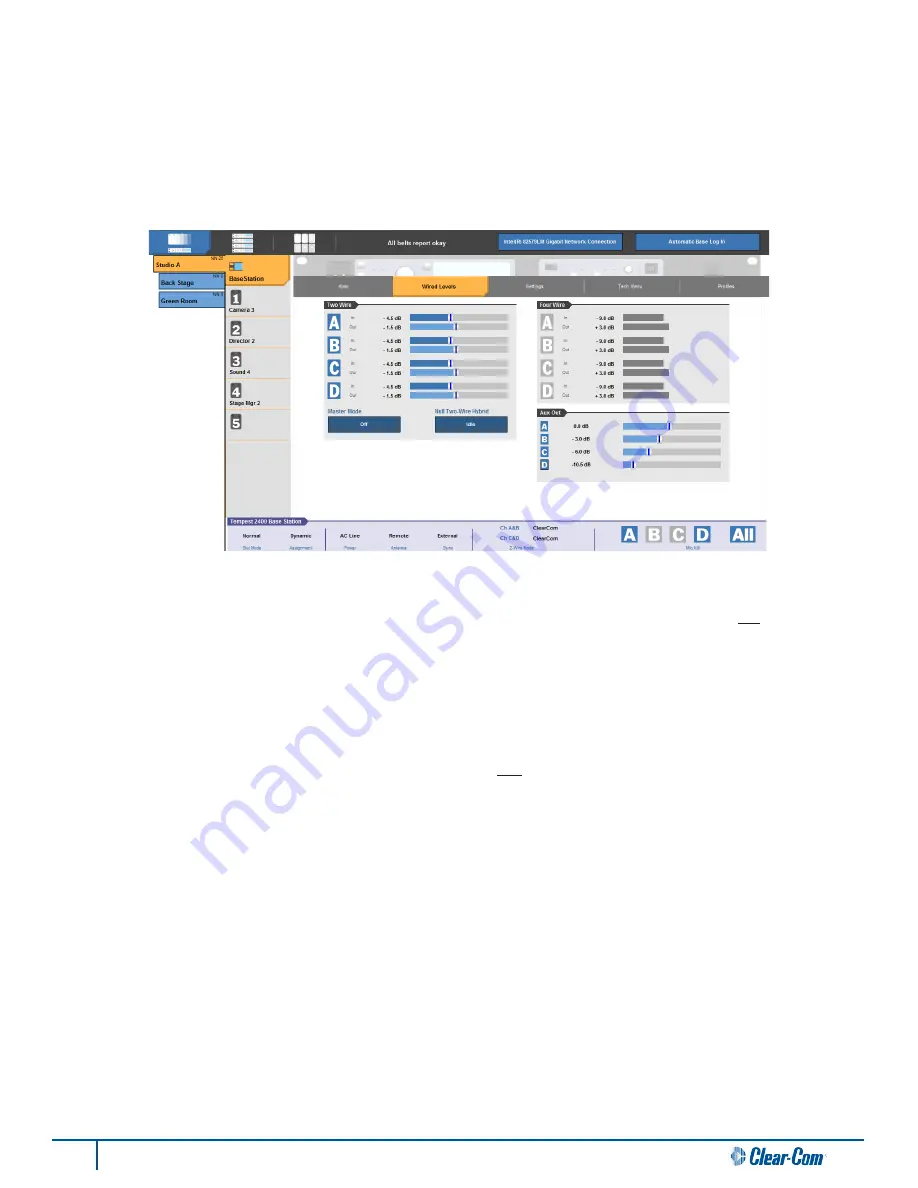
BaseStation Wired Levels Tab

The Wired Intercom Levels tab allows you to activate either 2-Wire or 4-Wire mode, and adjust the incoming and outgoing 
audio levels on any of the intercom channels (A-D).  The audio levels are measured in decibels (dB).  To activate a channel, 
simply click the channel button (A-D).  Once the channel is activated, you can adjust the levels using the slider bar(s).  To 
adjust, use your mouse to click on the slider you want to change and drag it to the new position (or use keyboard arrow keys).  
An active channel will appear in 

blue

 and deactivated channels are grayed out.  For more information on Two Wire and Four 

Wire, refer to the Tempest manual.  

Note: An intercom channel

 cannot be activated in both 2-Wire and 4-Wire mode at the same time. 

Master Mode (Set Base as Master)

 - this mode is used 

when two or more BaseStations are connected for 2-Wire operation, 

while slide switches (on BaseStation) are set to 

ClearCom

 mode, and an external 2-Wire intercom system is 

not

 connected.  

Master Mode will provide power for audio that a connected external 2-Wire intercom system would normally provide.  Master 
Mode is only available when the BaseStation slide switches are set to 

ClearCom

in order to enable Master Mode, click on the 

dark blue button under “Master Mode”  Two buttons will appear; click the “On” button.  When unavailable (in 

RTS

 or 

Balanced 

(BAL) 

mode), this button will be disabled and grayed out. If there is no power on any of the 2-wire XLR connectors, Master 

Mode will automatically be turned off.

Null Two-Wire Hybrid 

-

 this button initiates “nulling” on channels that are connected to a 2-Wire intercom system.  Before 

nulling, all talk buttons (mics) must be off on all Tempest BeltStations 

and all 2-Wire intercom devices to insure accurate 

results.  All 2-Wire intercom interfaces experience echo due to inherent inefficiencies in the 2-Wire hybrid circuitry.  When the 
circuit is nulled, a tone is generated, the echo is monitored, and Tempest’s internal circuitry automatically adjusts to minimize 
the echo.  Any connection made through 2-Wire intercom connections requires nulling.  For more information on nulling, refer 

to the 

Tempest

2400 Wireless Reference Manual

 for more about nulling the system.  

Note:  The nulling process will interfere with normal 

communication, therefore, it should be done prior to use and not during. 

To select the “type” of 2-Wire intercom system, use the slide switch(es) on the front of the Tempest BaseStation labeled CHAN 
A&B (and CHAN C&D with four-channel BaseStations).  This setting must be physically changed to either 

RTS

ClearCom

, or 

BAL

 and is not adjustable via T-Desk.  However, you can view the current placement of switch(es) on the bottom of the T-Desk 

screen in the 

Dashboard Status Bar

.

Summary of Contents for T-Desk

Page 1: ...T Desk Desktop Software Reference Manual 399G115 Rev A 8 July 2014...

Page 2: ...This page intentionally left blank...

Page 3: ...Connection 2 System Requirements 3 Installation 3 T Desk Overview 4 BaseStation Main Tab 5 BaseStation Wire Levels Tab 7 BaseStation Settings Tab 8 BaseStation Tech Menu Tab 10 BeltStation Main Tab 1...

Page 4: ...istributed under licenses restricting its use copying distribution and decompilation reverse engineering No part of this document may be reproduced in any form by any means without prior written autho...

Page 5: ...d alone Tempest BaseStation with up to five BeltStations is as easy to operate as a cell phone However optimizing multiple Tempest BaseStations while connected to one or more wired intercom systems is...

Page 6: ...manual addressing can be selected or addressing can be disabled The following TCP IP modes are available via the BaseStation for connection to T Desk Disabled Disables LAN connection on rear of BaseS...

Page 7: ...ed for direct connection between the BaseStation and computers not equipped with Auto MDIX capability Installation A copy of T Desk is available from the Tempest Wireless CD provided by your Tempest W...

Page 8: ...b Under each primary system tab there are a series of sections which will direct you to specific system settings features and information 4 Battery Alert this notifies the user of the battery status f...

Page 9: ...five that are associated and logged into the currently selected BaseStation This information includes the name of the BeltStation talk channels enabled and in use battery level and alert RSSI Radio Si...

Page 10: ...is pressed the relay is closed Relay 5 is still available to work with any other trigger options available as it would in Normal mode The BeltStation relays are configured under the BeltStation s Main...

Page 11: ...utton under Master Mode Two buttons will appear click the On button When unavailable in RTS or Balanced BAL mode this button will be disabled and grayed out If there is no power on any of the 2 wire X...

Page 12: ...ch BeltStation as Program Volume with individual level control The Aux Out levels can be adjusted for all intercom channels A D and are measured in decibels dB To enable move the slider bar to any val...

Page 13: ...ed by moving the slider bar to the left down or the right up Headset microphones may be of Electret or Dynamic type and the BaseStation automatically detects which type is connected The gain for each...

Page 14: ...s to minimize the probability of inadvertent adjustments The front panel can be unlocked by pressing MENU ENT on the BaseStation as well as from T Desk BaseStation Tech Menu Tab Rename BaseStation Typ...

Page 15: ...this feature is not applicable Menu Lock Key This is the 3 digit security key required to unlock the Menu Lock feature Radio Configuration Proper configuration of the radio is critical for optimal pe...

Page 16: ...Next select the location where you would like to save the profile and be sure to assign the profile an appropriate name To load a profile click on the blue button labeled Load Profile Browse to the d...

Page 17: ...k A B or C D Button The Talk button s can be set to Latching Momentary or Disabled mode y y Channel Select a user can set each channel knob independently The channels can be set to Talk and Listen to...

Page 18: ...y y Minimum Volume the belt will not adjust lower than the minimum volume Talk Controls y y Mic Gain adjusts the Mic Gain level dB for the BeltStation y y Talk Tones when enabled the user will hear a...

Page 19: ...battery reaches 10 charge y y Menu Lock when enabled it allows the BeltStation menu to be locked Advanced Settings y y Roaming Bias this feature adjusts the parameters that determine when a BeltStatio...

Page 20: ...to the selected BeltStation To load a profile click on the blue button labeled Load Profile under the desired belt Next select which profile you would like to load to the BeltStation and click Open T...

Page 21: ...s status area Once all systems are optimized this screen provides an easy method for continuous moni toring of all BeltStations All Belts Tab The All Belts Tab is a real time snapshot of all BeltStati...

Page 22: ......

Page 23: ...www clearcom com...

Reviews: