background image

4


T-Desk Reference Manual
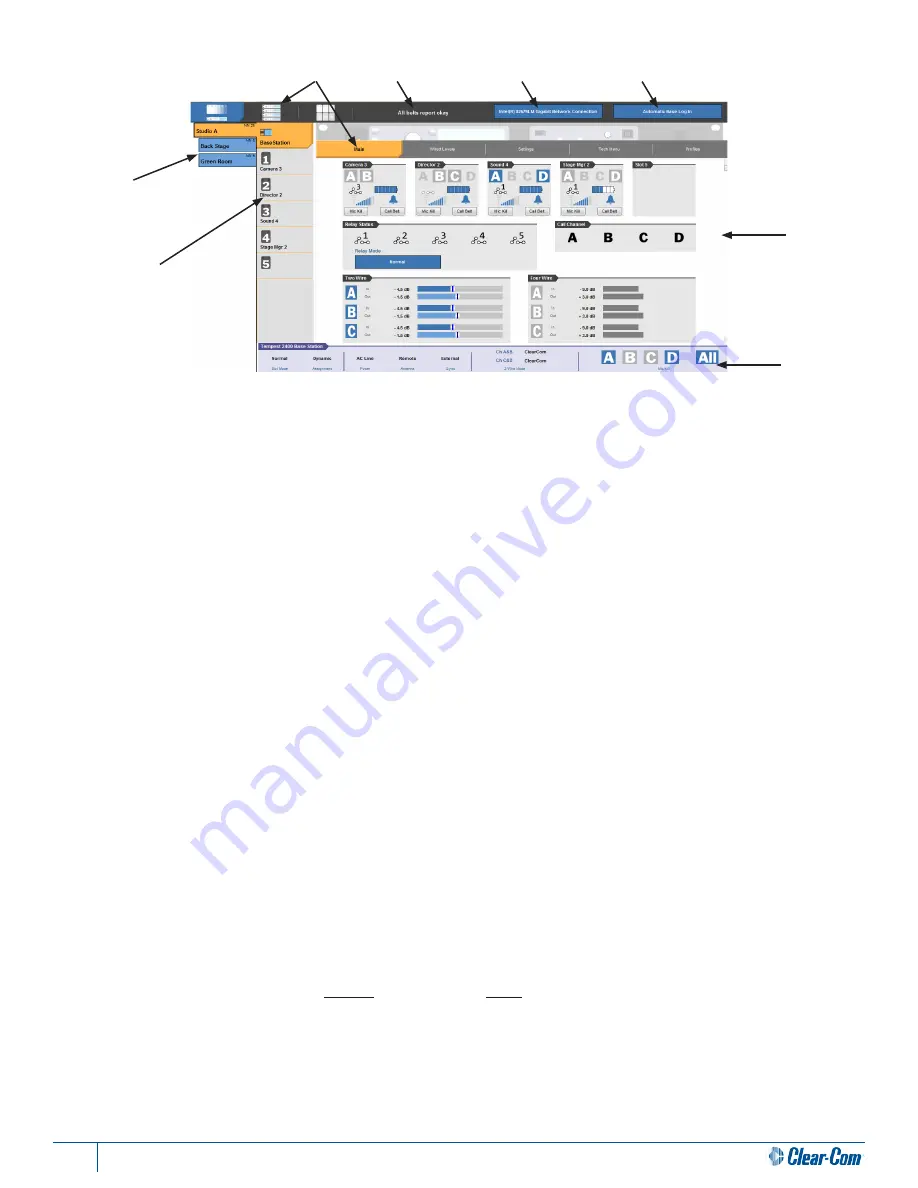


T-Desk Overview

1. 

BaseStation Navigation Pane - all LAN connected BaseStations will be listed on the left side of the screen in the 

BaseStation Navigation Pane, and may be selected for monitoring or optimizing. The selected BaseStation is 

highlighted in orange

 and others are listed on individual buttons with a 

blue

 background. BaseStations are not 

required to be named but descriptive names make managing multiple systems easier. You can rename BaseStations 

under the 

Tech Menu

 tab.  BaseStations can be sorted alphabetically by right-clicking on the navigation pane. 

Individual BaseStations can be selectively logged out manually from T-Desk by right-clicking on the BaseStation name.

2. 

BeltStation Navigation Pane - all BeltStations connected to the selected BaseStation will be displayed under the 

base, and any of those BeltStations can be selected for monitoring or optimizing.  The selected BeltStation will be 
highlighted in orange and the others will have a gray background. BeltStations are not required to be named, but 
descriptive names make managing mulitple belts easier.  You can rename BeltStations by selecting the appropriate 
belt under the BeltStation Navigation Pane and then clicking on the 

Tech Menu

 tab.

3.  Tabs

 - tabs are utilized throughout T-Desk to jump from screen-to-screen.  T-Desk consists of primary system tabs 

across the top of the screen including the: 

Main

 tab, 

Wired Levels

 tab, 

Settings

 tab, 

Tech Menu

 tab, and 

Profiles

 tab. 

By clicking on a tab, you advance to the user interface screen of that tab. Under each primary system tab, there are a 
series of sections which will direct you to specific system settings, features, and information. 

4. 

Battery Alert - this notifies the user of the battery status for BeltStations connected to any BaseStation.  If battery 

charge levels are sufficient, it will display “All belts report okay”.  If battery charge levels are low, a red battery icon will 
appear (see Low Battery Warning section).

5. 

Network Selection Button - this button enables the user to select from available networks and access BaseStations 

residing on other networks. Only one network can be selected at any given time.

6. 

Base Log-In Mode - this button allows the user to determine how BaseStations log in and out of T-Desk.  When in 

“Automatic”, BaseStations will come online automatically when properly configured and connected to the network.  
“Manual” mode allows the user to choose which BaseStations will appear in T-Desk.

7. 

Settings Window - this is where the selected BaseStation and/or BeltStation’s tab information will be displayed.

8. 

Dashboard Status Bar - this is located along the bottom of the T-Desk window in every tab.  The Dashboard displays 

a continuous snapshot of several system-wide settings as well as hosting a set of “Mic Kill” buttons for each intercom 
channel.  All items are informational with the exception of the “Mic Kill” buttons which will disable any open mic that 
resides on the associated button you click (

Ch A, Ch B, Ch C, Ch D, or All Ch

).  See below for more information.


MONITOR


STATUS


Slot Mode:  


Normal/Shared/Split


Assignment: 


Dynamic/Static


Base Power Supply:   

AC/DC


Base Antenna: 


Local/Remote


Base Sync:  


Internal/External


Chan A&B 2-Wire Mode: 

RTS/ClearCom/Bal


Chan C&D 2-Wire Mode: 

RTS/ClearCom/Bal


Mic Kill:   


A/B/C/D/All

6

7

8

1

3

4

2

5

Summary of Contents for T-Desk

Page 1: ...T Desk Desktop Software Reference Manual 399G115 Rev A 8 July 2014...

Page 2: ...This page intentionally left blank...

Page 3: ...Connection 2 System Requirements 3 Installation 3 T Desk Overview 4 BaseStation Main Tab 5 BaseStation Wire Levels Tab 7 BaseStation Settings Tab 8 BaseStation Tech Menu Tab 10 BeltStation Main Tab 1...

Page 4: ...istributed under licenses restricting its use copying distribution and decompilation reverse engineering No part of this document may be reproduced in any form by any means without prior written autho...

Page 5: ...d alone Tempest BaseStation with up to five BeltStations is as easy to operate as a cell phone However optimizing multiple Tempest BaseStations while connected to one or more wired intercom systems is...

Page 6: ...manual addressing can be selected or addressing can be disabled The following TCP IP modes are available via the BaseStation for connection to T Desk Disabled Disables LAN connection on rear of BaseS...

Page 7: ...ed for direct connection between the BaseStation and computers not equipped with Auto MDIX capability Installation A copy of T Desk is available from the Tempest Wireless CD provided by your Tempest W...

Page 8: ...b Under each primary system tab there are a series of sections which will direct you to specific system settings features and information 4 Battery Alert this notifies the user of the battery status f...

Page 9: ...five that are associated and logged into the currently selected BaseStation This information includes the name of the BeltStation talk channels enabled and in use battery level and alert RSSI Radio Si...

Page 10: ...is pressed the relay is closed Relay 5 is still available to work with any other trigger options available as it would in Normal mode The BeltStation relays are configured under the BeltStation s Main...

Page 11: ...utton under Master Mode Two buttons will appear click the On button When unavailable in RTS or Balanced BAL mode this button will be disabled and grayed out If there is no power on any of the 2 wire X...

Page 12: ...ch BeltStation as Program Volume with individual level control The Aux Out levels can be adjusted for all intercom channels A D and are measured in decibels dB To enable move the slider bar to any val...

Page 13: ...ed by moving the slider bar to the left down or the right up Headset microphones may be of Electret or Dynamic type and the BaseStation automatically detects which type is connected The gain for each...

Page 14: ...s to minimize the probability of inadvertent adjustments The front panel can be unlocked by pressing MENU ENT on the BaseStation as well as from T Desk BaseStation Tech Menu Tab Rename BaseStation Typ...

Page 15: ...this feature is not applicable Menu Lock Key This is the 3 digit security key required to unlock the Menu Lock feature Radio Configuration Proper configuration of the radio is critical for optimal pe...

Page 16: ...Next select the location where you would like to save the profile and be sure to assign the profile an appropriate name To load a profile click on the blue button labeled Load Profile Browse to the d...

Page 17: ...k A B or C D Button The Talk button s can be set to Latching Momentary or Disabled mode y y Channel Select a user can set each channel knob independently The channels can be set to Talk and Listen to...

Page 18: ...y y Minimum Volume the belt will not adjust lower than the minimum volume Talk Controls y y Mic Gain adjusts the Mic Gain level dB for the BeltStation y y Talk Tones when enabled the user will hear a...

Page 19: ...battery reaches 10 charge y y Menu Lock when enabled it allows the BeltStation menu to be locked Advanced Settings y y Roaming Bias this feature adjusts the parameters that determine when a BeltStatio...

Page 20: ...to the selected BeltStation To load a profile click on the blue button labeled Load Profile under the desired belt Next select which profile you would like to load to the BeltStation and click Open T...

Page 21: ...s status area Once all systems are optimized this screen provides an easy method for continuous moni toring of all BeltStations All Belts Tab The All Belts Tab is a real time snapshot of all BeltStati...

Page 22: ......

Page 23: ...www clearcom com...

Reviews: