background image

User manual robotic vacuum cleaner CleanMate RV500 series

48

FAQ

Malfunction

Causes

Solution

The robot will not 

charge

The robot has not made a 

connection with the charging 

base

Be sure that the robot´s charging contacts have made a 

connection with the charging pins. You may move the 

robot manually to make the connection if necessary.

The charging base is unlugged 

while the robot is powered 

on, which cause battery 

consumptation

Plug in the charing base and ensure the robot is 

powered on. Keep the robot on the charging base to 

make sure it has full battery to work at any time.

The battery is completely 

discharged

Reactivate the battery. Place the robot on the charging 

base by hand, remove after charging for 3 minutes, 

repeat 3 times, then charge normally.

The robot gets 

into trouble while 

working and stops.

The robot is tangled with 

something on the floor (cords, 

drooping curtains, etc.)

The robot will try various ways to get itself out of 

trouble. If it is  unsuccessful, manually remove the 

obstacles and restart.

The robot returns 

to the charging 

base before it 

finishes cleaning

When battery power gets 

low, the robot automatically 

switches to return to charging 

base.

This is normal. No solution necessary.

Working time varies according 

to floor surface, room 

complexity and the selected 

cleaning mode

This is normal. No solution necessary.

The robot 

will not clean 

automatically at 

scheduled time

The robot is powered off

Power on the robot.

The robot´s battery is low

Keep the robot powered on and on the charging base 

to make sure it has full battery to work at any time.

The robot´s suction intake is 

blocked and/or its components 

are tangled with debris

Power off the robot, clean the dust bin with filter, 

suction intake, side brushes, main brush regards 

maintenance in the manual.

Remote control 

failure (effective 

control range of 

remote control is 5 

m in free space)

The battery in the remote 

control need to be replaced

Replace with a new battery taking sure is is installed 

correctly.

The robot is powered off  or 

the battery is low

Make sure the robot is powered on and fully charged.

The infrared signal cannot 

be transmitted because the 

infrared emitter on remote 

control or infrared receiver on 

the robot are dirty

Use clean dry cloth to wipe the infrared emitter on 

remote control.

There is other equipment 

interfering with the infrared 

signal to the robot

Avoid using the remote control near other equipment 

using infrared signals.

Summary of Contents for RV500 Series

Page 1: ...verze 6 18 Model RV500 series CZ SK EN N vod k obsluze N vod na pou itie User manual Robot Vacuum Cleaner Robotick vysava Robotick vys va...

Page 2: ...komun ln ho odpadu prost ednictv m ur en ch sb rn ch m st Ekologick likvidace tohoto za zen je zaji t na v r mci kolektivn ho syst mu Retela www retela cz Pou it baterie nebo akumul tory nepat do net...

Page 3: ...ukl zen ho lav ch a vysoce t kav ch l tek jako je nap benz n i l h Nikdy nezakr vejte v trac otvory vysava e p edejdete tak zni en v robku Nepou vejte rozbit i poni en v robek S vysava em pou vejte p...

Page 4: ...Hnac kolo 4 Senzor proti p du 5 Kryt baterie 6 P edn vod c kolo 7 Prachov n dobka 8 Bo n kart ek 9 Nab jec kontakty 1 Tla tko Hlavn vyp na a z rove START STOP 1 Adapt r 2 Konektor adapt ru 3 Nab jec...

Page 5: ...r 6 Tla tko PAUZA 7 Tla tko CHARGING 8 Tla tko SPOT 9 Tla tko SCHEDULING odlo en start 10 Tla tko S N zv en v konu 11 Tla tko S N sn en v konu 12 Tla tko EDGE pod l roh Ochrann p ska Sou st balen je...

Page 6: ...series 6 Zahn te t sn koberce pod koberec a nenech vejte na podlaze dn oble en z v sy p ehozy atd Uvoln te prostor podlahy p i klidu aby do lo k klidu v ech m st podlahy P ed ukl zen m odkli te z podl...

Page 7: ...konektoru na boku z kladny a pot zapojte adapt r do el z suvky Nenech vejte okolo z kladny voln le et dn kabely ani kabel od adapt ru Po zapojen z kladny do el s t je p ipravena k nab jen vysava e UP...

Page 8: ...it nebo kalkuluje dal pohyb v pr b hu automatick ho klidu PAUZA Stiskem Hlavn ho vyp na e START na t le robota nebo tla tkem PAUZA na d lkov m ovl d n p eru te klid Stiskem tla tka AUTO na d lkov m ov...

Page 9: ...klid zah jil Zv en sn en sac ho v konu Pomoc d lkov ho ovl d n m ete nastavit vy i ni sac v kon P i ni m sac m v konu je robot ti a spot ebuje m n energie Vy sac v kon je vhodn pou t p i klidu koberc...

Page 10: ...a ne blikat ikona minut Stiskem ipky nahoru i dol nastav te spr vn minuty Nastaven hodin potvr te stiskem tla tky HODINY Spr vn as je ulo en NASTAVEN PL NOVA E KLIDU Stiskn te tla tko SCHEDULING pl no...

Page 11: ...ktu ln ho asu Jedn se o jednor zov klid vysava nebude ukl zet opakovan pokud op t nenastav te odlo en start pomoc d lkov ho ovl d n ZRU EN PL NOVA E KLIDU I ODLO EN HO STARTU Stiskn te a p idr te po d...

Page 12: ...ete prachovou n dobku odji t n m z mku na jej m lev m boku Vysypte obsah n dobky do ko e na odpadky N dobku m ete vyt t vlhk m had kem Vyndejte z n dobky filtr a o ist te jej vyklep n m nebo vys t m F...

Page 13: ...a vypnut Hlavn m vyp na em O ist te 4 senzory na spodn stran vysava e od prachu a dal ch ne istot jemn m such m had kem i vatovou ty inkou P EDN VOD C KOLE KO Ujist te se e je vysava vypnut Hlavn m vy...

Page 14: ...m kkou vodu Pevn zav ete v ko z sobn ku na vodu aby se voda nevylila UM ST N MOPU NA VYSAVA Oto te vysava spodn stranou vzh ru Za koly vysava e jsou such zipy Um st te mop do zadn sti vysava e tak aby...

Page 15: ...dr tky od baterie do krytu Kryt mus po dn zapadnout zatla te na n j dokud neusly te Click Pou itou baterii zlikvidujte na m stech t d n ho odpadu nevyhazujte ji do komun ln ho odpadu LED kontrolka Ba...

Page 16: ...ac do z kladny p li brzy Pokud je baterie vybit vysava se jede nab t Jedn se o norm ln stav a v e je v po dku Pokud jste zvolili jin re im ne AUTO po jeho dokon en se vrac do z kladny nebo se zastav J...

Page 17: ...e Li ION 2200 mAh V dr baterie 80 100 minut Spot eba 30 W Hlu nost 65 dB N doba na prach 500 ml Technick daje Z sobn k na vodu 170 ml D lk ovl d n IR s dosahem a 5 m Baterie v DO 2 ks typ LR03 AAA Roz...

Page 18: ...etky elektrick a elektronick v robky musia by likvidovan oddelene od komun lneho odpadu prostredn ctvom ur en ch zbern ch miest Ekologick likvid cia tohto zariadenia je zaisten v r mci kolekt vneho sy...

Page 19: ...vajte vys va pre upratovanie hor av ch a vysoko prchav ch l tok ako je napr Benz n alebo lieh Nikdy nezakr vajte vetracie otvory vys va a pred dete tak zni enie v robku Nepou vajte rozbit i zni en v r...

Page 20: ...e koleso 4 Senzor proti p du 5 Kryt bat rie 6 Predn vodiace koleso 7 Prachov n dobka 8 Bo n kefka 9 Nab jac kontakty 1 Tla idlo Hlavn vyp na a z rove START STOP 1 Adapt r 2 Konektor adapt ra 3 Nab jac...

Page 21: ...Tla idlo PAUZA 7 Tla idlo CHARGING 8 Tla idlo SPOT 9 Tla idlo Scheduling odlo en tart 10 Tla idlo SANIE zv enie v konu 11 Tla idlo SANIE zn enie v konu 12 Tla idlo EDGE pozd rohov Ochrann p ska S as...

Page 22: ...yti Zahnite strapce koberce pod koberec a nenech vajte na podlahe iadne oble enie z vesy prikr vky at Uvo nite priestor podlahy pri upratovan aby do lo k upratovaniu v etk ch miest podlahy Pred uprato...

Page 23: ...do konektora na boku z kladne a potom zapojte adapt r do el z suvky Nenech vajte okolo z kladne vo ne le a iadne k ble ani k bel od adapt ra Po zapojen z kladne do el siete je z klad a pripraven UPOZ...

Page 24: ...lebo kalkuluje al pohyb v priebehu automatick ho upratovania PAUZA Stla en m Hlavn ho vyp na a START na tele robota alebo tla idlom PAUZA na dia kovom ovl dan preru te upratovanie Stla en m tla idla A...

Page 25: ...enie zn enie sacieho v konu Pomocou dia kov ho ovl dania m ete nastavi vy i alebo ni i sac v kon Pri ni om sacom v kone je robot tich a spotrebuje menej energie Vy sac v kon je vhodn pou i pri uprato...

Page 26: ...ikona min t Stla en m pky nahor alebo nadol nastav te spr vne min ty Nastavenie hod n potvr te stla en m tla idla HODINY Spr vny as je ulo en NASTAVENIE PL NOVA E UPRATOVANIA Stla te tla idlo SCHEDULI...

Page 27: ...ho asu Jedn sa o jednorazov upratovanie robot nebude upratova opakovane ak op nenastav te odlo en tart pomocou dia kov ho ovl dania ZRU ENIE PL NOVA A UPRATOVANIA I ODLO EN HO TARTU Stla te a pridr te...

Page 28: ...prachov n dobku odisten m z mku na jej avom boku Vysypte obsah n dobky do ko a na odpadky N dobku m ete vytrie vlhkou handri kou Vyberte z n dobky filter a o istite ho vyklepan m alebo vysat m Filter...

Page 29: ...istite 4 senzory na spodnej strane robota od prachu a al ch ne ist t jemnou suchou handri kou alebo vatovou ty inkou PREDN VODIACE KOLIESKO Uistite sa e je robot vypnut Hlavn m vyp na om O istite kol...

Page 30: ...kk vodu Pevne zatvorte vie ko z sobn ka na vodu aby sa voda nevyliala UMIESTNENIE MOPU NA ROBOTA Oto te robot spodnou stranou nahor Za kolesami robota s such zipsy Umiestnite mop do zadnej asti robot...

Page 31: ...ryt mus poriadne zapadn zatla te na neho k m nebudete po u Click Pou it bat riu zlikvidujte na miestach trieden ho odpadu nevyhadzujte ju do komun lneho odpadu LED kontrolka Farva LED kontrolky V znam...

Page 32: ...z kladne pr li skoro Ak je bat ria vybit vys va sa ide nabi Ide o norm lny stav a v etko je v poriadku Ak ste zvolili in re im ne AUTO po jeho dokone e sa vracia do z kladne alebo sa zastav Ide o nor...

Page 33: ...a Li ION 2200 mAh V dr bat rie 80 100 minut Spotreba 30 W Hlu nos 65 dB N doba na prach 500 ml Technick daje Dia k ovl danie IR s dosahem a 5 m Bat rie v DO 2 ks typ LR03 AAA Z sobn k na vodu 170 ml R...

Page 34: ...ons relevant to the type of equipment Crossed out wheeled bin on the product packaging or literature indicates that in the European Union all electrical and electronic products batteries and the end o...

Page 35: ...ught in the unit and either prevent it from moving or the unit could pull over a lamp table or chair and cause damage to the unit floor object or person Please do not sit or stand on this product Pay...

Page 36: ...n Collided sensor 3 Driving Wheel 4 Anti Drop Sensor 5 Battery pack 6 Front Wheel 7 Dust Bin 8 Side Brush 9 Charging Contacts 1 Power Switch and START STOP button 1 Adapter 2 Power Socket 3 Charging P...

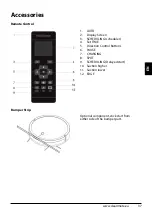
Page 37: ...2 Display Screen 3 SCHEDULING scheduler 4 Set TIME 5 Direction Control Buttons 6 PAUSE 7 CHARGING 8 SPOT 9 SCHEDULING Delayed start 10 Suction higher 11 Suction lower 12 EDGE Bumper Strip Optional co...

Page 38: ...ll arrange the furniture incase any stuck This products cleans bare floors and shortpile carpet It is not designed to clean longpile or shag carpet Please keep the corridor and other narrow area unobs...

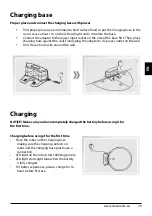
Page 39: ...t the wall Finally plug the adapter to AC power outlet on the wall Don t leave loose wire around the wall NOTICE Make sure you have completely charged the battery before using it for the first time Ch...

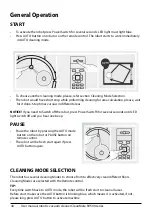
Page 40: ...reas PAUSE Pause the robot by pressing the AUTO mode button on the robot or PAUSE button on remote control The robot will be fresh start again if press AUTO button again CLEANING MODE SELECTION The ro...

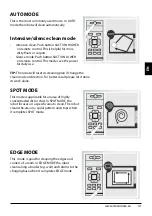
Page 41: ...ve silence clean mode Intensive clean Push button SUCTION HIGHER on remote control This is helpful for more dirty floors or carpets Silence mode Push button SUCTION LOWER on remote control This mode s...

Page 42: ...et HOUR Press LEFT direction button to set MINUTES Press FRONT BACK direction buttons on remote control to set MINUTES Setting won t work without press TIME button when setting done SCHEDULING schedul...

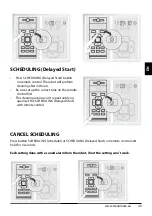
Page 43: ...set up the correct time on the remote control first This cleaning action won t repeat until you again set the SCHEDULING Delayed Start with remote control CANCEL SCHEDULING Press button SCHEDULING sc...

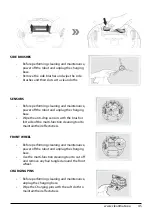
Page 44: ...re that suctin inlet is free from any dirty dust and obstacles DUST BIN AND FILTER Before performing cleaning and maintenance power off the robot and unplug the charging base Remove the filter and cle...

Page 45: ...charging base Wipe the anti drop sensors with the brush or felt side of the multi function cleaning tool to maintain their effectivness FRONT WHEEL Before performing cleaning and maintenance power of...

Page 46: ...bot and install the mop on the bottom of the robot After mopping uload the water tank from the machine take off the mop INSTALLING THE MOP Place the cleaning mop on the bottom of the robot The cleanin...

Page 47: ...or to the robot Carefully close the battery cover don t press the cables with the battery cover Do not dispose the old battery as unsortet municipal waste LED control Color of the LED control Robot st...

Page 48: ...automatically switches to return to charging base This is normal No solution necessary Working time varies according to floor surface room complexity and the selected cleaning mode This is normal No...

Page 49: ...y Li ION 2200 mAh Working time 80 100 minutes Rated power 30 W Noise 65 dB Dust bin 500 ml Specification Water tank 170 ml Remote cont IR range max 5 m Remote battery 2 pcs type LR03 AAA Dimension 34...

Page 50: ...Pou itie v robku pre in ely ne pre ktor je ur en vylu uje mo nos uplatnenia z ruky Pre uplatnenie z ruky je nutn predlo i riadne vyplnen zaru list opatren pe iatkou a podpisom predajca Autorizovan se...

Reviews: