background image

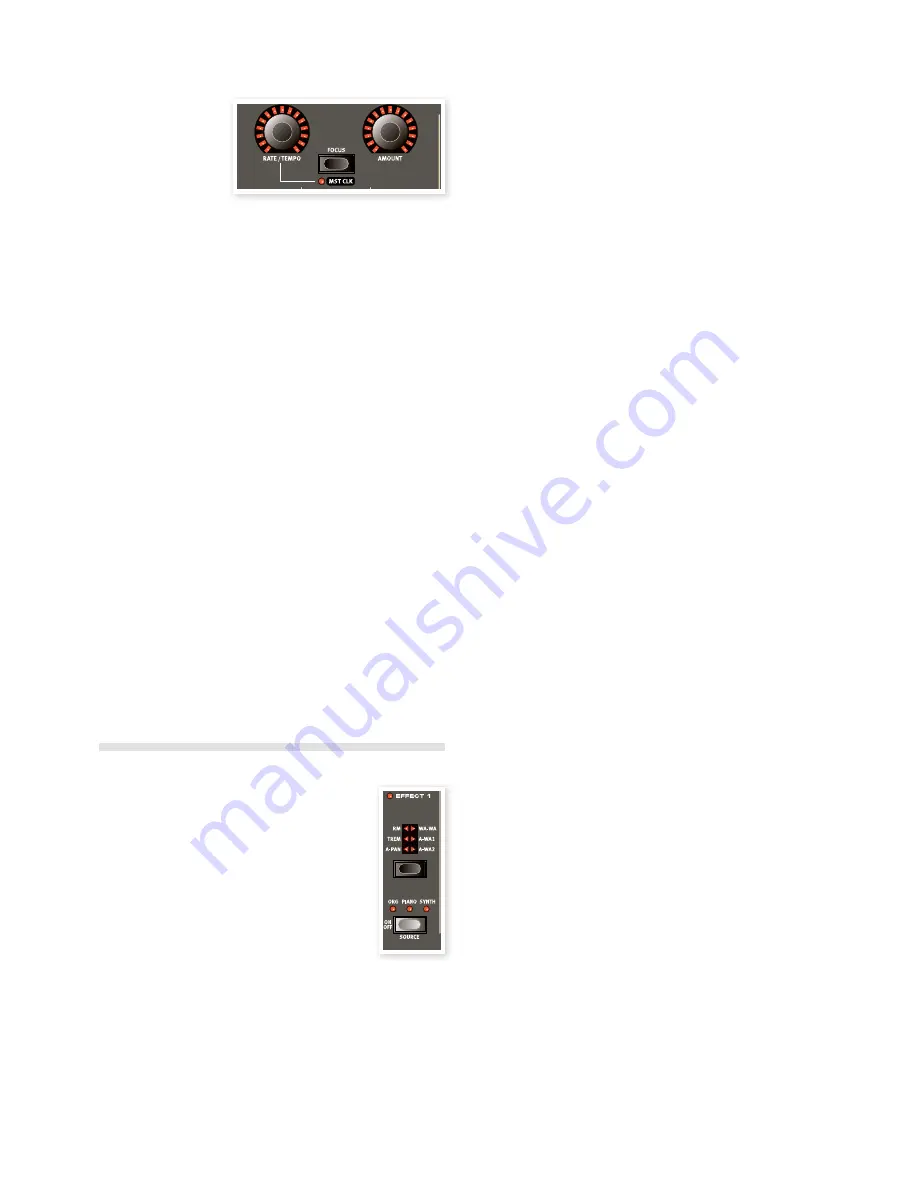
The Focus button 

If you have more than 
one effect activated in 
the Effects section (e.g. 
Effect 1 and Effect 2), 
the Focus button is used 
to select which effect’s 
settings (Rate/Tempo and Amount) you currently “see” and can edit. 
Pressing the Focus button will alternate focus between the currently 
activated effects. The LED beside the corresponding Effect 1/Effect 2/
Delay section is lit to indicate the effect in focus.

Mst Clk

Hold Shift and press the Focus button when an appropriate effect is 
selected, to synchronize the effect to the Master Clock. This changes 
the behavior of the Rate/Tempo knob, from the normal setting of a rate 
to setting a subdivision of the Master Clock’s tempo instead.

The subdivisions are not identical for the different synchronize-able 
features. The delay have some meters that can create a nice “swing” or 
triplet feel, like for example 1/4S (swing), 1/4T (triplet feel), 1/4D (dotted 
notes). The LFO and Effects 1 and 2 have a few “slow” subdivisions 
(4/1, 2/1 etc.) to make sweeps that stretches across entire bars if 
needed. 

Effect type selection when an Effect is off

When an effect is off, you can still check which effect type is selected 
by pressing the corresponding Effect Selector button once. The 
Selector LED will briefly show the current effect type. If you press the 
Selector button repeatedly, you change the Effect type without turning 
on the effect. In this way, you can make sure that the right effect type is 
selected before it is turned on.

This feature is available for Effects 1 & 2, the Amp simulation model 
and the Reverb.

You can also adjust the effect settings even if the actual effect is turned 
off. The values of the parameters will be shown in the display.

Effect 1 

The Effect 1 section offers six different types of 
modulation effects. Use the Selector button to switch 
between the available modulation effects. The following 
effects are available:

A-Pan (Auto Pan)

The A-Pan is an automatic panning modulation that 
smoothly pans the signal between the Left and Right 
outputs in the stereo panorama.

The rate and the amount of panning are controlled with the Rate/Tem-
po and Amount knobs. The Pan effect is stereo in/stereo out.

Static Pan control of an Instrument

Manual control of over the panning of an instrument can be achieved 
with the A-Pan effect:

Enable Effect 1 for the instrument you want to pan, and select the 
A-Pan effect type.

Set the Rate/Tempo knob to zero. Place the instrument anywhere 
in the stereo panorama with the Amount knob, just like a pan 
control on a mixer.

Trem (Tremolo)

Tremolo is a volume modulation that continuously varies the volume 
of the output signal. Tremolo is commonly used, especially for electric 
pianos. The Tremolo effect is stereo in/stereo out.

The Rate/Tempo and Amount knobs to controls the Tremolo rate 
and depth. Note that the output volume is at maximum level at zero 
Amount setting.

RM (Ring modulation)

Ring Modulation is a type of modulation where two signals are mul-
tiplied with each other. The result is an in-harmonic “bell like” sound. 
In the Nord Stage 2 EX the instrument signal is multiplied with an ad-
ditional sine wave.

You set the pitch of the sine wave with the Rate/Tempo knob and the 
amount of ring modulation with the Amount knob. This effect is mono 
in/mono out.

Wa-Wa

The Wah-Wah modulation is often used for instruments to get a 
characteristic sound, also known as the “Quack”. Wah-Wah can be 
extremely useful on electric piano. Try out the Clavinet sound with Wah-
Wah modulation and you’ll understand. The Wah-Wah modulation is 
a lowpass type of filter that can be swept across the frequency range. 
During the sweep, the filter’s characteristics also changes. The Wah 
effect is mono in/mono out.

You control the “pedal position” of the Wah with the Rate/Tempo knob 
and the wet/dry mix with the Amount knob. 

An expression pedal connected to the Control Pedal Input can be used 
to control the filter sweep by Morphing the Rate. This allows you to 
control the Wah-Wah effect with the pedal, using the Morph function - 
see page 19.

A-Wa 1 & 2 (Auto-Wah) 

Auto-Wah 1-2 are variations of the Wah-Wah effect described above. 
The A-Wa uses the signal’s amplitude (envelope follower) to control the 
filter sweep range, making the effect “velocity sensitive”. The range of 
the Auto-Wah 1 is controlled with the Rate/Tempo knob and the wet/
dry mix with the Amount knob.

A-Wa 2 works in the same way, but produces a different character. 

The A-Wa effects are mono in/mono out.


Chapter 9 effeCtS 

|  37

Summary of Contents for NordStage2 EX 88

Page 1: ...User Manual NordStage2 EX 88 NordStage2 EX HP76 NordStage2 EX Compact OS Version 2 x Part No 50444 Copyright Clavia DMI AB Print Edition B...

Page 2: ...flash with the arrowhead symbol within an equilateral triangle is intended to alert the user to the presence of uninsulated voltage within the products en closure that may be of sufficient magnitude t...

Page 3: ...21 Note Range 21 Latch Ped KB Gate 21 Output Routing 21 Using an external keyboard Dual KB 22 Using multiple keyboards 22 Master level 22 6 Organ Drawbars and buttons 23 Selecting The Organ Model 23 T...

Page 4: ...e Mode 44 Send MIDI Ctrl 44 Dump Program 44 Dump Synth 44 Extern Menu 45 Extern MIDI Mode 45 Extern MIDI A B Channel 45 Extern MIDI A B Volume 45 Extern MIDI A B Prog Change 45 Extern MIDI A B Bank Se...

Page 5: ...ment sections and two independent effect sections Amongst other things this allows for dual manual B3 organ emulation and easy setup of all kinds of instrument layering and splits About the User Manua...

Page 6: ...f charge on the www nordkeyboards com website Small Medium Large The acoustic grand pianos and uprights are available in several sizes X Large large medium and small The large medium and small sizes s...

Page 7: ...es both for pressing the pedal down and also releasing it If you allow your foot to slip off the edge of the pedal it will spring back with full force creating an obvious sound The floor sound is hear...

Page 8: ...d below the display An alternate method is to turn the Value Dial located to the right of the display 2 The Pages are accessed by pressing the Program Page 3 4 buttons repeatedly located above the Val...

Page 9: ...immediately snap to the knob s position Hold Shift and turn a knob to view the stored setting of a parameter in the display without changing it The Buttons Selector buttons are used to select one sett...

Page 10: ...ead more about Store and Store As renaming a program and assign ing it to a category in the Program chapter on page 17 Live Mode Nord s Live Mode feature provides you with five temporary program buffe...

Page 11: ...ditional layer combination If you press and hold a Slot button you can copy the settings of any other Slot in the memory by turning the Value Dial until you find the sound you wish to copy Release the...

Page 12: ...s for that one organ model on the different slots to create e g a traditional dual manual organ setup The Extern section can also be part of a split or layer scenario e g if you wish to control an ext...

Page 13: ...ton There are 300 memory locations for synth sounds Arpeggio clinic Are you ready for some action Let s try the Synth arpeggio 1 Make sure that only the Synth section is turned on Set the attack times...

Page 14: ...ut there is another way Let s synchronize the delay to the same clock as the arpeggio 5 Hold Shift and press the Focus Mst Clk button between the effect dials the Mst Clk LED lights up 6 Turn the effe...

Page 15: ...ond ing Slot button To get out of a dual slot situation hold the button of the slot that you wish to remain in focus and press the other one Copy settings from a slot Press and hold one of the Slot bu...

Page 16: ...ory is selected and you decide you wish to store the settings permanently as a program you can do so using the standard methods see below You can also store Programs into the Live memory locations in...

Page 17: ...he Ins Page 4 button you enter a blank space at the cursor position By holding down Shift and pressing the Del Page 3 button you erase the character at the cursor position Alternatively you can press...

Page 18: ...gram Page button M M The Program Bank and Program buttons are not affected by the sort mode If you e g use the Abc Sort to dial up a program named Betty 1 and this is located in Bank 2 Page 20 Program...

Page 19: ...trol simultaneously using Morph The following parameters can be controlled by the Morph sources The Level setting for all Instruments The Shape setting in the Synth oscillator section The filter Frequ...

Page 20: ...different keyboard zones Proceed as follows 1 Activate two instruments by pressing the KB Zone Select buttons in each corresponding section which makes the KB Zone LEDs Lo Up Hi light up 2 Press the...

Page 21: ...e button in the corresponding instrument section to activate the sustain pedal for an instru ment The Sustped LED is lit when this is turned on Press again to activate Pitch Stick reception and a thir...

Page 22: ...sounds but would in certain circumstances like to use to play the Nord Stage 2 EX second manual By activating Dual KB you can quickly switch between these modes without having to bother with MIDI men...

Page 23: ...hold a drawbar button the corresponding drawbar setting will continue to increment or decrement within its range until you release the button The drawbars can be Morph controlled if you want to make d...

Page 24: ...percussion is only present when you hit the keys when no other note is sounding In other words if you play a note or a chord and then add on more notes without releasing the previously pressed keys t...

Page 25: ...duce any sound Vibrato There are several types of vibrato and choruses available for the Vox model which is activated using the On button in the Vibrato section The V3 setting is the one that is model...

Page 26: ...ll is a characteristic feature that you control from an continuous pedal Swell is not only a volume control for the B3 it also changes the character of the sound in a special way To use Swell control...

Page 27: ...n instrument into the empty Model location Piano Select Type Use the Piano Type selector to choose which piano sound you want to use Type Description Grand Acoustic and electric grand pianos Upright U...

Page 28: ...ond Acoustics feature available if you have connected the Nord Triple Pedal to the Stage 2 EX not included sold separately By activating this the mechanical noise that happens when you operate the sus...

Page 29: ...between the slots Using the Slots you can play two different sounds simultaneously layered or in splits If you for example layer the Synth sections of both slots you can create really complex and evol...

Page 30: ...nd not very strong harmonics Sawtooth The sawtooth wave contains all harmonics and is the richest of the available waveforms It is suitable for all sorts of sounds Pulse The pulse wave contains only o...

Page 31: ...odulator s frequency relation to the carrier If an operator uses feedback it is indicated by a dot next to the digit In the chart below all available algorithms together with the notation used in the...

Page 32: ...n the sample playback will begin at a fixed alternative starting point which will bypass most if not all of the original attack portion of the sample Load Sound When you save a Stage 2 EX program the...

Page 33: ...e low frequency oscillator the LFO The Freq Mod 1 knob sets the amount of modulation Freq Mod 2 This knob governs the amount of the second modulation source to the Filter Frequency Set the knob to a p...

Page 34: ...ed by the LFO Waveform Description Notethat theModulationalwaysstartsat maximum amp Square no LED lit Use for abrupt modulation changes suit able for trills distinct tremolos etc Notethat theModulatio...

Page 35: ...h Sound press Shift and the Store Synth button in the Vibrato section The waveform display starts blinking You can now use the waveform selector dial to navigate to a memory location where you would l...

Page 36: ...mono in stereo out The channel configuration is stated in the related text for each individual effect Whenever this ap plies it will also be explained in the corresponding effect description The Slot...

Page 37: ...effect is stereo in stereo out Static Pan control of an Instrument Manual control of over the panning of an instrument can be achieved with the A Pan effect 1 Enable Effect 1 for the instrument you w...

Page 38: ...and press the tap tempo button to activate the Ping Pong mode This will make the delay repeats alternate between the left and right channels If short delay times are used these repeats will be asymme...

Page 39: ...e Slot Effects by pressing the Source button You switch between fast and slow rotor speeds by pressing the Slow Stop button To stop the rotors press the Stop Mode button to activate the Stop Mode and...

Page 40: ...on Activating Activate the Extern section in order to have Extern transmit MIDI from your Nord Stage 2 EX This is done by pressing the On button under the Parameter rotary encoder in the same fashion...

Page 41: ...e turned off If the external instrument organizes programs in Banks there is an op tion to send Bank Change messages on the Extern Menu page see page 45 MIDI CC This feature makes it possible to trans...

Page 42: ...e how the Nord Stage 2 EX keyboard triggers Organ sounds When High is selected you will trigger organ sounds before the key is fully depressed This mode closely mimics the way a original tonewheel org...

Page 43: ...Stage 2 EX instruments Range Swell Default Volume Memory Protection This is set to On when Nord Stage 2 EX leaves the factory meaning that you cannot save any changes to Programs or Synth Sounds Set...

Page 44: ...available only through MIDI Range MIDI 1 16 USB1 USB16 Off Default off MIDI Piano A B Channel This sets the receiving MIDI channel for the Piano section A B If a channel is selected here you can assi...

Page 45: ...o set a value for a MIDI Bank Select message on Control Change address 32 cc 32 M M There are many different variations between instruments in how Banks are numbered and accessed via MIDI Please consu...

Page 46: ...to the unit and func tionality for backing up and restoring the entire Nord Stage 2 EX memory The Nord Sound Manager and the user manual for the application can be found on the DVD that was delivered...

Page 47: ...re active on the program that is selected on the Stage 2 EX If your program includes layers and or splits those aspects will be acknowledged in the same way as if you used the keyboard itself when inc...

Page 48: ...he desired value and it will be transmitted along with the rest For yet another layer of integrated control set up a Morph to control the Extern encoder via the mod wheel aftertouch or a control pedal...

Page 49: ...MIDI notes to the Stage 2 EX and the Extern section is active incoming MIDI notes can be re routed to the MIDI Output of the Stage 2 EX on the MIDI channel that is set for the Extern section This all...

Page 50: ...ly and other being controlled by the Stage 2 EX itself There are no limitations to the channel settings in the MIDI menu it is quite possible to have more than one receptor react to the same MIDI chan...

Page 51: ...u experi ence double triggered notes when you play both from the keyboard internally and via the MIDI loop Local On Off is set in the MIDI menu which is described on page 44 Panic If notes should hang...

Page 52: ...13 Synth Oscillator Mode 43 Synth Waveform Select 44 0 127 Synth Oscillator Shape 45 Synth Oscillator Shape Mod 46 Synth Filter Frequency 48 Synth Filter Resonance 49 Synth Filter Vel Env Mod 2 Synth...

Page 53: ...27 O v 1 127 O v 1 127 After Key s Touch Channel X O X O Pitch Bender O O Control Change O O Program Change True O 0 127 O 0 127 System Exclusive O O System Song Pos Common Song Sel Tune X X X X X X S...

Page 54: ...M Signals connected to this input will not be processed with the Stage 2 EX s effects or appear at the line level output jacks1 4 USB Connection The USB connection is used for the Nord Stage 2 EX to...

Page 55: ...tary pedal connected to the Rotor Latch input to operate as a latching pedal for selected instruments This func tionality can be activated for the instruments and the latch operation needs to be selec...

Page 56: ...e any changes as they are made and remember these settings after the power is shut off Furthermore the Synth is capable of storing 300 synthesizer sounds The content of Program Bank A is duplicated in...

Page 57: ...Info Piano 27 Ins 18 Instrument MIDI 47 K KB Gate 21 KB Track 33 KB Zone Select 20 L Latch Ped 21 Legato mode 35 Level encoders 20 LFO 34 Live Mode 16 Load Sound 32 Low Pass 32 M Master level 56 MIDI...

Page 58: ...ort Mode 18 Sostenuto 7 55 Sound Init 35 Sound Menu 43 Split Keyboard 19 Stop Mode 39 Store 16 Store As 16 String Resonance 28 String Resonance Level 43 Sustenuto 28 SustPed 21 Synth Init 18 System Me...

Page 59: ...nterference to radio or television reception which can be determined by turning the equipment off and on the user is encouraged to try to correct the interference by one or more of the following measu...

Page 60: ......

Reviews: