background image

12  |   Nord ElEctro 4 HP/SW USEr MaNUal oS v1.1x

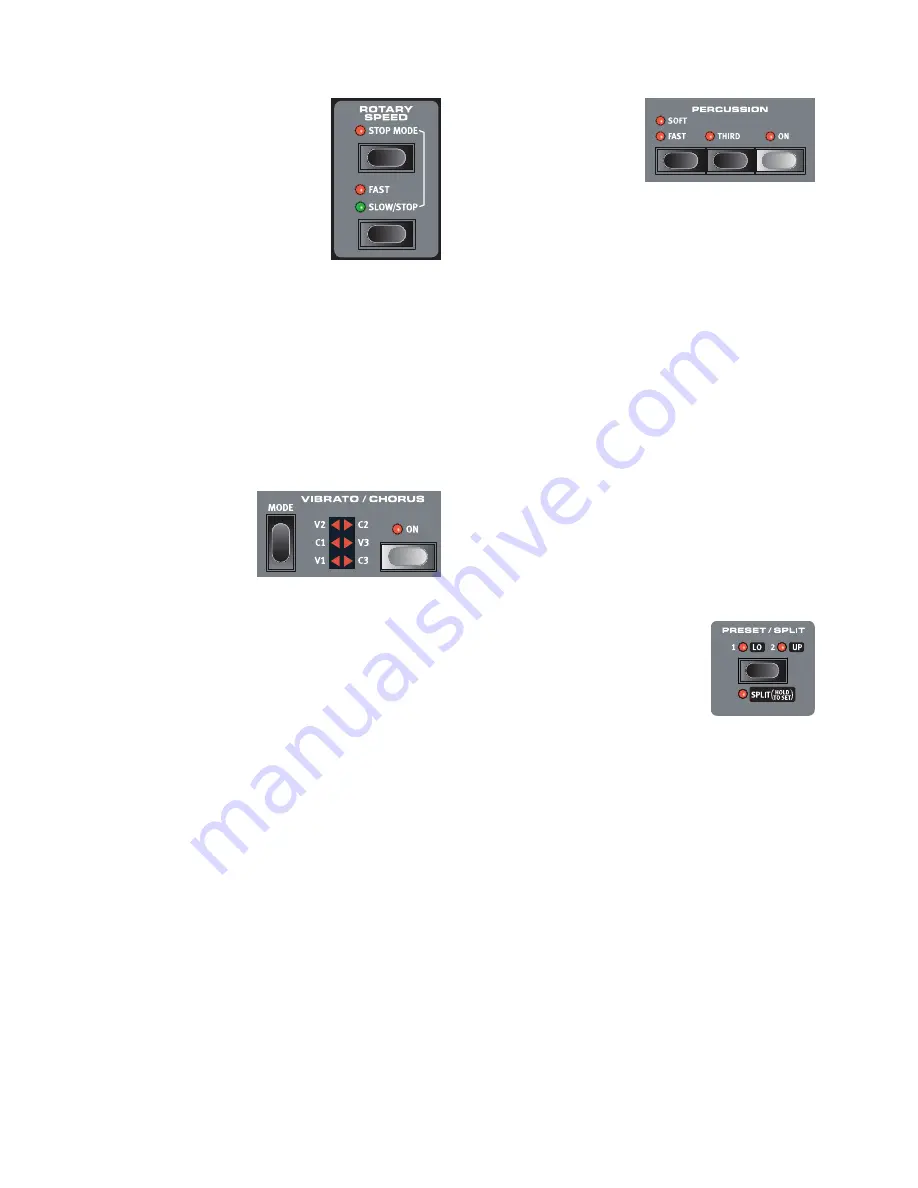
Rotary Speed 

The rotary speaker speed is controlled with 
the rotary speed buttons or with an external 
pedal connected to the rotor pedal input on 
the rear panel . 

Press the Slow/Stop button to change the 
rotation from Slow to Fast and vice versa . 

To stop the rotors, press the Stop Mode 
button to activate the Stop Mode and then 
the Slow/Stop button (this does not deacti-
vate the Rotary Speaker simulation - it only stops the rotors) . When you 
press the Slow/Stop button again the rotors will accelerate to the Fast 
speed setting . This functionality mimics the behavior of an early, one 
speed original rotary speaker .

A connected pedal can be set to change the speeds only when it is 
held down or to function like a switch, changing the speed every time 
you press it . This functionality is set in the System menu, read more on 
this on page 17 .


M

The actual rotary simulation is activated at the Effects section, with 
the Speaker/Comp selector.

Vibrato/Chorus 

The Vibrato/Chorus section 
mimics the behavior of the 
original organs, which means 
that these parameters func-
tionality depends on which 
model is active . Select the 
desired vibrato or chorus type by repeatedly pressing the Mode button . 
The Vibrato/Chorus section is common for both the upper and lower 
presets, if the split function is active .

B3 

– The original tonewheel organ’s vibrato and chorus scanner 

consists of a tapped delay line in combination with a rotating scan-
ner . For the Vibrato effect, phase shift is applied to the signal . For the 
Chorus effect, a phase modulated signal is added to the original signal . 
Three different types of choruses (C1- C3) and three different types of 
vibratos (V1-V3) are available .

VX 

- There is only one type of vibrato available for the VX model, which 

is activated using the ON button in the Vibrato section .

Farf 

- This model has two basic vibrato modes; “Light” and “Heavy”, 

with two different rates for each mode .

Percussion 

The Percussion effect adds 
extra attack to the B3 sound by 
having a single envelope gener-
ator controlling either the 2nd or 
the 3rd harmonic . The envelope 
“opens up” for a short moment 
in the beginning of the sound when you press the key(s) . The percus-
sion will only affect the upper manual if the Split function is active . 

The Percussion is a single-triggered non-legato effect . It is only present 
when you hit the keys when no other note is sounding . In other words, 
if you play a note or a chord and then add on more notes without 
releasing the previously pressed keys, there will be no percussion effect 
in the new notes . You have to release all keys to be able to play new 
notes with the percussion effect .

The percussion effect is activated and deactivated by pressing the On 
button . The Soft/Fast button toggles between normal or soft per-
cussion levels and fast or slow decay times, providing four available 
combinations . The Third button toggles between using the 2nd or 3rd 
partial as the source for the percussion effect . The percussion decay 
times (and levels) can be fine-tuned for Fast and Slow mode individu-
ally . Please refer to the B3 Menu on page 19 for details .


M

With the original instrument, you could not use the percussion 
effect and 9th drawbar simultaneously. However with the Nord 
Electro 

4 HP/SW

 you have a choice. You can use the percussion 

and 9th drawbar together or chose to mimic the original organ 
behavior by turning off the 9th drawbar whenever the percussion 
is activated. Read more on the Perc Drawbar 9 setting in the B3 
menu on page 19.

Preset/Split 

Use the 1/Lo and 2/Up buttons to recall two 
separate settings for the organ section . 

Press the Shift and the Split button to divide 
the Nord Electro 4 HP/SW keyboard in two 
sections, the Lower Manual and Upper Manual 
sections . By default, the split point on the 
keyboard is between the keys B3 and C4 . 

You can set the split point by holding Shift + pressing Split, the split LED 
starts to flash, then while still holding both buttons press the desired key . 
A set split point is saved as part of the parameters in a program .

Additional MIDI keyboard

You can connect an additional MIDI keyboard to the Electro 4 HP/SW 
to use the organ in a dual manual fashion, with the external keyboard 
operating as the lower manual . 

Connect the external MIDI keyboard’s MIDI out to the Electro 4 
HP/SW’s MIDI in . 

Set the MIDI channel of the external keyboard to the channel that 
is set in the MIDI menu, the Lower Channel setting . 

The default Lower MIDI channel in the Electro 4 HP/SW is “2” .

Select the MIDI Split option in the MIDI Menu (the 7th option) and 
set this to On .

Read more on how to change settings in the MIDI Menu on  page 18 .

Press and hold Shift and the Split button .

Summary of Contents for Nord Electro 4 SW

Page 1: ...User Manual Nord Electro 4 HP Nord Electro 4 SW OS Version 1 1x Part No 50385 Copyright Clavia DMI AB Print Edition F...

Page 2: ...flash with the arrowhead symbol within an equilateral triangle is intended to alert the user to the presence of uninsulated voltage within the products en closure that may be of sufficient magnitude t...

Page 3: ...EQ 15 Effect 1 15 Effect 2 16 Speaker Comp 16 Delay Reverb 16 Feedback 16 Ping Pong 16 Tempo Tap 16 Gain 16 6 The Menus System Menu 17 1 Memory Protect On Off 17 2 Output Routing 17 3 Transpose 17 4 F...

Page 4: ...Electro 4 HP SW in the very first few pages of this manual After that follows the reference section where all the functions are explained in detail Disclaimer All trademarks and brand names mentioned...

Page 5: ...re conveniently printed to the right on the panel The menus are de scribed in the Menu chapter that begins on page 17 Knobs buttons Knobs The knobs control the continuously variable pa rameters in the...

Page 6: ...ear at the Electro 4 HP SW s left and right output jacks MIDI Connections MIDI Out MIDI connection used for sending keyboard and panel generated MIDI data from the Nord Electro 4 HP SW to other equipm...

Page 7: ...nnected to the sustain pedal input to control sustain for piano sounds and rotary speed selection for organ sounds page 17 Control Pedal stereo connector for a pedal of the potentiometer type also kno...

Page 8: ...he next electric piano You can of course organize the programs in any order you want Such a process can be done quite easily by using the drag and drop features in the Nord Sound Manager Edit a progra...

Page 9: ...manual key The Rotary effect The rotary effect adds some great sonic drama to the organs but can of course be used with any other sound as well The Electro 4 HP SW rotary has three available speeds fa...

Page 10: ...range Each instrument has a finite note range read more about this on page 15 This means that upper keys may become silent if you transpose upwards Adding effects 1 Select the program number 1 1 whic...

Page 11: ...eel Mode on page 19 These will dramatically change the sound of the B3 model from squeaky clean to a battered old work horse The VX model The original instrument is probably the most famous of all the...

Page 12: ...e Split function is active The Percussion is a single triggered non legato effect It is only present when you hit the keys when no other note is sounding In other words if you play a note or a chord a...

Page 13: ...lly simulated in the Nord Electro 4 HP SW which means that you get all the possible original Clavinet D6 sound varia tions plus an additional four by selecting different pick up and filter combination...

Page 14: ...Rotary menus The 128 programs in the Electro 4 HP SW are organized in 32 pages with 4 programs in each page Up Down buttons The Up Down buttons to the left of the display have several functions in th...

Page 15: ...instrument not being used as the active in the program This allows you to quickly change from for example a piano performance with some effects turned on to an organ performance with another set of e...

Page 16: ...natural sound reflections in various acoustic environments You can choose between five reverb types with various lengths and densities indicated by the three LEDs that light up one or two at a time Th...

Page 17: ...t to use it for sustain with piano sounds and as a Rotor Speed switch with organ sounds In this case select rt rotor toggle with the Up Down buttons If you re using two separate sustain pedals one in...

Page 18: ...e on the DIN connectors or the USB MIDI functionality Range P DIN MIDI ports U USB MIDI default 3 MIDI Channel This sets the MIDI Channel that the Nord Electro 4 HP SW transmits and responds to Range...

Page 19: ...ll be muted when the percus sion is activated to mimic the behavior of an original organ Range C Cancel nO Normal default Rotary Menu 1 Rotary Model There is one rotary model available with two separa...

Page 20: ...The Nord Sound Manager is compatible with computers running Mac OSX 10 4 or later Windows XP Windows 7 and Windows Vista If you run the Nord Sound Manager on a Windows computer you also need a Clavia...

Page 21: ...a sequencer Connections 1 Connect the MIDI Out on the Nord Electro 4 HP SW to the MIDI In on your sequencer 2 Connect the MIDI Out from your sequencer to the MIDI In on the Nord Electro 4 HP SW Local...

Page 22: ...ssion on the transmitting device If the dump contained all Programs All it will replace all programs cur rently stored in the Nord Electro 4 HP SW If the dump contained only a single program it will b...

Page 23: ...ey s Touch Channel X X X X Pitch Bender X X Control Change O O Program Change True O 0 127 O 0 127 System Exclusive O O System Song Pos Common Song Sel Tune X X X X X X System Clock Realtime Commands...

Page 24: ...onitor In 6 Mono 13 O Octave Shift 10 15 Organ Model 11 Organ section 11 Organ Trig 18 Output Routing 17 P Perc Drawbar 9 Cancel 19 Perc Norm Level 19 Perc Slow Decay 19 Perc Soft Level 19 Percussion...

Page 25: ...he source of interference to radio or television reception which can be determined by turning the equipment off and on the user is encouraged to try to correct the interference by one or more of the f...

Page 26: ......

Reviews: