•
ALWAYS DISCONNECT THE MACHINE before servicing or changing
accessories.
•
AVOID ACCIDENTAL STARTING. Ensure the machine is switched OFF before
plugging in.
•
CHECK FOR DAMAGE. If part of the machine (eg. A cover or guard), is
damaged, it should be carefully inspected to ensure it can perform its’
intended function correctly. If in doubt the part should be renewed. Damage
to moving parts or major components should be Inspected by a qualified
technician before operating the machine. Contact your local dealer for
advice.
•
DO NOT STAND ON THE MACHINE. Serious injury could occur if the machine is
tipped over. Do not store materials above or near the machine such that it is
necessary to stand on the machine to get to them.
•
NEVER operate a machine when under the influence of alcohol, drugs or
medication.
5
ADDITIONAL SAFETY RULES FOR WOOD LATHES
WARNING:
THIS MACHINE MUST NOT BE MODIFIED, OR USED FOR ANY PURPOSE OTHER
THAN THAT FOR WHICH IT IS DESIGNED.
•
IMPORTANT
: You should not operate this machine unless you are thoroughly
familiar with wood turning lathes and wood turning techniques. If there is any
doubt whatsoever, you should consult a qualified person.
•
Do not operate the machine until it is completely assembled, and this entire
manual, has been read and understood.
•
Ensure the proper electrical regulations are followed, and that the machine is
properly earthed.
•
Before switching the machine ON,
ALWAYS
:-
a.
Clear the lathe bed of ALL objects (tools, scraps of wood etc.)
b.
Examine the setup carefully, ensuring nothing could possibly interfere with
the rotating workpiece. eg. The tool rest is secure and not liable to swing
into the workpiece. Rotate the workpiece by hand to check clearance.
c.
Ensure the tool rest is adjusted to the correct height, and is as close to the
workpiece as possible.
d.
Ensure all clamps are properly secured.
e.
Your clothing is properly adjusted.
f.
Ensure the workpiece is centralised
Headstock
Live Centre
Face Plate
Drive Spindle
Spindle Collar
Key (4x4x85mm)
Bearing (6205ZZ)
Bearing (6205ZZ)
Spring
Bracket Shift Lever
Ball Bearing (6006Z)
Circlip
Pulley Spindle (Right)
V-Belt 23mm
Pulley Spindle (Left)
Circlip
Tommy Bar
Lock Nut 12mm
Clamp Left
Hex Screw 8x20mm
Rack
Gear Assembly
Hex Socket Screw
Clamp Right
Hex Screw
Clamp Spindle
Headstock Clamp Handle
Hex. Wrench
Circlip
Sleeve
Spring
Pulley Motor (Right)
Pulley Motor (Left)
Pan Head Screw 5x10mm
Key 4x4x85mm
Motor
Cover Motor
Headstock Lock Assy
Tool Rest
SD2001RV
SD2002RV
SD2003RV
SD2004RV
SD2004ARV
SD2005RV
SD2006RV
SD2007RV
SD2008RV
SD2009RV
SD2010RV
SD2011RV
SD2012RV
SD2013RV
SD2014RV
SD2015RV
SD2016RV
SD2017RV
SD2018RV
SD2019RV
SD2020RV
SD2021RV
SD2021ARV
SD2022RV
SD2023RV
SD2024RV
SD2024ARV
SD2025RV
SD2026RV
SD2027RV
SD2028RV
SD2029RV
SD2030RV
SD2031RV
SD2032RV
SD2033RV
SD2034RV
SD2035RV
SD2036RV
37
38
39
40
40A
41
42
43
44
45
46
47
48
48A
49
50
51
52
53
53A
54
54A
54B
54C
54D
55
56
57
58
59
60
61
62
63
64
65
66
67
68
Handle Assy
Tool Rest Extension
Tool Rest Body
Tool Rest Clamp Rod
Tool Rest Clamp Handle
Circlip
Bolt
Clamp
Hex Nut 18mm
Centre
Tailstock Spindle
Tailstock Screw
Tailstock
Set Screw
Handle
Locking Handle - Tailstock
Bolt
Extension Bed
Screw 10x25mm
Spring washer
Stand Assembly
Stand Leg
Bed Mounting Plate
Stand Long Cross Member
Stand Short Cross Member
Lathe Bed
Screw 8x16mm
Switch
Screw 4x16mm
Plastic Jam nut
Carriage Bolt
Washer
Nut 8x18 NC
Power cable
Label
Warning Label
Speeds Label
Headstock Mounting Ring
Mounting Ring Allen Screw
SD2037RV
SD2038RV
SD2039RV
SD2040RV
SD2040ARV
SD2041RV
SD2042RV
SD2043RV
SD2044RV
SD2045RV
SD2046RV
SD2047RV
SD2048RV
SD2048ARV
SD2049RV
SD2050RV
SD2051RV
SD2052RV
SD2053RV
SD2053ARV
SD2054RV
SD2054ARV
SD2054BRV
SD2054CRV
SD2054DRV
SD2055RV
SD2056RV
SD2057RV
SD2058RV
SD2059RV
SD2060RV
SD2061RV
SD2062RV
SD2063RV
SD2064RV
SD2065RV
SD2066RV
SD2067RV
SD2068RV
1
2
3
4
4A
5
6
7
8
9
10
11
12
13
14
15
16
17
18
19
20
21
21A
22
23
24
24A
25
26
27
28
29
30
31
32
33
34
35
36
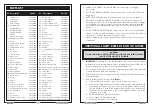
No. Description
Part No.
No.
Description
Part No.
PARTS LIST
16


