background image

English

21


CZ309A

iPod Operations

This section describes operations when 
connected to an Apple iPod via the USB slot.

Notes:

• See the iPod Owner’s Manual for details 

regarding operation conditions.

• The unit will not operate, or may operate 

improperly with unsupported versions.

• For a list of compatible Apple iPod unit with the 

this model, please contact your Clarion dealer or 
www.clarion.com.

• “Made for iPod” means that an electronic 

accessory has been designed to connect 
specifically to iPod and has been certified by the 
developer to meet Apple performance 
standards.
Apple is not responsible for the operation of this 
device or its compliance with safety and 
regulatory standards. 
iPod and iTunes are trademarks of Apple Inc., 
registered in the U.S. and other countries.

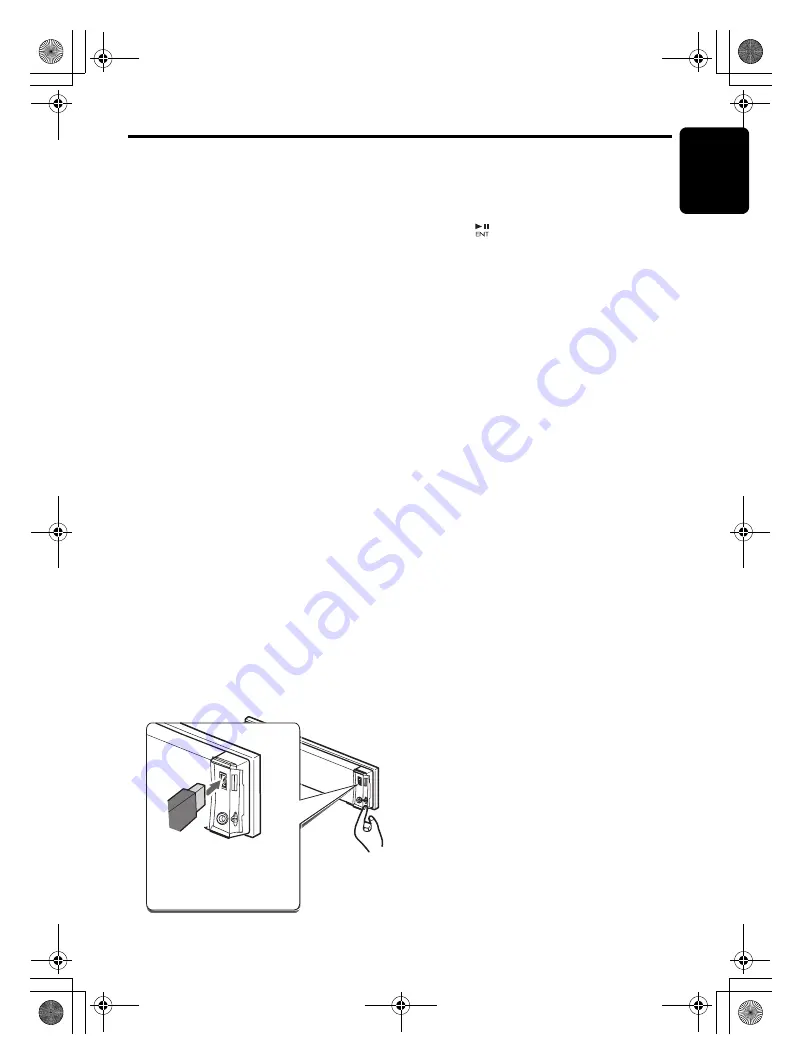
Connecting an iPod

When an iPod is connected to the USB slot, 
“Shuffle” set on the iPod will become as follows:

• “Shuffle (Albums)” play 

 Random play 

• “Shuffle (Songs)” play 

 All random play

The iPod has two modes, the “Play mode” and 
the “iPod menu mode” for selecting tracks. 
Switch between these modes by pressing the 
[

BND

] button for 1 second or longer. 

Note:

• To connect iPod, please use the USB cable 

attached in iPod. 

Select iPod mode

1. Press the [

SRC

] button.

Playback will begin from the last file that was 
played on the iPod.

Note:

• The following operations in Play mode operate 

the same as in CD mode:

Track selection:

 [

x

], [

v

]

Fast-forward/fast-backward:

 [

x

], [

v

]

Pause:


[

]

Top function:

 [BND]

See “

CD/MP3/WMA/AAC Operations

” (page 12-

15) for details.

Other various play functions 
(in Play mode)

Notes:

• These functions are not supported when in the 

iPod menu mode.

• The Random function set on the iPod remains the 

same after attachment/detachment of the iPod.

• The Repeat function on the iPod will be changed 

when you connect/disconnect the iPod to the 
unit.

Repeat play

Play back one track repeatedly. 

1. Press the [

RPT

] button.

Random play

Play all albums within a selected category, in 
random order. (Corresponds to “Shuffle 
(Albums)” command on iPod.)

1. Press the [

RDM

] button.

All random play

Play all tracks within a selected category, in 
random order. (Corresponds to “Shuffle 
(Songs)” command on iPod.)

1. Press and hold the [

RDM

] button for 1 

second or longer.

To cancel play

1. Press the same play button once again.

Notes:

• When the repeat play mode is canceled, after 

play all tracks within a selected category, 
playback will begin from the first track in the 
selected category.

• When playing the last track within a selected 

category in Random mode, if ACC is switched off 
then on again, playback will begin from a 
different track.

• Though the default setting of an iPod is “

All 

Repeat

”, the indication on the mode status is not 

displayed.

Confirm the proper 
orientation of the iPod 
connector 

b

efore 

inserting.

iPod cable

CZ309A_ENG.book  Page 21  Thursday, November 27, 2008  1:53 PM

Summary of Contents for CZ309A

Page 1: ...CZ309A CZ309A_ENG book Page 1 Thursday November 27 2008 1 53 PM ...

Page 2: ...English 2 CZ309A CZ309A_ENG book Page 2 Thursday November 27 2008 1 53 PM ...

Page 3: ...ONTROL PANEL 6 5 REMOTE CONTROL 7 Functions of Remote Control Unit Buttons 7 Inserting the Battery 8 6 OPERATIONS 9 Basic Operations 9 Radio Operations 11 CD MP3 WMA AAC Operations 12 Operations Common to Each Mode 16 7 ACCESSORIES 19 USB MTP Operations 19 iPod Operations 21 CD Changer Operations 23 DVD Changer Operations 24 TV Operations 24 8 TROUBLESHOOTING 26 9 ERROR DISPLAYS 28 10 SPECIFICATIO...

Page 4: ...THORITY TO OPERATE THE EQUIPMENT Handling Compact Discs Compared to ordinary music CDs CD R and CD RW discs are both easily affected by high temperature and humidity and some of CD R and CD RW discs may not be played Therefore do not leave them for a long time in the car Never stick labels on the surface of the compact disc or mark the surface with a pencil or pen Display Screen In extreme cold th...

Page 5: ...ay while in the CD MP3 WMA AAC mode RPT button Perform repeat play while in the CD MP3 WMA AAC mode SCN button Perform scan play while in the CD MP3 WMA AAC mode ISR button Recall ISR radio station in memory Press and hold the button for 2 seconds or longer Store current station into ISR memory radio mode only DISP button Switch the display indication ROTARY knob Adjust the volume by turning the k...

Page 6: ... shown in the figure below and put it into the supplied DCP case Ensure the DCP is in the correct orientation CAUTION The DCP can easily be damaged by shocks After removing it be careful not to drop it or subject it to strong shocks When the Release button is pressed and the DCP is unlocked the car s vibrations may cause it to fall To prevent damage to the DCP always store it in its case after det...

Page 7: ...wn SCN button Press to perform preset scan Press and hold the button for 2 seconds or longer to perform auto store CD MP3 WMA AAC and USB MTP modes BND button Press to play the first track x v buttons Press to move the tracks up and down Press and hold the button for 1 second or longer to perform fast forward fast backward Except DRM file button Switches between playback and pause SCN button Press...

Page 8: ...onger to perform all random play TV mode BND button Switches reception band x v buttons Moves preset channels up and down SCN button Press to perform preset scan Press and hold the button for 2 seconds or longer to perform auto store RDM button Press to alternate between TV and VTR Inserting the Battery 1 Turn over the remote control unit and slide the cover in the direction indicated by the arrow...

Page 9: ... MTP can connect to this unit via USB SLOT Adjusting the volume 1 Turning the ROTARY knob clockwise increases the volume turning it counterclockwise decreases the volume The volume level is from 0 minimum to 33 maximum Switching the display Press the DISP button to select the desired display Sound Adjustment You can adjust a sound effect or tone quality to your preference Setting the Z Enhancer Pl...

Page 10: ... range 60 80 100 200 BASS Q The factory default setting is 1 Adjustment range 1 1 25 1 5 2 3 4 Press the button to return to the previous mode Adjusting the treble This adjustment can be performed only when the Z Enhancer Plus is set to CUSTOM 2 1 Select TREBLE 3 1 Press the w or z button to select as following order TREB G TREB F The factory default setting is TREB G 3 2 Press the button 3 3 Pres...

Page 11: ... 1 second or longer to turn on the MAGNA BASS EXTEND effect M B EX appears in the display for 2 seconds 2 Press and hold the SOUND button for 1 second or longer to turn off the MAGNA BASS EXTEND effect Radio Operations Listening to the radio 1 Press the SRC button and select the radio mode 2 Press the BND button and select the radio band Each time the button is pressed the radio reception band cha...

Page 12: ...o function and tune the selected radio station ISR appears in the display Press the ISR button again to return to the previous mode CD MP3 WMA AAC Operations MP3 WMA AAC This unit can play back MP3 WMA AAC files Notes If you play a file with DRM Digital Rights Management for WMA remaining ON no audio is output The WMA indicator blinks Windows Media and the Windows logo are trademarks or registered...

Page 13: ...the disc When playing CCCD copy control CDs set to CD type 1 Press and hold the BND button for 1 second or longer Each time the button is held pressed in this way M SESS will be displayed for 1 second then CD or MP3 appears in the display the playback type alternates between CD type and MP3 WMA AAC type M SESS CD When playing music CD only M SESS MP3 When playing music MP3 WMA AAC only 2 When sett...

Page 14: ...e the title display CD TEXT disc User Track Disc Artist User MP3 WMA AAC disc Track Folder Title Album Artist Track Notes If the CD playing is not a CD text CD or no user title has been input NO TITLE appears in the display If MP3 WMA AAC disc is not input TAG NO TITLE appears in the display For MP3 supports ID3 Tags V2 3 2 2 1 1 1 0 Tag displays give priority to V2 3 2 2 In the case of album Tags...

Page 15: ...he first track of all the folders on an MP3 WMA AAC disc 1 Press and hold the SCN button for 1 second or longer to perform folder scan play Repeat play This function allows you to play the current track repeatedly 1 Press the RPT button to perform repeat play Folder repeat play This function allows you to play a track currently being played in the MP3 WMA AAC folder repeatedly 1 Press and hold the...

Page 16: ...to select the setting Each time you press the w or z button the setting changes in the following order MESSAGE ON OFF Entering message information Message up to 30 characters long can be stored in memory and displayed as a type of screen saver setting The factory default setting is WELCOME TO CLARION 2 1 Select MSG INP 3 1 Press the button 3 2 Press and hold the BND button for 1 second or longer t...

Page 17: ...phone calls can be heard on the front right speaker connected to this unit LEFT Telephone calls can be heard on the front left speaker connected to this unit Cellular phone interrupt setting If you connect this unit and your cellular phone with a separately sold cable you can listen to your telephone calls on your car speakers The factory default setting is OFF 2 1 Select TEL SW 3 1 Press the w or...

Page 18: ...itle into memory Clearing titles 1 Select and play a CD in the CD changer or tune in to a TV station or Radio for which you want to clear the title 2 Press and hold the DISP button for 1 second or longer 3 Press the x or v button to select TITLE IN 4 Press the button The display switches to the title input display 5 Press and hold the BND button for 1 second or longer All characters in the title d...

Page 19: ... are also not supported When a USB memory device is composed of two or more drives only one of the drives will be detected USB memory devices with security functions cannot be played The order in which tracks are recorded may differ depending on the USB memory device connected the actual playback order may not be the same as that indicated on your computer s display If you continuously operate fol...

Page 20: ...e as that indicated on your computer s display To listen to tracks on a connected USB memory MTP device 1 Press the SRC button to switch the source When USB memory MTP device is selected playback except DRM files will begin from the location at which playback was previously stopped When a USB memory MTP device is connected the USB MTP mode will be displayed When a USB memory MTP device is disconne...

Page 21: ...ollowing operations in Play mode operate the same as in CD mode Track selection x v Fast forward fast backward x v Pause Top function BND See CD MP3 WMA AAC Operations page 12 15 for details Other various play functions in Play mode Notes These functions are not supported when in the iPod menu mode The Random function set on the iPod remains the same after attachment detachment of the iPod The Rep...

Page 22: ... select the desired subfolder When the track name display is showing pressing the x button will return to the currently playing folder name display 5 Use the w and z buttons to select a track within a category Selecting category using preset memory 1 Press and hold the BND button for 1 second or longer to select the iPod menu mode The category can be set as follows in the DIRECT 1 6 buttons 1 PLAY...

Page 23: ...CROLL to ON or OFF The factory default setting is ON Refer to the subsection Setting the method for title scroll in section Operations Common to Each Mode When set to ON The title is automatically kept scrolling When set to OFF To scroll just 1 time When you want to see the title again in the title mode press and hold the DISP button for 3 seconds or longer to scroll the title Selecting a CD 1 Pre...

Page 24: ... Watching a TV 1 Press the SRC button and select the TV mode 2 Press the BND button to select the desired TV band TV1 or TV2 Each time the button is pressed the input selection toggles between TV1 and TV2 3 Press the x or v button to tune in the desired TV station Watching a video The TV tuner has a VTR input terminal to which 1 external device can be connected Connect a 12 V video cassette player...

Page 25: ...1 Press and hold the DISP button for 1 second or longer to switch to the adjustment selection display 2 Press the x or v button to select TV DIVER 3 Press the w or z button to set to ON or OFF ON Sets the diver setting to ON OFF Sets the diver setting to OFF 4 Press the DISP button to return to the previous mode CZ309A_ENG book Page 25 Thursday November 27 2008 1 53 PM ...

Page 26: ...l wires are attached use an external relay to provide remote on voltage excessive current required Nothing happens when buttons are pressed Display is not accurate The microprocessor has malfunctioned due to noise etc Turn off the power then press the RELEASE button and remove the DCP Press the reset button for about 2 seconds with a thin rod If the RESET button is pressed when a disc is loaded pl...

Page 27: ... Use ISO9660 level 1 2 or JOLIET or Romeo or APPLE ISO file system USB MTP iPod No sound heard The device contains no MP3 WMA AAC files Record MP3 WMA AAC files properly to the device The files are not proper MP3 WMA AAC format Use only properly encoded MP3 WMA AAC files Connectors are loose Disconnect the device and reconnect securely Sound is interrupted or has noise The MP3 WMA AAC files are im...

Page 28: ...e CD changer cannot be played because it is loaded upside down Eject the disc then reload it properly DVD changer ERROR 2 A DISC inside the DVD changer cannot be played This is a failure of DVD mechanism and consult your store of purchase ERROR 3 A DISC cannot be played due to scratches etc Retry or replace with a non scratched non warped disc ERROR 6 A DISC inside the DVD changer cannot be played...

Page 29: ...ntrol unit 40 g including battery Dimensions Source unit 178 W 50 H 155 D mm Dimensions Remote control unit 44 W 113 H 11 D mm Note Specifications and design are subject to change without notice for further improvement WMDRM 10 for devices This product is protected by certain intellectual property rights of Microsoft Use or distribution of such technology outside of this product is prohibited with...

Page 30: ...Clarion Co Ltd All Rights Reserved Copyright 2008 Clarion Co Ltd 2008 9 PE 3045K 280 8732 00 CZ309A_KO book Page 84 Tuesday November 25 2008 5 48 PM ...

Reviews: