FREQUENTLY ASKED QUESTIONS
detergent and water solution. This will help to get rid of mildew and odor in your tent. Be sure to dry the tent thoroughly.
Note: W e do not recommend using a washing machine to wash your tent, as this may damage the tent.
Q: Will my fish house leak because I see pinholes in the fabric?
A: While the fabric of the tents on the shelters is water resistant it is not waterproof, so some water from rain or melting
snow may come through your tent. It is good to have small holes in the fabric to allow vapors inside the shelter to escape.
Q: Will using a heater help to eliminate or reduce water vapor and condensation in my shelter?
A: No. A byproduct of burning propane is water. A bigger heater will produce more water vapor. Also, the colder the
temperature the more condensation there will be inside the shelter.
Q: Are tent patch kits available for my flip over style Fish Trap or Clam ice fishing shelter?
A: Yes, patch kits are available for a wide range of shelters, and may be purchased at clamoutdoors.com
Q: How do I apply the patch material?
A: When applying a patch it works best to spray some adhesive (we recommend using 3M #77 or 3M #90 spray
adhesive) on to both surfaces
—the part of the tent where the patch is going to be applied and the patch itself. Wait until
the adhesive begins to dry and becomes tacky, then place the patch on the tent, and they will stick together. (Note: Care
should be taken to apply the patch evenly and smoothly, since wrinkles or uneven areas will be very difficult to correct
once the two surfaces with the adhesive have come into contact with each other.)
Q: Is there anything that can be applied to the outside of the tent to prevent water from coming through?
A: There are products that can be applied to the outside of a tent that will make it make it more water repellent, such as
Kiwi Camp Dry.
Q: I have seen some flip over style shelters with a removable console. Where can I get one?
A: This console now comes with a retractable leg, and can be purchased from our
On line Store
at clamoutdoors.com
Q: I have a plastic C-clip connector on the poles of my Clam/Fish Trap that have broken. Are these clips
available for purchase?
A: These clips, called Quick Connects, may be purchased through our
On-line Store
at clamoutdoors.com.
Q: What is the proper way to set up and take down my Fish Trap?
Set-Up:
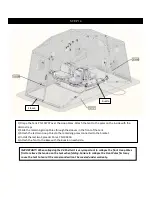
Face the seats. Grab the hoop that is on top and pull on it until you feel and hear the push buttons engaging in the
full open position. Grab the next hoop and do the same until all the hoops are fully open. W hen finished, you
should be inside the shelter.
Install the roof spreaders, then the front spreader(s), and finally the rear spreader(s). (Spreader count varies with
shelter style/configuration
– smaller shelters use only a rear spreader).
Take-Down:
Remove all spreaders.
For adjustable spreaders, snug the tension knobs after compacting so that they don
’t vibrate out during transit.
From inside the shelter, start with the rear wall hoop. Compress both buttons and retract the hoop, then the same
with next inward hoop, etc. Continue until all upright hoops are collapsed.
Step out of the shelter, disengage the porch hoop buttons and swing the porch hoop onto the previously retracted
hoops. Make sure the tent does not catch on the mount brackets while collapsing the porch hoop.
Go around the shelter and tuck the tent material in between the rested hoops the best you can to keep the tent
material from dragging during transit
– a travel cover works great here to hold everything together.
***Please Note: Make sure that the tent material is clear of the canopy brackets to minimize rubbing or possible tearing.
Q : Do you ship outside of the United States?
A: We are only set up to ship warranty or replacement parts required to
MAINTAIN
a Clam shelter (tents, poles, parts,
patch kits, etc.). No accessories
– see a local dealer or an online dealer of Clam products. If the replacement parts are
not warranty you will be charged for the product plus actual shipping charges. It will be the customer
’s responsibility to
pay all importing costs (duties, taxes, etc) at the time the goods are delivered.
Q: The poles to my Clam/Fish Trap have gotten bent out of place. Should I try to bend them back?
A: It might be possible to bend the poles back into their proper place. If your bent pole is not creased lay it on a flat
surface and bend it back into shape. If you need to order replacement poles you can do that on our
On-line Store
at
clamoutdoors.com.


