background image

13

CLAGE 

4. Installation

Note: The flush-mount cabinet must be submerged into the wall at least 

130 mm. If the cabinet only is set to the first stop frame in the wall, a wall-

flush installation is not possible!

1.  Dimension the hole in the wall according to the dimensions of the flush-

mount cabinet.

2. Install the cabinet in the wall.
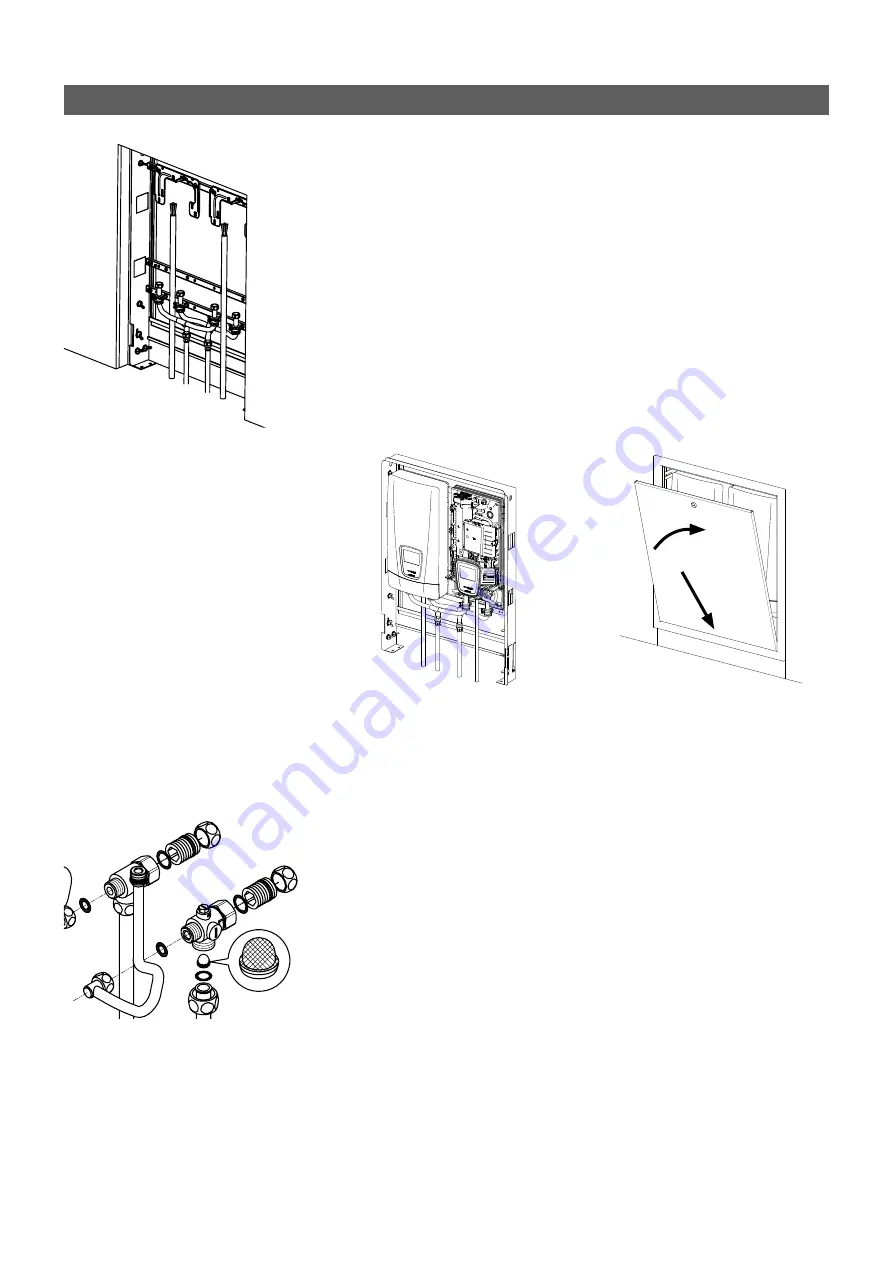
3. Route the water supply lines centrally in the cabinet from below.
4. Connect the water supply lines with the pre-assembled manifolds.
5. If necessary, fill open spaces between wall and cabinet with polyurethane 

foam or other suitable heat-resistant filler.

6. Install the cabinet panels once both DSX are installed and flooring and wall 

plastering has been completed. Snap the cover at the frame bottom edge 

first, than close it.

Installing the flush-mount cabinet

Note: Fasten the screw nuts with caution, to avoid damage to the valves or 

the piping system.

1.  The two ½ inch screw-in nipples and the ½ inch seals must be screwed into 

the ½ inch union nuts of the hot-water and cold-water connectors.

2. Remove the two ½ inch caps of the side outlets of the hot-water and cold-

water connectors and mount them onto the open end of the screw-in nip-

ples.

3. Screw the ½ inch side outlets of the hot-water and cold-water connectors 

with the ½ inch union nuts of the preassembled manifolds, together with 

the ½ inch seals.

4. Repeat the steps 1 - 3 with the connecting pieces of the second appliance.
 The hot-water and cold-water connectors must then be screwed into the 

3

/

8

 inch union nut of the appliance, together with the 

3

/

8

 inch seals.

Note until installation: put the strainer into the cold water connection!

Install the DSX as described in the installing instructions of the appliance 

(chapter: “Installing the appliance”).

Installing connection pieces

Installing DSX

1

2

www.clage

-

com.ru

Summary of Contents for DSX Touch Twin

Page 1: ...Montageanleitung f r den Fachhandwerker Installation instruction for the professional 06 20 de 2 en 8 DSX Touch Twin Unterputzeinbauschrank DSX Touch Twin flush mount cabinet www clage com ru...

Page 2: ...n 2 Inhaltsverzeichnis 1 bersichtsdarstellung 3 2 Sicherheitshinweise 4 3 Abmessungen 5 4 Installation 6 Montageort 6 Montage Unterputzeinbauschrank 7 Montage Wasseranschlussst cke 7 Montage DSX 7 www...

Page 3: ...3 CLAGE Einbaurahmen Blendrahmen Deckel Blende 1 bersichtsdarstellung www clage com ru...

Page 4: ...sind f r den Endanwender bestimmt Die dem Ger t beigef gten Anleitungen entsprechen dem technischen Stand des Ger tes Die jeweils aktuelle Ausgabe dieser Anleitung ist online verf gbar unter www clage...

Page 5: ...5 CLAGE 3 Abmessungen Maximaler Abstand vom Kabelende zur Schrankoberseite www clage com ru...

Page 6: ...unstoffrohre d rfen nur verwendet werden wenn diese DIN 16893 Reihe 2 entsprechen Die Warmwasser leitungen m ssen w rmeged mmt sein Bei Einbau in eine Geb udewand muss diese eine minimale Wandst rke v...

Page 7: ...is Ziehen Sie die berwurf muttern ma voll an um die notwendi ge Dichtheit zu erreichen ohne die Armaturen oder die Rohrleitungen zu besch digen 1 Verschrauben Sie die Zoll Einschraubnippel und die Zol...

Page 8: ...in 8 Contents 1 Overview 9 2 Safety instructions 10 3 Dimensions 11 4 Installation 12 Installation site 12 Installing the flush mount cabinet 13 Installing connection pieces 13 Installing DSX 13 www c...

Page 9: ...9 CLAGE Mounting frame Panel frame Cover Panel 1 Overview www clage com ru...

Page 10: ...nd user The provided manuals correspond to the technical specifications of the appliance The appliance must be earthed at all times The appliance is only suitable for domestic use and similar applica...

Page 11: ...11 CLAGE 3 Dimensions Maximum distance from the cable end to the top of the cabi net Panel frame Panel frame Paving height Paving width Union nut height adjustable www clage com ru...

Page 12: ...pes may only be used if they conform to DIN 16893 Series 2 The hot water pipes must be thermally insulated For installing in a building wall it must have a minimum wall thickness of 150mm The followin...

Page 13: ...e Fasten the screw nuts with caution to avoid damage to the valves or the piping system 1 The two inch screw in nipples and the inch seals must be screwed into the inch union nuts of the hot water and...

Page 14: ...www clage com ru...

Page 15: ...www clage com ru...

Page 16: ...m vorbehalten Subject to technical changes design changes and errors 9120 34531 06 20 CLAGE GmbH Pirolweg 1 5 21337 L neburg Deutschland Telefon 49 4131 8901 0 Telefax 49 4131 83200 E Mail service cla...

Reviews: