background image


16


S

S

e

e

t

t

t

t

i

i

n

n

g

g


U

U

p

p


t

t

h

h

e

e


P

P

r

r

i

i

n

n

t

t

e

e

r

r


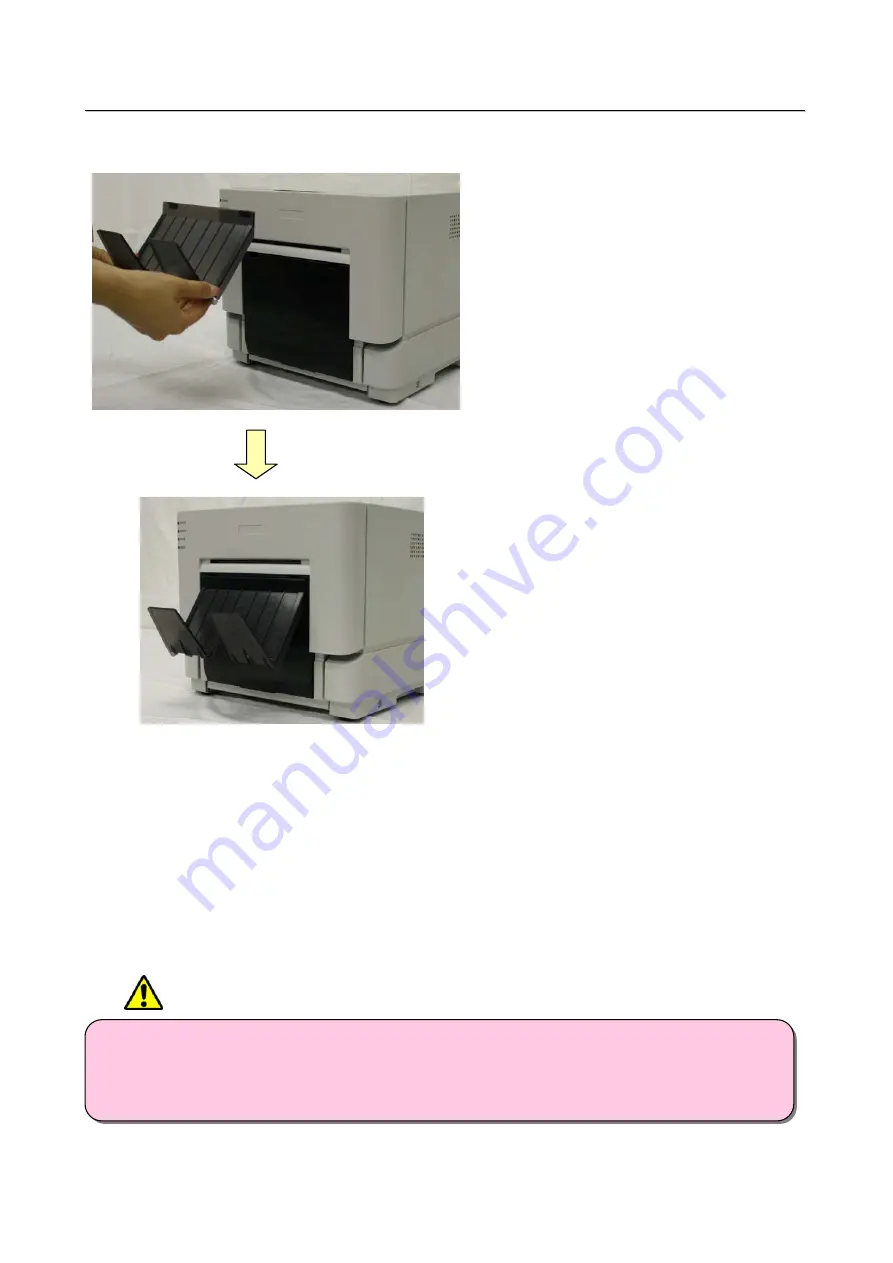
9.  Attach the Paper Tray to the Scrap Box. 


The tray can hold about 50 photos, but please remove them frequently.


・ 

Use with sizes other than L or PC, or allowing too many photos to accumulate could cause problems.
Moreover, there is a possibility that a paper tray may be damaged. 

・ 

Open and close a paper tray softly.  There is a possibility of damaging if unreasonable power is
applied.


CAUTION


Summary of Contents for JR20-M01

Page 1: ...D Di ig gi it ta al l P Ph ho ot to o P Pr ri in nt te er r User s Manual JR20 M01 Version 1 00...

Page 2: ...ade for non commercial personal purposes Also the contents of this document are subject to change in the future without prior notice Concerning Safety Warnings Warnings concerning safety and use and t...

Page 3: ...below the possible levels of injury or damage due to misuse are categorized as Warning and Caution according to the degrees of danger involved About the symbols The symbols shown have the following m...

Page 4: ...s that require extreme reliability The printer weighs approximately 14 kg 31 lbs When moving it lift in a way that avoids excessive physical stress Lifting recklessly or dropping the printer could cau...

Page 5: ...If use is intended on a transportation vehicle train truck ship etc please talk to a representative in advance When disposing of the printer peripheral items packaging or media please abide by local w...

Page 6: ...rinter and radio or television Radio or television reception could be adversely affected Do not use a power voltage or frequency other than those specified Do not put anything on the power cord or ste...

Page 7: ...use harmful interference in which case the user will be required to correct the interference at his or her own expense You are cautioned that changes or modifications not expressly approved by the par...

Page 8: ...on of Conformity European users Hereby CITIZEN SYSTEMS JAPAN CO LTD declares that this digital color printer is in compliance with the essential requirements and other relevant provisions of Dir ectiv...

Page 9: ...compliance statements 6 Declaration of Conformity 7 Table of Contents 8 Setting Up the Printer Checking the Contents 9 Names of Components 10 Connecting 11 Paper Ribbon 12 Setting the Media 13 Troubl...

Page 10: ...ansportation When removing the printer from its package carrying it or moving it be sure to use care Dropping the printer could result in personal injury or damage to other items If the printer is lif...

Page 11: ...mp po on ne en nt ts s Front of Unit Please be careful not to hurt yourself or damage anything on the edges of the printer Ventilation USB port Back of Unit Ventilation Side of Unit Platen Roller Scr...

Page 12: ...the OFF position 2 Plug the cord connector end into the printer Power Plug Socket 3 Plug the cord into the wall outlet 4 Connect the USB cable to the printer and the computer 5 Turn on the power of t...

Page 13: ...Width 152mm Ribbon Width 134mm Width 159mm Set the paper and ribbon without putting them directly on the work surface Any dust or dirt could get inside the printer and adversely affect the print quali...

Page 14: ...open the front cover 2 Set the paper to the paper holder When setting it make sure there are no gaps between the paper and the holder Make sure the paper is not sticking out If the end of roll is unev...

Page 15: ...er will beep Approx to the dotted line When doing this insert the paper straightly If it isn t inserted straight the paper will be crooked which could cause white line on the edges of the print ribbon...

Page 16: ...ntration for printing Please change the media as a set because the IC chip for each ribbon has unique information Otherwise errors could occur If different width media for example L size and PC size a...

Page 17: ...about 50 photos but please remove them frequently Use with sizes other than L or PC or allowing too many photos to accumulate could cause problems Moreover there is a possibility that a paper tray may...

Page 18: ...End 1 Put in a new roll of ribbon Door is Open No paper Set the paper properly and close the front cover Door is Open Close the front cover Paper Error Free the paper and reset it correctly Ribbon Err...

Page 19: ...he printer and cut off any wrinkled or partially printed areas evenly with scissors Printing over an already printed area will cause the ribbon to stick and the paper will jam again When pulling the p...

Page 20: ...age is printed over the previous image the ribbon may stick and it may cause the paper to jam 3 Reattach the ribbon with cellophane or similar tape 4 Set the ribbon into the printer 5 Rotate the take...

Page 21: ...power is cut during printing If the power is cut during printing you will not be able to open the front cover 1 Turn the power back ON The partial print will be cut into scrap size pieces and removed...

Page 22: ...hered to the print head the unevenness of print and the poor fixation of print may occur 1 Prepare a piece of gauze or other soft cloth soaked in ethyl alcohol 2 Wipe the thermal print head gently wit...

Page 23: ...Max 480Mbps TYPE B connector Driver compatible OS Windows XP Windows Vista 32 64bit Windows 7 32 64bit Weight Approx 14kg printer only Power AC100V 240V 50 60Hz Power consumption 100V 3 9A 240V1 6A T...

Reviews: