14
S
S
e
e
t
t
t
t
i
i
n
n
g
g
U
U
p
p
t
t
h
h
e
e
P
P
r
r
i
i
n
n
t
t
e
e
r
r
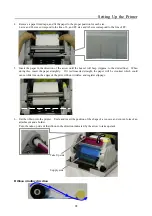
4. Remove a paper fixed tape, and fit the paper to the proper position for each size.
L size and 2L size correspond to the line of L, and PC size and A5 size correspond to the line of PC.
5. Insert the paper in the direction of the arrow until the buzzer will beep (Approx. to the dotted line). When
doing this, insert the paper straightly. If it isn't inserted straight, the paper will be crooked, which could
cause white line on the edges of the print, ribbon wrinkles, and register slippage.
6. Set the ribbon into the printer. Unite and insert the position of the shape of a concave and convex form of an
attachment and a holder.
Turn the take-up side of the ribbon in the direction indicated by the arrow to take up slack.
Ribbon winding direction
Supply side
Take Up side


