background image

 iDP-460 User’s Manual

6.3.3

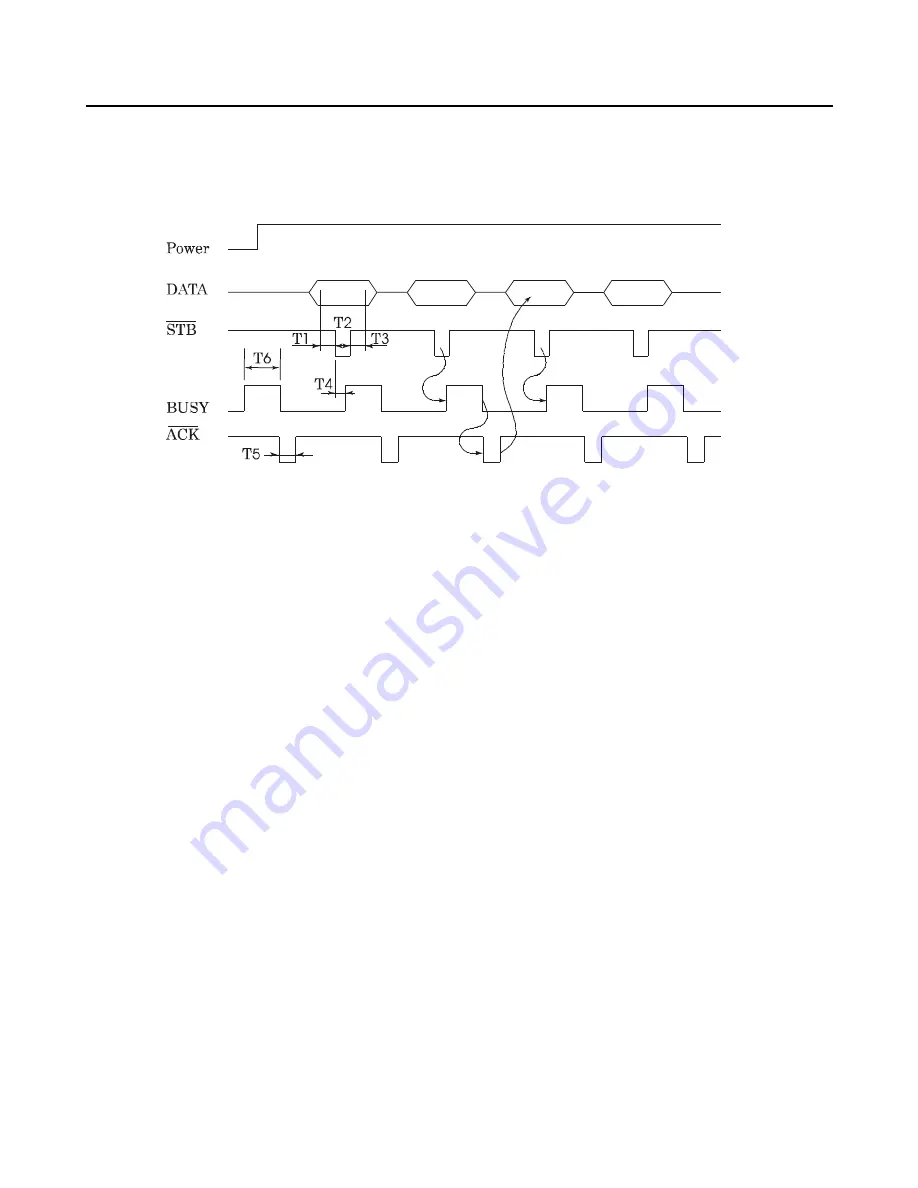
Timing Chart

(1) Data input and printing timing

T1, T2, T3

: 0.5 

µ

s MIN

T4

: 270 ns MAX

T5

: 2.3 

µ

s TYP

T6

: 500 ms MIN (At power-on)

6.3.4

Data Receiving Control

When the BUSY signal is at "LOW," the printer can receive the data from the host, but when at "HIGH," it
cannot.

7. SERIAL INTERFACE

7.1 Specifications

(1) Synchronous system:  Asynchronous

(2) Baud rate: 150, 300, 600, 1,200, 2,400, 4,800, 9,600, or 19,200 bps (User selectable)

(3) Configuration of one word

Start bit

: 1 bit

Data bits

: 7 or 8 bits (User selectable)

Parity bit

: Odd, even, or none (User selectable)

Stop bit

: 1 bit or more

Summary of Contents for iDP-460

Page 1: ...CITIZEN User s Manual Model iDP 460 Dot Matrix Printer Rev 1 00 Newly issued on Feb 26 1998 Japan CBM Corporation Information Systems Div...

Page 2: ...C801 4 1988 0 5KV Signal Line 1KV AC mains Supplementary Information The product complies with the requirements of the Low Voltage Directive 73 23 EEC 93 68 EEC and the EMC Directive 89 336EEC 92 31 E...

Page 3: ...l outlet does not exceed 15 amperes Never push objects of any kind into this product through cabinet slots as they may touch dangerous voltage points or short out parts that could result in a risk of...

Page 4: ...e in die Geh useschlitze schieben Drucker darf nur da gewartet werden wo im Handbuch angegeben ffnen und Abnehmen von Abdeckungen die mit Do not remove gekennzeichenet sind k nnte gef hrliche spannung...

Page 5: ...ar gorie a pour les missions de bruit radio manant d appareils num riques tel que pr vu dans les r glements sur l interf rence radio du d partment Canadien des communications CAUTIONS 1 Prior to using...

Page 6: ...ology system based on the standards of the Radio Interference Voluntary Regulations Council for Information Processing Systems VCCI Use of this system in a domestic environment may cause radio interfe...

Page 7: ...of hazard and damages that can occur if the given instructions are neglected or the equipment is incorrectly operated WARNING Negligence of this precaution may result in death or serious injury CAUTIO...

Page 8: ...spill any liquid or spray any chemical containing liquid over the equipment If any liquid is spilled on it turn off the power disconnect the power cable and power cord from the plug socket and so on...

Page 9: ...p or put any object on the cable Never connect a grounding cable to a gas pipe There is a danger of explosion When connecting or disconnecting the grounding cable be sure to disconnect the power plug...

Page 10: ...Do not use Scotch tape to fasten paper together for continuous use Never pull the set paper forcibly When opening closing the printer cover take care that the paper will not be caught To Prevent Injur...

Page 11: ...oth to wipe off stains and dust from the surfaces of the main body case For severe soiling dip the cloth in water and wring it for wiping off the soil Never use organic solvents such as alcohol thinne...

Page 12: ...l and Display of Error 26 4 9 Print Duty 27 5 DIP SWITCH SETTING 28 5 1 Location of DIP Switch 28 6 PARALLEL INTERFACE 30 6 1 Specifications 30 6 2 Connector s Pin Configuration 30 6 3 Input and Outpu...

Page 13: ...11 3 International Character Codes Table 58 APPENDIX 1 BLOCK DIAGRAM 75 APPENDIX 2 OUTLINE DRAWING 76 German 4 BETRIEB 54 4 1 Anschlu des Netzteils 54 4 2 Anschlu des Schnittstellenkabels 55 4 3 Ansc...

Page 14: ...ter confirm that the following parts are provided Printer body 1 unit Cassette ribbon 1 piece Sample paper roll 1 roll AC adapter 1 piece User s manual 1 copy Mini DIN DIN cable 1 piece Provided only...

Page 15: ...iDP 460 User s Manual h Exclusive AC Adapter Types and Power Cords 34AD U 120 V 2 core cord 34AD E 230 V 2 core cord...

Page 16: ...lel Conforms to CENTRONICS Input buffer 250 bytes Paper end detection Stops printing when the paper runs out Drawer kick connector 1 drawer D type only Auto loading function Automatically feeds the pa...

Page 17: ...Paper width 76 0 5 mm Paper thickness Single sheet paper 45 to 55 kg 1 000 sheets 1 091 x 788 mm Copying paper Non carbon paper 1 original 1 copy Total thickness 0 2 mm or less Roll diameter 83 mm or...

Page 18: ...iDP 460 User s Manual 3 OUTER APPEARANCE AND COMPONENT PARTS 4 OPERATION 4 1 Connecting AC Adapter...

Page 19: ...other device or application besides this equipment When disconnecting the AC adapter be sure to hold the AC adapter itself or the plug Do not pull its cord Pulling an AC adapter cord will damage it an...

Page 20: ...n a stopper to fix Mini DIN interface Insert until locked 4 Connect the cable to a computer 4 3 Connecting Drawer Kick Out Connector 1 Turn off the power 2 Check the top and bottom of the drawer kick...

Page 21: ...the tension to it before setting 3 While putting the ribbon in between the head cover and platen push the locking claws into the holder of the printer 4 Turn the knob of the cassette ribbon in the arr...

Page 22: ...rinter cover is not detachable Do not apply an excessive force beyond its stopping position Do not insert a frayed or bent end of paper into the printer 3 Check the winding direction of the paper roll...

Page 23: ...nual CAUTION If the paper is slack rewind it to remove the slack If the paper is set slantwise operate the paper free lever to correct the paper position While printing do not hold the paper This can...

Page 24: ...operate the paper free lever 4 7 Removing Paper Jam 1 Open the printer cover 2 Cut off the paper near the paper inlet slot 3 Push the paper free lever in the arrow direction The paper feed roller is...

Page 25: ...ar the print head detects a paper end turning on the ERROR LED thus stopping the printer If the paper is inserted into the paper course it is loaded Printer mechanism error If the printer mechanism is...

Page 26: ...protects the printing head against temperature through software The printer calculates the number of print dots and prints as follows depending on whether the number of printing dots per line is over...

Page 27: ...iDP 460 User s Manual 2 Remove a cassette ribbon The DIP switches are located as shown in the figure below Only DS1 provided for the parallel interface...

Page 28: ...used OFF KThe DS2 is used only for the serial interface 5 6 7 Baud Rate bps OFF OFF OFF 150 ON OFF OFF 300 OFF ON OFF 600 ON ON OFF 1200 OFF OFF ON 2400 ON OFF ON 4800 OFF ON ON 9600 ON ON ON 19200 1...

Page 29: ...onfuguration No Signal Name No Signal Name 1 2 3 4 5 6 7 8 9 10 11 12 13 14 15 16 17 18 STB DATA 1 DATA 2 DATA 3 DATA 4 DATA 5 DATA 6 DATA 7 DATA 8 ACK BUSY GND HI LEVEL GND GND GND FRAME GND 19 20 21...

Page 30: ...printer ACK An 8 bit data request signal A pulse signal output at the end of the BUSY signal Negative logic BUSY A signal to indicate the BUSY status of the printer Input new data when at LOW Positive...

Page 31: ...2 0 V at minimum LOW level 0 8 V at maximum 2 Output signal level All the output signals are at the TTL level HIGH level 2 4 V at minimum LOW level 0 4 V at maximum 3 Input and output conditions All t...

Page 32: ...signal is at LOW the printer can receive the data from the host but when at HIGH it cannot 7 SERIAL INTERFACE 7 1 Specifications 1 Synchronous system Asynchronous 2 Baud rate 150 300 600 1 200 2 400 4...

Page 33: ...l RS 232C Mark 1 Space 0 6 Reception control DTR signal RS 232C Mark Data transfer disabled Space Data transfer enabled 7 Transmission control TD signal Status transmission P 250 Transmits A 41h P 900...

Page 34: ...Data 4 4 DSR Input Data Set Ready D Sub Connector Mini DIN Connector Cautions 1 An RS 232C signal is based on the EIA RS 232C 2 When the data is not being transferred the received data should be alwa...

Page 35: ...error results ignoring the previous data The data can be written in the input buffer even during printing Busy is also issued at the time of power on test print on line and reset 3 TD When a command i...

Page 36: ...s assumed neither the start bit nor an error and it is attempted to detect the start bit again 2 Data bit parity bit The data bit and parity bit are sampled for 1 bit worth of time from the 1 2 start...

Page 37: ...ror If a parity check has been specified and an error is detected at the time of parity check that data is either stored in the buffer as or discarded Depends on DIP switch selection 3 Overrun error I...

Page 38: ...CONNECTOR 8 1 Specifications of Drawer Kick Out Connector D type Only 1 Drawer kick out drive signal The pulses specified by the BELL command 07h are output Approx 200 ms 2 Electrical characteristics...

Page 39: ...66P HIROSE or equivalent CAUTION No output is made while printing A solenoid used for the drawer should be of 36 or more An output current should be kept below 0 8 A Otherwise there is a danger of tro...

Page 40: ...ied power supply Use of unspecified one may lead to a trouble or breakage Do not connect the power supply with different polarities 9 MAINTENANCE AND SERVICE For the information on maintenance and ser...

Page 41: ...H O O 35 US Set Normal Width Mode 1FH O O 35 SO Set Double Width Character or Specify High Page 0EH O O 35 SI Normal Width Mode or Reset Character Code 0FH O O 36 BELL Drawer Kickout D type only 07H O...

Page 42: ...er ID and some status sent to the host from the printer Refer to the attached Detail of Commands P200 represents the P 200 mode O Command enable Command disable n in the command indicates the characte...

Page 43: ...erently between the P 200 mode and P 250 mode In the P 200 mode if the 40th character in the line is received the contents of the buffer will be printed automatically In the P 250 mode the default del...

Page 44: ...as required Initial Value Describes an initial value for the command when accompanied by an argument See Also Describes the associated commands for use Sample Program Describes a coding example in the...

Page 45: ...on In other than the P 250 mode and P 900R mode this command is ignored immediately after one line buffer full printing In the P 250 mode and P 900R mode printing is not performed until this command i...

Page 46: ...command will be ignored See Also ESC c NULL ALL Name Pad character NOP Code 00 H Function If this character code is received it will be ignored without being handled as the data It has no effect on o...

Page 47: ...250 mode it will be ignored Initial Value The P 200 mode is effectuated immediately after power on See Also GS GS P 250 42ch Name Execute P 200 Mode Code 1D H Function This command resets all the attr...

Page 48: ...d normal width mode or CAN command is received In the P 200 mode this attribute is reset to normal width at the beginning of each line every time the line is fed See Also US SO SI US ALL Name Set Norm...

Page 49: ...only one character worth of position in a line it will be printed in normal width This attribute remains valid until the SI command normal width mode or CAN command is received In the P 200 mode this...

Page 50: ...a trouble ESC a n ALL Name Set Line Height Code 1B H 61H n 3B H Domain 7 n 255 30 H n 39 H Function This command defines a height of each print line A dot line is 1 18 inch It sets a line feed rate t...

Page 51: ...r 256 or more is specified for the parameter this command will be ignored See Also ESC a Program Example When ejecting the paper by 5 lines ESC b 5 LPRINT CHR H1B b5 1B H 62 H 35 H 3B H ESC c ALL Name...

Page 52: ...hanical error the data may not be received See Also ESC a ESC e n P 250 P 900R Name Set Right Margin Code 1B H 65H n 3B H Domain 0 n 42 30 H n 39 H Function In the P 250 mode and P 900R mode this comm...

Page 53: ...acters If the n value is specified beyond the limits this command will be ignored Initial Value n 0 See Also 11 2 International Character Codes List Sample Program When setting the character sets to J...

Page 54: ...900R Mode Code 1B H 78 H Function Any command or function following this command works as the P 900R mode Caution This command can be canceled by the FS GS or ESC c command See Also FS GS ESC c 11 CHA...

Page 55: ...iDP 460 User s Manual 11 2Japanese...

Page 56: ...iDP 460 User s Manual 11 3International Character Codes Table All Common APPENDIX 1 BLOCK DIAGRAM...

Page 57: ...wer Parallel CENTRONICS Serial RS 232C AC Adapter 34 AD Series 26V DC 1 15A DIP Switch Driver Interface Reset Driver Driver Filter Power Supply Vp Vcc Print Head Paper End DC Moter Driver Printer Mech...

Page 58: ...iDP 460 User s Manual APPENDIX 2 OUTLINE DRAWING...

Page 59: ...suchen in dieser Anleitung nicht erw hnte Ger teteile eigenh ndig zu warten zerlegen oder zu reparieren 5 Bitte beachten Sie da wir keinerlei Haftung f r Sch den bernehmen die auf uns chgem e Bedienun...

Page 60: ...des obigen Punkts 8 keinerlei Haftung f r negative Folgeerscheinungen im Zusammenhang mit dem Betrieb dieses Ger ts bernehmen VORSICHT Dieses Ger t ist ein Datentechnologiesystem der Klasse A basieren...

Page 61: ...h den die durch eine Mi achtung der Bedienungshinweise oder durch die unsachgem e Handhabung des Ger ts entstehen k nnen WARNUNG Die Mi achtung dieser Vorsichtsma regel kann zu K rperverletzungen mit...

Page 62: ...versehentlichem Na werden das Ger t sofort ausschalten das Stromanschlu kabel abziehen das Netzkabel von der Steckdose trennen usw und an einen Fachh ndler wenden Das Ger t niemals eigenh ndig zerleg...

Page 63: ...Stromausf lle die Folge sein Dar ber hinaus nicht fest auf das Netzkabel treten oder schwere Gegenst nde darauf abstellen Erdungskabel niemals an ein Gasrohr anschlie en da hierbei Explosionsgefahr b...

Page 64: ...enfeld dr cken Papierbl tter niemals zum fortlaufenden Drucken mit Klebestreifen zusammenkleben Ein bereits eingezogenes Blatt niemals gewaltsam herausziehen Beim ffnen Schlie en der Druckerabdeckung...

Page 65: ...ls 1 Den Netzschalter dr cken 2 Den Kabelstecker des Netzteils an die Netzanschlu buchse an der R ckwand des Druckers anschlie en 3 Um Anschlu unterbrechungen vorzubeugen den Kabelstecker wie in der u...

Page 66: ...s Netzteil von der Steckdose getrennt und der Drucker nicht verwendet werden Ein Blitzschlag kann Br nde und elektrische Schl ge ausl sen Das Netzteil Anschlu kabel von W rmequellen fernhalten Die Kab...

Page 67: ...rn DIN Minischnittstelle bis zum Einrasten einschieben 4 Das Kabel an einen Computer anschlie en 4 3 Anschlu des Ausschubmechanismussteckers der Geldschublade 1 Den Drucker mit dem Netzversorgung auss...

Page 68: ...en der Kassette straff zu wickeln 3 Die Farbbandkassette zwischen Druckkopfabdeckung und Walze einsetzen und gleichzeitig die Halteklauen in den Halter des Druckers dr cken 4 Das Farbband durch Drehen...

Page 69: ...rabdeckung ist nicht abnehmbar und sollte deshalb nicht ber den Anschlag hinaus aufgeklappt werden Beim Einf hren des Druckpapiers darauf achten da das Papierende nicht zerknittert oder geknickt ist 3...

Page 70: ...apier durch Zur ckdrehen der Papierrolle straffen Bei schr g eingesetztem Druckpapier den Papier Freigabehebels dr cken und das Papier gerade richten Die Druckerabdeckung niemals w hrend des Druckens...

Page 71: ...bet tigen 4 7 Beseitigung von Papierstaus 1 Die Druckerabdeckung aufklappen 2 Das Druckpapier vor der Papiereinzug ffnung sauber abschneiden 3 Den Papier Freigabehebel in Pfeilrichtung dr cken Hierdu...

Page 72: ...s Papierende und schaltet das LED Fehleranzeigel mpchen ein Durch Einschieben des Papiers in den Papierweg wird das Papier eingezogen Druckmechanismusfehler Wenn der Druckmechanismus aufgrund eines Pa...

Page 73: ...twaremasig gegen Erhitzung geschutzt Der Drucker berechnet hierzu die Anzahl der Druckpunkte und druckt je nach Anzahl pro Zeile wie folgt 1 Bei bis zu 500 Punkten pro Zeile Drucken in beiden Richtung...

Page 74: ...iDP 460 User s Manual 2 Das Farbband herausnehmen Die DIP Schalter sind wie in der Abbildung gezeigt angeordnet Bei der Paralllelschnittstelle ist nur DS1 vorhanden...

Page 75: ...Druckt Ignoriert die Daten ON 5 Baudrate OFF 6 Baudrate ON 7 Baudrate Siehe untenstehende Tabelle ON 8 Nicht verwendet OFF IDS2 wird nur bei seriellen Schnittstellen verwendet 5 6 7 Baudrate bps OFF...

Reviews: