


Installing a Fabric Module
Before You Begin
•
You must wear an electrostatic discharge (ESD) wrist strap or other ESD protective device while handling
modules.
•
Prepare an antistatic surface or packing materials for each module that you remove from the chassis.
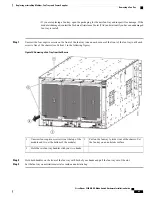
Step 1
Place one hand on the front of the module and turn the module 90 degrees so that the electrical connectors are on the
bottom.
Step 2
Unscrew the two captive screws (one on each ejector handle) and rotate the ejector handles away from the chassis (see
Callouts 1 and 2 in the following figure). Be sure that the locking posts on the top and bottom of the chassis (see Callout
3) rotate into the module so that the module can slide fully into the slot.
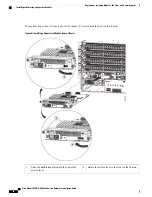
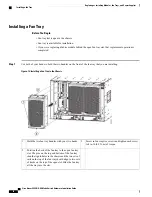
Figure 18: Installing a Fabric Module in a Chassis
Align the rails on the top of the module to the track on
the top of the open slot.
4
Unscrew two captive screws (one on each ejector
handle).
1
Align the bottom of the module so that it slides into
the tracks on the bottom of the open slot.
5
Rotate both ejector handles away from the front of
the module.
2
Slide the module all the way into the slot.
6
Be sure that the locking posts fully rotate down into
the module
3
Cisco Nexus 9504 NX-OS Mode Switch Hardware Installation Guide
76
Replacing or Installing Modules, Fan Trays, and Power Supplies
Installing a Fabric Module