background image

 
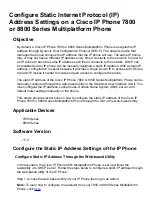
Note: In this example, the primary DNS used is 192.168.100.1.
 
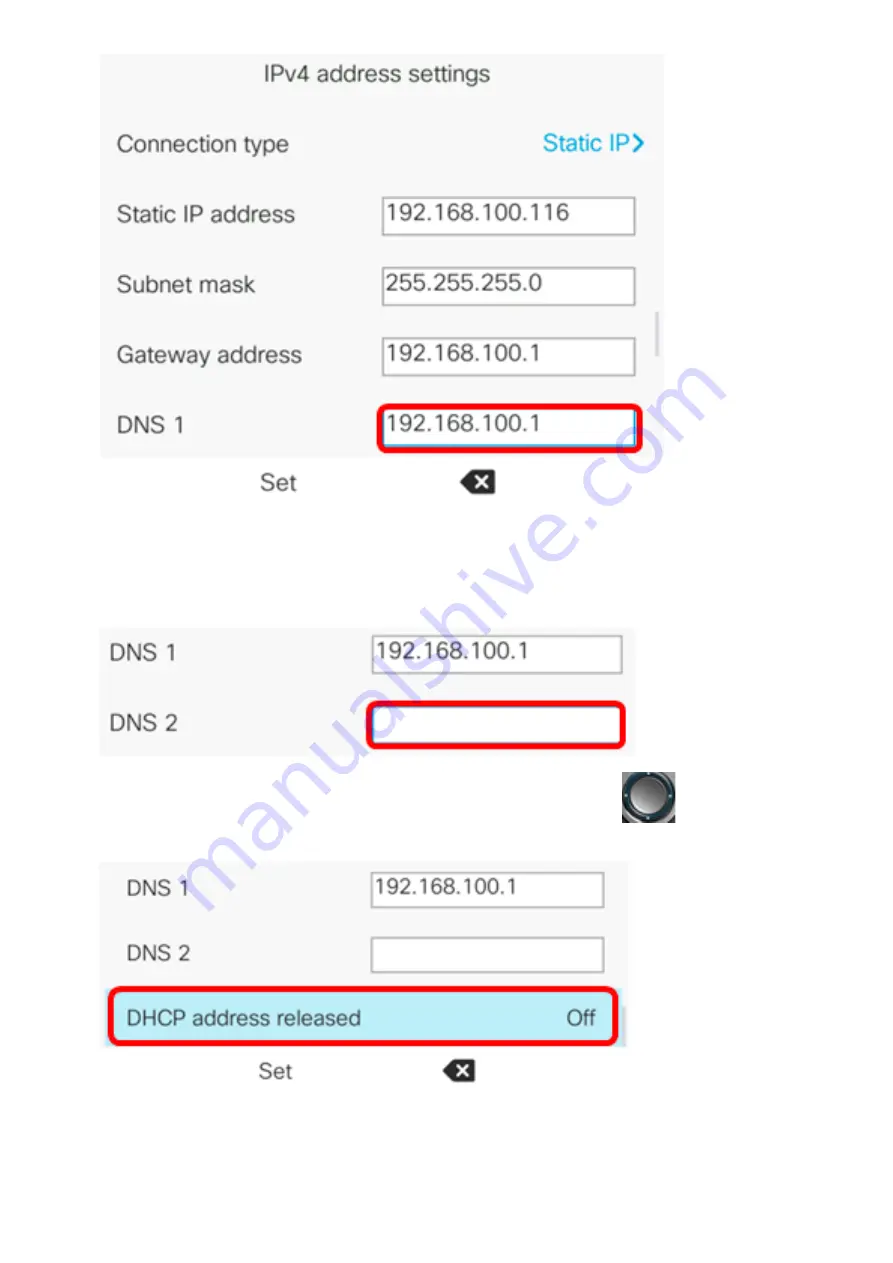
Step 9. (Optional) Enter the secondary DNS address in the DNS 2 field. In this scenario, the
Secondary DNS is left blank.


Step 10. (Optional) Press the left or right arrows of the navigation 

button to toggle the

DHCP address released setting to On or Off. The default setting is Off.


Step 11. Press the Set softkey to apply the configuration settings on your IP Phone.
 

Summary of Contents for IP Phone 7800 Series

Page 1: ...ress of the Cisco IP Phone 7800 or 8800 Series Multiplatform Phone can be manually configured through the web based utility or the Graphical User Interface GUI You must configure the IP address subnet mask Domain Name System DNS server and default router settings manually on the phone This article provides instructions on how to configure the static IP address of the Cisco IP Phone 7800 or 8800 Se...

Page 2: ...Voice System Step 3 In the IPv4 Settings area choose Static IP from the Connection Type drop down list Step 4 Enter the IP address of the IP Phone in the Static IP field Note In this example 192 168 100 116 is used ...

Page 3: ...k in the NetMask field Note In this example 255 255 255 0 is used Step 7 Enter the primary DNS address in the Primary DNS field Note In this example 192 168 100 1 is used Step 8 Optional Enter the secondary DNS address in the Secondary DNS field In this scenario the Secondary DNS is left blank Step 9 Click Submit All Changes ...

Page 4: ... configured settings have been applied log in to the web based utility of your IP Phone then choose Info Status The IPv4 Information area should display the updated configuration settings You should now have successfully configured the static IP address settings on your Cisco IP Phone through the web based utility Configure Static IP Address Through the GUI ...

Page 5: ...Step 1 Press the Settings button on your IP Phone Step 2 Choose Network Configuration using the circle navigation button Step 3 Choose IPv4 address settings ...

Page 6: ...Step 4 Press the left or right arrows of the navigation button to choose Static IP Step 5 Enter the IP address of the IP Phone in the Static IP address field ...

Page 7: ... subnet mask in the Subnet mask field Note In this example the subnet mask is 255 255 255 0 Step 7 Enter the gateway address in the Gateway address field Note In this example the gateway address used is 192 168 100 1 Step 8 Enter the primary DNS address in the DNS 1 field ...

Page 8: ... in the DNS 2 field In this scenario the Secondary DNS is left blank Step 10 Optional Press the left or right arrows of the navigation button to toggle the DHCP address released setting to On or Off The default setting is Off Step 11 Press the Set softkey to apply the configuration settings on your IP Phone ...

Page 9: ... the configured settings have been applied press the button on your IP Phone then choose Status Network Status The Network status page should display the updated configuration settings You should now have successfully configured the static IP address settings through the GUI of your Cisco 7800 or 8800 Multiplatform IP Phone ...

Reviews: