background image

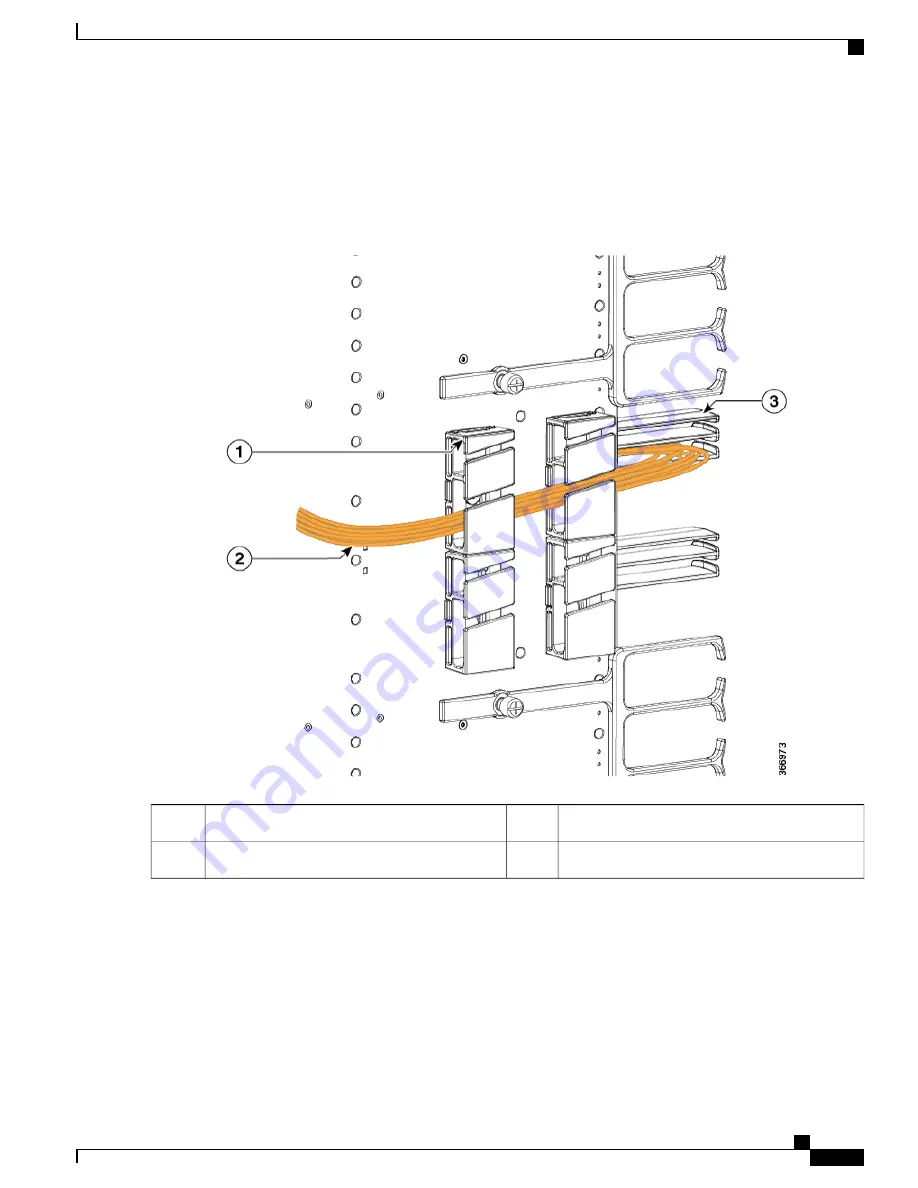
The following figures illustrate the possible cable routing options for the fiber-optic cables connected to the Supervisor
PIC:

Figure 18: Routing the Fiber-Optic Cables Connected to the Supervisor PIC

Option 1

Supervisor PIC cable management bracket

3

Snap-on plastic fiber/cable routing guides

1

Fiber-optic cable bundle

2

Cisco Converged Broadband Routers Hardware Installation Guide    

21

Installing the Supervisor in the Cisco cBR Chassis

Cable Management for the Supervisor PIC in the Cisco cBR Chassis

Summary of Contents for cBR

Page 1: ...nstalling the Supervisor 250G Installing the Supervisor PIC in the Cisco cBR Chassis Perform this procedure to install the following PICs Supervisor PIC Blank PIC for the Supervisor Do not support mix use of 250G and 160G SUP and SUP PIC Note Before You Begin If you are adding a new Supervisor PIC or upgrading the existing Supervisor PICs ensure that the power modules installed in the chassis are ...

Page 2: ...C for the Supervisor 3 16 flat blade torque screwdriver Step 1 Grasp the faceplate of the PIC with one hand and place your other hand under the PIC to support its weight Step 2 Carefully align the PIC with the plastic guides in the slot Step 3 Slide the PIC into the slot applying even pressure using both your hands until it is within an inch of full insertion Step 4 Open the ejector levers and ful...

Page 3: ...e when inserting the PIC into the slot Caution Figure 1 Inserting the Supervisor PIC into the Chassis Cisco Converged Broadband Routers Hardware Installation Guide 3 Installing the Supervisor in the Cisco cBR Chassis Installing the Supervisor PIC in the Cisco cBR Chassis ...

Page 4: ... recommended Install the Supervisor Card if not already installed Installing the Supervisor PIC Cable Management Bracket The Supervisor PIC cable management bracket is shipped separately in the chassis accessory kit It has a smaller slot for fiber optic cables and a larger slot for the RJ 45 cables Before You Begin Attach an ESD preventive wrist strap to your wrist and connect the other end to the...

Page 5: ... Cable Management Bracket Supervisor PIC cable management bracket 2 Captive screws 1 Step 2 Tighten the captive screws using a 3 16 flat blade torque screwdriver with a torque of 6 8 in lb 0 68 0 90 Nm to secure the Supervisor PIC cable management bracket What to Do Next Install the chassis mounted fiber cable routing guide if not already installed Route the Supervisor PIC cables through the Super...

Page 6: ...odule circuitry 3 40GBASE QSFP transceiver body 1 Bail clasp latch 2 The QSFP or QSFP28 transceiver module can have either a bail clasp latch or a pull tab latch Installation procedures for both types of latches are provided Before You Begin Do not install or remove the QSFP28 module with fiber optic cables still attached to it Doing so may damage cables cable connectors or the optical interfaces ...

Page 7: ...4x10G LR S with breakout cable Required Tools and Equipment Wrist strap or other personal grounding device to prevent ESD occurrences Antistatic mat or antistatic foam to set the transceiver on Cisco Converged Broadband Routers Hardware Installation Guide 7 Installing the Supervisor in the Cisco cBR Chassis Installing the QSFP or QSFP28 Transceiver Modules in the Supervisor PIC ...

Page 8: ...dules equipped with a bail clasp latch keep the bail clasp aligned in a vertical position Step 7 Align the QSFP or QSFP28 transceiver module in front of the module s transceiver socket opening and carefully slide the QSFP or QSFP28 transceiver into the socket until the transceiver makes contact with the socket electrical connector see the figure below Figure 5 Installing the 40 Gigabit QSFP or 100...

Page 9: ...ready to attach the network interface cable What to Do Next Verify if the QSFP or QSFP28 module is seated and latched properly Grasp the QSFP or QSFP28 module and try to remove it without releasing the latch If the QSFP or QSFP28 module cannot be removed it is installed and seated properly If the QSFP or QSFP28 module can be removed reinstall it Connect fiber optic cable to the QSFP or QSFP28 port...

Page 10: ...size of the equipment Handle it with care Restrictions If you are using a single Supervisor you must install the Supervisor Card in the slot corresponding to the Supervisor PIC In the Cisco cBR 8 router Note Slot 4 1 for the Supervisor PIC corresponds to slot SUP0 for the Supervisor Card Slot 5 1 for the Supervisor PIC corresponds to slot SUP1 for the Supervisor Card Required Tools and Equipment E...

Page 11: ...icular to the faceplate Step 3 Grasp the faceplate of the card with one hand and place your other hand under the card to support its weight Step 4 Carefully align the support rails on the card with the rails in the appropriate slot Step 5 Slide and push the card into the slot applying even pressure using both your hands until it mates with its midplane connectors Cisco Converged Broadband Routers ...

Page 12: ...assis Step 6 Simultaneously pivot both the spring loaded ejectors towards the faceplate until they make contact with the faceplate Figure 9 Closing the Spring Loaded Ejectors on the Supervisor Card Cisco Converged Broadband Routers Hardware Installation Guide 12 Installing the Supervisor in the Cisco cBR Chassis Installing the Supervisor Card in the Cisco cBR Chassis ...

Page 13: ... two captive screws using a 3 16 flat blade torque screwdriver with a torque of 10 12 lb in 1 12 1 36 Nm to secure the card Cisco Converged Broadband Routers Hardware Installation Guide 13 Installing the Supervisor in the Cisco cBR Chassis Installing the Supervisor Card in the Cisco cBR Chassis ...

Page 14: ...nd making any optical connections follow these guidelines Keep the protective dust plugs installed in the unplugged fiber optic cable connectors and in the transceiver optical bores until you are ready to make a connection Inspect and clean the MPO connector end faces just before you make any connections Grasp the MPO connector only by the housing to plug or unplug a fiber optic cable 40 Gigabit Q...

Page 15: ...ces Step 3 Remove the dust plugs from the QSFP or QSFP28 transceiver module optical bores Step 4 Immediately attach the network interface cable MPO connectors to the QSFP or QSFP28 transceiver module see the figure below Figure 11 Cabling a 40 Gigabit QSFP or QSFP28 Transceiver Module What to Do Next Route the fiber optic cables through the Supervisor PIC cable management bracket and chassis mount...

Page 16: ...ource What to Do Next Route the RJ 45 cable through the Supervisor PIC cable management bracket and chassis mounted fiber cable routing guide Using the NME Ports on the Supervisor PIC Before You Begin Install the Supervisor PIC Install the Supervisor Card Required Tools and Equipment RJ 45 cable Cisco Converged Broadband Routers Hardware Installation Guide 16 Installing the Supervisor in the Cisco...

Page 17: ...ole Port on the Supervisor PIC The console port provides local administrative access to the router and its command line interface CLI Before You Begin Install the Supervisor PIC Install the Supervisor Card Restrictions Each Supervisor PIC must have a console port connection when running a redundant configuration in the chassis Required Tools and Equipment RJ 45 cable RJ 45 to DB 9 adapter Cisco Co...

Page 18: ...minal Step 4 Power up the PC or terminal Step 5 Configure the PC terminal emulation software or the terminal with the following settings 9600 baud 8 data bits No parity generation or checking 1 stop bit No flow control What to Do Next Route the cable through the Supervisor PIC cable management bracket and chassis mounted fiber cable routing guide Connect a terminal server to the auxiliary port if ...

Page 19: ...rver Step 1 Connect one end of the RJ 45 cable to the auxiliary port on the Supervisor PIC Figure 16 Auxiliary Port Connection on the Supervisor PIC Step 2 Connect the other end of the RJ 45 cable to the RJ 45 to DB 9 adapter Figure 17 Connecting an RJ 45 to DB 9 Adapter Step 3 Connect the RJ 45 to DB 9 adapter to the appropriate serial port on the terminal server Cisco Converged Broadband Routers...

Page 20: ...r PIC cable management bracket Install the chassis mounted cable strap down clips and attach the snap on plastic fiber cable routing guides as necessary based on the cable routing preference Connect the cables to the appropriate ports on the Supervisor PIC Required Tools and Equipment Cable ties Step 1 Perform the following for the fiber optic cables connected to the Supervisor PIC If you are usin...

Page 21: ...ber Optic Cables Connected to the Supervisor PIC Option 1 Supervisor PIC cable management bracket 3 Snap on plastic fiber cable routing guides 1 Fiber optic cable bundle 2 Cisco Converged Broadband Routers Hardware Installation Guide 21 Installing the Supervisor in the Cisco cBR Chassis Cable Management for the Supervisor PIC in the Cisco cBR Chassis ...

Page 22: ... bracket 4 Strap down clips 1 Snap on plastic fiber cable routing guides 5 Fiber optic cable bundle in flexible conduit 2 Cable tie 3 Cisco Converged Broadband Routers Hardware Installation Guide 22 Installing the Supervisor in the Cisco cBR Chassis Cable Management for the Supervisor PIC in the Cisco cBR Chassis ...

Page 23: ...tic fiber cable routing guide and then through the lower slot of the Supervisor PIC cable management bracket Secure the cable bundle using cable ties If you are using a chassis mounted cable strap down clip without the snap on plastic fiber cable routing guide route the RJ 45 cables through the lower slot of the Supervisor PIC cable management bracket Secure the cable bundle to the lower tie down ...

Page 24: ... RJ 45 Cables Connected to the Supervisor PIC Option 1 Supervisor PIC cable management bracket 3 Snap on plastic fiber cable routing guides 1 RJ 45 cable bundle 2 Cisco Converged Broadband Routers Hardware Installation Guide 24 Installing the Supervisor in the Cisco cBR Chassis Cable Management for the Supervisor PIC in the Cisco cBR Chassis ...

Page 25: ... management bracket 4 Strap down clip 1 Snap on plastic fiber cable routing guides 5 RJ 45 cable bundle 2 Cable tie 3 Cisco Converged Broadband Routers Hardware Installation Guide 25 Installing the Supervisor in the Cisco cBR Chassis Cable Management for the Supervisor PIC in the Cisco cBR Chassis ...

Page 26: ... Cable ties 3 Strap down clips 1 Supervisor PIC cable management bracket 4 RJ 45 cable bundle 2 Cisco Converged Broadband Routers Hardware Installation Guide 26 Installing the Supervisor in the Cisco cBR Chassis Cable Management for the Supervisor PIC in the Cisco cBR Chassis ...

Page 27: ...rmanent connections you must use the ports on the Supervisor PIC Required Tools and Equipment Memory stick or flash drive Step 1 Open the tethered I O door on the Supervisor Card by pulling on the left edge of the door until the door is released from the spring loaded ejector Figure 24 Opening the Tethered I O Door on the Supervisor Card Tethered I O door 1 Cisco Converged Broadband Routers Hardwa...

Page 28: ...nsole port connection The console port on the Supervisor Card is for temporary connections For permanent console connection you must use the port on the Supervisor PIC Required Tools and Equipment Console cable with mini type B USB connector on one end and a type A USB connector on the other end Exar XR21V1410 UART with USB interface Cable with type A USB connector on one end and DB 9 connector on...

Page 29: ...tep 2 Connect the mini type B USB connector of the console cable to the console port on the Supervisor Card Figure 27 Console Port Connection on the Supervisor Card Console cable with mini type B USB connector on one end and a type A USB connector on the other end 2 Mini type B USB connector 1 Cisco Converged Broadband Routers Hardware Installation Guide 29 Installing the Supervisor in the Cisco c...

Page 30: ...on SUP250 all 10G and 100G interfaces are visible regardless of whether the related QSFP module is inserted or not The backhaul interface numbering scheme on SUP250 is different from SUP160 shown as below 10GE interface 100GE interface Te4 1 2 Te4 1 9 Hu4 1 0 Hu4 1 1 SUP4 Te5 1 2 Te5 1 9 Hu5 1 0 Hu5 1 1 SUP5 Therefore we recommend the user to copy the SUP160 configuration out to the server and edi...

Page 31: ... in the above chart The mappings are Ten4 1 0 Ten 4 1 7 SUP160 as Ten4 1 2 Ten4 1 9 SUP250 Ten5 1 0 Ten5 1 7 SUP160 as Ten5 1 2 Ten5 1 9 SUP250 d Modify the bootvar to the correct value boot system bootflash image_name e Save the configuration as a sup250 txt file Step 3 Copy the sup250 txt into eUSB Step 4 Copy the IOS image into eUSB copy ftp username password server ip dir image_name Step 5 Exe...

Page 32: ...port both boards should be in rommon mode Send break and make sure the board is in rommon mode if it does not in rommon mode after boot up Step 14 Insert the eUSB into the USB0 of the SUP in slot4 boot the SUP from rommon to IOS boot usb0 image_name Step 15 Once the SUP enter the IOS mode copy the image from eUSB to bootflash on the SUP copy usb0 image_name bootflash Step 16 Insert the eUSB into t...

Page 33: ... STANDBY HOT Uptime in current state 1 day 23 hours 49 minutes Image Version Cisco IOS Software Fuji cBR Software X86_64_LINUX_IOSD UNIVERSALK9 M Experimental Version 16 7 20171024 133607 v167_throttle nobackup mcgourtm v167_throttle_ece2 103 Copyright c 1986 2017 by Cisco Systems Inc Compiled Tue 24 Oct 17 12 43 by mcgourtm BOOT bootflash cbrsup universalk9 2017 10 24_12 51_mcgourtm SSA bin 12 CO...

Page 34: ...ard 4 1 and 5 1 card 0 0 cBR CCAP LC 40G card 1 0 cBR CCAP LC 40G card 2 0 cBR CCAP LC 40G card 3 0 cBR CCAP LC 40G card 4 1 sup pic 2x100g 8x10g card 5 1 sup pic 2x100g 8x10g card 6 0 cBR CCAP LC 40G card 7 0 cBR CCAP LC 40G card 8 0 cBR CCAP LC 40G card 9 0 cBR CCAP LC 40G b Add the configuration cable sup250 ifmod 100GE right before cable downstream freq profile 0 to make sure the SUP250 board ...

Page 35: ...t map ip dscp based plim qos input map ip dscp 40 queue strict priority plim qos input map mpls exp 5 queue strict priority cdp enable service policy output parent egress to core channel group 11 mode active end interface HundredGigE5 1 0 mtu 2000 no ip address load interval 30 plim qos input map ip dscp based plim qos input map ip dscp 40 queue strict priority plim qos input map mpls exp 5 queue ...

Page 36: ...of the chassis and tighten the hook screw Step 7 Insert another SUP250 PIC into the slot 5 on the front side of the chassis and tighten the hook screw Step 8 Insert the SUP250 board into the slot 4 on the rear side of the chassis and tighten the hook screw Step 9 Insert another SUP250 board into the slot 5 on the rear side of the chassis and tighten the hook screw Step 10 Connect the 100G QSFP on ...

Page 37: ...cy Mode sso Operating Redundancy Mode sso Maintenance Mode Disabled Communications Up Current Processor Information Active Location slot 4 Current Software state ACTIVE Uptime in current state 1 day 23 hours 59 minutes Image Version Cisco IOS Software Fuji cBR Software X86_64_LINUX_IOSD UNIVERSALK9 M Experimental Version 16 7 20171024 133607 v167_throttle nobackup mcgourtm v167_throttle_ece2 103 C...

Page 38: ...he Cisco cBR Chassis Perform this procedure to install the following PICs Supervisor PIC Blank PIC for the Supervisor Before You Begin If you are adding a new Supervisor PIC or upgrading the existing Supervisor PICs ensure that the power modules installed in the chassis are adequate to support the Supervisor PICs Warning Attach an ESD preventive wrist strap to your wrist and connect the other end ...

Page 39: ...hand and place your other hand under the PIC to support its weight Step 2 Carefully align the PIC with the plastic guides in the slot Step 3 Slide the PIC into the slot applying even pressure using both your hands until it is within an inch of full insertion Step 4 Open the ejector levers and fully insert the PIC into the slot applying even pressure on both sides until it mates with the midplane c...

Page 40: ... when inserting the PIC into the slot Caution Figure 28 Inserting the Supervisor PIC into the Chassis Cisco Converged Broadband Routers Hardware Installation Guide 40 Installing the Supervisor in the Cisco cBR Chassis Installing the Supervisor PIC in the Cisco cBR Chassis ...

Page 41: ...visor PIC cable management bracket recommended Install the Supervisor Card if not already installed Installing the Supervisor PIC Cable Management Bracket The Supervisor PIC cable management bracket is shipped separately in the chassis accessory kit It has a smaller slot for fiber optic cables and a larger slot for the RJ 45 cables Before You Begin Attach an ESD preventive wrist strap to your wris...

Page 42: ...he lower slot is the larger slot for RJ 45 cables Important Figure 30 Installing the Supervisor PIC Cable Management Bracket Supervisor PIC cable management bracket 2 Captive screws 1 Step 2 Tighten the captive screws using a 3 16 flat blade torque screwdriver with a torque of 6 8 in lb 0 68 0 90 Nm to secure the Supervisor PIC cable management bracket What to Do Next Install the chassis mounted f...

Page 43: ... all cables before removing or installing an SFP transceiver module Caution Attach an ESD preventive wrist strap to your wrist and connect the other end to the grounding lug connected to the chassis You must use the supported SFP modules The following SFP modules are supported on the Supervisor PIC SFP 10G SR SFP 10G LR SFP 10G ER SFP 10G ZR SFP 10G LRM Required Tools and Equipment ESD preventive ...

Page 44: ...odules the TX and RX marking might be replaced by arrowheads pointing from the SFP module connector transmit direction or TX and towards the connector receive direction or RX Note Step 4 Align the SFP module in front of the socket opening Step 5 Carefully insert the SFP module into the socket until you feel the connector latch into place Figure 32 Installing the SFP Module in the Supervisor PIC Ci...

Page 45: ...ensure that the power modules installed in the chassis are adequate to support the Supervisor Cards Warning Attach an ESD preventive wrist strap to your wrist and connect the other end to the grounding lug connected to the chassis Install the Supervisor PIC recommended Be aware of the weight and size of the equipment Handle it with care Restrictions If you are using a single Supervisor you must in...

Page 46: ...dicular to the faceplate Step 3 Grasp the faceplate of the card with one hand and place your other hand under the card to support its weight Step 4 Carefully align the support rails on the card with the rails in the appropriate slot Step 5 Slide and push the card into the slot applying even pressure using both your hands until it mates with its midplane connectors Cisco Converged Broadband Routers...

Page 47: ...assis Step 6 Simultaneously pivot both the spring loaded ejectors towards the faceplate until they make contact with the faceplate Figure 35 Closing the Spring Loaded Ejectors on the Supervisor Card Cisco Converged Broadband Routers Hardware Installation Guide 47 Installing the Supervisor in the Cisco cBR Chassis Installing the Supervisor Card in the Cisco cBR Chassis ...

Page 48: ... two captive screws using a 3 16 flat blade torque screwdriver with a torque of 10 12 lb in 1 12 1 36 Nm to secure the card Cisco Converged Broadband Routers Hardware Installation Guide 48 Installing the Supervisor in the Cisco cBR Chassis Installing the Supervisor Card in the Cisco cBR Chassis ...

Page 49: ...able with the LC connector Step 1 Remove the dust plugs from the network interface cable LC connectors Save the dust plugs for future use Step 2 Inspect and clean the LC connector end faces Step 3 Remove the dust plug from the SFP module optical bores on the Supervisor PIC Step 4 Immediately connect the fiber optic cable with cable LC connector to the SFP port Grasp the LC connector housing to con...

Page 50: ...ct the other end of the RJ 45 cable to the to the DTI server as a reference clock source What to Do Next Route the RJ 45 cable through the Supervisor PIC cable management bracket and chassis mounted fiber cable routing guide Using the NME Ports on the Supervisor PIC Before You Begin Install the Supervisor PIC Install the Supervisor Card Required Tools and Equipment Cisco Converged Broadband Router...

Page 51: ...e Console Port on the Supervisor PIC The console port provides local administrative access to the router and its command line interface CLI Before You Begin Install the Supervisor PIC Install the Supervisor Card Restrictions Each Supervisor PIC must have a console port connection when running a redundant configuration in the chassis Required Tools and Equipment RJ 45 cable RJ 45 to DB 9 adapter Ci...

Page 52: ...e serial port on the PC or terminal Step 4 Power up the PC or terminal Step 5 Configure the PC terminal emulation software or the terminal with the following settings 9600 baud 8 data bits No parity generation or checking 1 stop bit No flow control What to Do Next Route the cable through the Supervisor PIC cable management bracket and chassis mounted fiber cable routing guide Cisco Converged Broad...

Page 53: ...ard Required Tools and Equipment RJ 45 cable RJ 45 to DB 9 adapter Terminal server Step 1 Connect one end of the RJ 45 cable to the auxiliary port on the Supervisor PIC Figure 42 Auxiliary Port Connection on the Supervisor PIC Step 2 Connect the other end of the RJ 45 cable to the RJ 45 to DB 9 adapter Figure 43 Connecting an RJ 45 to DB 9 Adapter Cisco Converged Broadband Routers Hardware Install...

Page 54: ...Install the Supervisor PIC Install the Supervisor PIC cable management bracket Install the chassis mounted cable strap down clips and attach the snap on plastic fiber cable routing guides as necessary based on the cable routing preference Connect the cables to the appropriate ports on the Supervisor PIC Required Tools and Equipment Cable ties Step 1 Perform the following for the fiber optic cables...

Page 55: ...ber Optic Cables Connected to the Supervisor PIC Option 1 Supervisor PIC cable management bracket 3 Snap on plastic fiber cable routing guides 1 Fiber optic cable bundle 2 Cisco Converged Broadband Routers Hardware Installation Guide 55 Installing the Supervisor in the Cisco cBR Chassis Cable Management for the Supervisor PIC in the Cisco cBR Chassis ...

Page 56: ... bracket 4 Strap down clips 1 Snap on plastic fiber cable routing guides 5 Fiber optic cable bundle in flexible conduit 2 Cable tie 3 Cisco Converged Broadband Routers Hardware Installation Guide 56 Installing the Supervisor in the Cisco cBR Chassis Cable Management for the Supervisor PIC in the Cisco cBR Chassis ...

Page 57: ...tic fiber cable routing guide and then through the lower slot of the Supervisor PIC cable management bracket Secure the cable bundle using cable ties If you are using a chassis mounted cable strap down clip without the snap on plastic fiber cable routing guide route the RJ 45 cables through the lower slot of the Supervisor PIC cable management bracket Secure the cable bundle to the lower tie down ...

Page 58: ... RJ 45 Cables Connected to the Supervisor PIC Option 1 Supervisor PIC cable management bracket 3 Snap on plastic fiber cable routing guides 1 RJ 45 cable bundle 2 Cisco Converged Broadband Routers Hardware Installation Guide 58 Installing the Supervisor in the Cisco cBR Chassis Cable Management for the Supervisor PIC in the Cisco cBR Chassis ...

Page 59: ... management bracket 4 Strap down clip 1 Snap on plastic fiber cable routing guides 5 RJ 45 cable bundle 2 Cable tie 3 Cisco Converged Broadband Routers Hardware Installation Guide 59 Installing the Supervisor in the Cisco cBR Chassis Cable Management for the Supervisor PIC in the Cisco cBR Chassis ...

Page 60: ...ep 3 Repeat Step 1 on page 54 and Step 2 on page 57 for the cables connected to the each Supervisor PIC Using the USB Port on the Supervisor Card Before You Begin Install the Supervisor PIC Install the Supervisor Card Cisco Converged Broadband Routers Hardware Installation Guide 60 Installing the Supervisor in the Cisco cBR Chassis Using the USB Port on the Supervisor Card ...

Page 61: ...by pulling on the left edge of the door until the door is released from the spring loaded ejector Figure 50 Opening the Tethered I O Door on the Supervisor Card Tethered I O door 1 Step 2 Connect the memory stick or flash drive to the USB port on the Supervisor Card Figure 51 Connecting the USB Drive to the USB Port Cisco Converged Broadband Routers Hardware Installation Guide 61 Installing the Su...

Page 62: ...d Equipment Console cable with mini type B USB connector on one end and a type A USB connector on the other end Exar XR21V1410 UART with USB interface Cable with type A USB connector on one end and DB 9 connector on the other end PC or terminal Step 1 Open the tethered I O door on the Supervisor Card by pulling on the left edge of the door until the door is released from the spring loaded ejector ...

Page 63: ...r XR21V1410 UART with USB interface Step 4 Connect the Exar XR21V1410 UART to the appropriate serial port on the PC or terminal using a cable with type A USB connector on one end and DB 9 connector on the other end Step 5 Power up the PC or terminal Step 6 Configure the PC terminal emulation software or the terminal with the following settings 9600 baud 8 data bits No parity generation or checking...

Page 64: ...Cisco Converged Broadband Routers Hardware Installation Guide 64 Installing the Supervisor in the Cisco cBR Chassis Using the Console Port on the Supervisor Card ...

Reviews: