background image


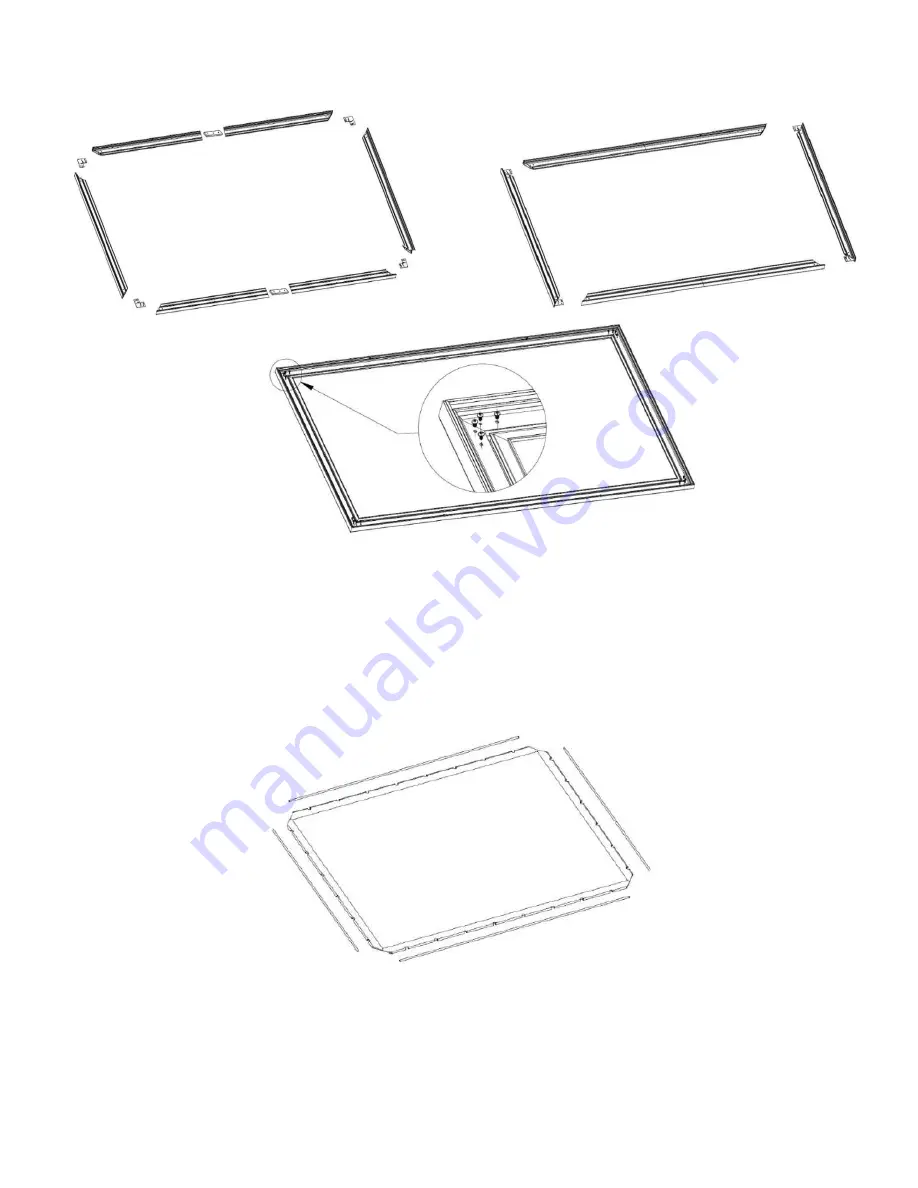
Step 3:

 Unroll the screen material and carefully lay it inside the frame, projection-side-down and rotated in 

the correct direction.  

Step 4:

 Layout the tension rods around the screen material. Insert the two short tension rods into the left and 

right-side pockets of the screen material. Be careful not to puncture the screen material as you slide the rods 
through the screen pockets. Insert the two long rods into the upper and lower pockets of the screen material.  


Summary of Contents for Startus G3

Page 1: ...Fixed Frame Screen ...

Page 2: ...ny damage 3 When installing the screen material onto the frame make sure it is facing forward 4 Be careful not to scratch or damage the screen surface while handling it 5 Do not write or draw on screen surface Do not poke fold or tear screen material 6 Do not use detergents or harsh chemicals to clean screen material A soft cloth can clean dust and dirt off frame 7 Cover the screen to block out di...

Page 3: ... Electric or Cordless Drill Level Pencil Screwdriver Ladder Carpenter s square Measuring tape Stud finder ...

Page 4: ... screws all the way down Join the side frame rails to the upper and lower frame rails allowing the exposed bracket to slide into the track at the angled end of the upper and lower frame rails Secure the brackets in place with the remaining bracket screws and fully tighten all bracket screws The frame should now be square at all four corners with no gaps As you unpack the projection screen Remove a...

Page 5: ...n Step 4 Layout the tension rods around the screen material Insert the two short tension rods into the left and right side pockets of the screen material Be careful not to puncture the screen material as you slide the rods through the screen pockets Insert the two long rods into the upper and lower pockets of the screen material ...

Page 6: ... include 2 support bars Step 6 count the number of cut out notches at each edge of the screen material Then hook one spring per cut out notch onto the frame at the corresponding location On each spring the small hook is for connection to the frame and the larger hook is for connection to the screen tension rod For each corner of the frame stretch the two closest springs to the corner onto the expo...

Page 7: ... is determined based on the frame width Note For instructions where the screen will be mounted flush to a ceiling the top of the upper bracket should be placed no less than 3 8 below the ceiling Note For a wood framed wall locate two studs in the wall that are spaced apart the amount in the table below and then secure each bracket to the center of each stud with the included mounting screws Ensure...

Page 8: ...hen 90 48 48 90 to 110 64 72 110 to 135 80 72 135 to 160 96 96 160 to 185 112 120 185 to 210 128 120 210 to 240 144 144 240 to 265 160 168 Step 8 Secure the lower brackets to the wall The lowest part of each bottom bracket should A minus 1 8 below the highest part of each upper bracket The distance between the centers of the lower bracket will also be C Step 9 After the lower brackets have been pr...

Page 9: ...ckets Adjust the horizontal position of the screen to the desired position then tighten the locking screws on the bottom of the lower mounting brackets until the tabs of the mounting brackets fit firmly into the track of the frame locking the frame into place 5 Cleaning the Projection Screen 6 Troubleshooting Initially there may be some wrinkles in the screen If there are do not worry Let the scre...

Page 10: ......

Reviews: