background image

24

SVGm

Instruction Manual

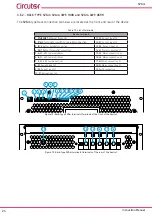
3�6�2�- RACK-TYPE SVGm: SVGm-3WF-100R and SVGm-4WF-069R

The 

SVGm 

type Rack connection terminals are located at the front and rear of the device.

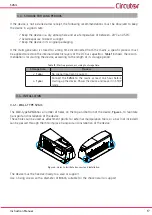
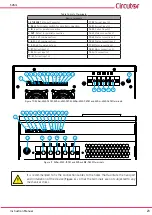
Table 15: List of terminals�

Device terminals

1:


ETHERNET

, Ethernet Connector

11: S2

, Current input L2

2:


R

BUS

, Terminator switch for parallel connection

12: S1, 

Current input L3

3:


IN

, Input for parallel connection

13: S2

, Current input L3

4: OUT

, Output for parallel connection

14: L1

, Mains connection L1

5: A, 

RS-485 communications

15: L2

, Mains connection L2

6: B, 

RS-485 communications

16: L3

, Mains connection L3

7: S, 

RS-485 communications

17: N

, Mains connection N 

8: S1, 

Current input L1

18: N

, Mains connection N

9: S2

, Current input L1

19: 

Earth connection

10: S1, 

Current input L2

S1

S1

S1

S2

S2

S2

L1 L2 L3

RS485
A B S

LINK

IN

OUT

ETHERNET

1

2

3

4

5

6

8

9 10 11 12 13

RBUS

7

Figure 12: Rack-type SVGm terminals (terminals at the front of the device)�

14

15

16

17

18

19

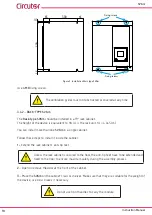
Figure 13: Rack-type SVGm terminals (terminals at the rear of the device)�

Summary of Contents for SVGm

Page 1: ...SVGm M248B01 03 22A Static var generator INSTRUCTION MANUAL ...

Page 2: ...2 SVGm Instruction Manual ...

Page 3: ...y prior to connecting the unit Follow all installation and maintenance in structions throughout the unit s working life Pay special attention to the installation standards of the National Electrical Code Refer to the instruction manual before using the unit In this manual if the instructions marked with this symbol are not respected or carried out correctly it can result in injury or damage to the...

Page 4: ... AND CURRENT MEASUREMENT ON THE LOAD SIDE 30 3 7 3 3 WIRE CONNECTION AND CURRENT MEASUREMENT ON THE MAINS SIDE 31 3 7 4 3 WIRE CONNECTION AND CURRENT MEASUREMENT ON THE LOAD SIDE 32 3 7 5 3 WIRE CONNECTION AND 2 CURRENT TRANSFORMERS ON THE MAINS SIDE 33 3 7 6 3 WIRE CONNECTION AND 2 CURRENT TRANSFORMERS ON THE LOAD SIDE 34 3 8 PARALLEL CONNECTION OF 2 TO 100 SVGm 35 3 8 1 CONNECTING INDIVIDUAL DEV...

Page 5: ... 17 SAVE DATA 72 8 RS 485 COMMUNICATIONS 73 8 1 CONNECTIONS 73 8 2 PROTOCOL 74 8 2 1 EXAMPLE OF MODBUS QUERY 74 8 2 2 MODBUS MAP 74 9 ETHERNET COMMUNICATIONS 78 9 1 CONNECTION 78 9 2 WEB SITE 78 10 MAINTENANCE 80 10 1 STANDARD MAINTENANCE 80 10 2 COOLING FANS 82 10 3 CHANGE OF COOLING FANS SVGm OF 20 7 and 30 kvar 82 10 4 CHANGE OF COOLING FANS SVGm OF 41 4 and 60 kvar 85 10 5 CHANGE OF COOLING FA...

Page 6: ... 2 3 2 1 3 3 5 3 6 1 3 6 2 3 6 3 3 6 4 3 8 3 8 2 7 2 10 10 3 10 4 10 5 10 6 10 7 10 8 11 04 22 M248B01 03 22A Changes in the following sections 2 3 5 3 6 3 3 8 3 8 2 4 1 4 2 4 3 4 4 4 7 1 6 1 1 6 3 6 4 6 7 6 8 6 9 7 6 7 7 7 8 7 9 7 10 7 11 7 12 7 15 8 1 8 2 2 1 8 2 2 2 8 2 2 4 9 1 11 SYMBOLS Table 2 Symbols Symbol Description Compliant with the relevant European standards 1 min After disconnecting...

Page 7: ...f any problem is noticed upon reception immediately contact the transport com pany and or CIRCUTOR s after sales service 1 2 TRANSPORT AND HANDLING The transport loading and unloading and handling of the device must be carried out with proper precautions and using the proper manual and mechanical tools so as not to damage it If the device is not to be immediately installed it must be stored at a l...

Page 8: ...ile that supports the device Figure 2 There might be an offset in the centre of gravity from the centre of the cabinet as a result of the uneven distribution of loads inside the device The necessary precautions must be taken to prevent the device from tipping over during abrupt operations Figure 2 Unloading with a forklift When unpacking the device pay attention to prevent damaging the device if y...

Page 9: ...n uneven surfaces Do not store them in outdoor areas humid areas or areas exposed to splashing water Avoid hot spots maximum ambient temperature 50ºC Avoid salty and corrosive environments Avoid storing the devices in areas where a lot of dust is generated or where the risk of chem ical or other types of contamination is present ...

Page 10: ...s Enclosure type Rack Cabinet o Wall depending on model There are different models of the device for different powers SVGm 20 7 and 30 kvar Table 3 Relation of models SVGm of 20 7 and 30 kvar Model 3 Wires L1 L2 L3 4 Wires L1 L2 L3 N Type Power kvar Mains voltage Un Maximum Parallelization SVGm 4WF 020M 400 Wall 20 7 208 400 V 100 units SVGm 3WF 030M 480 Wall 30 208 480 V 100 units SVGm 41 4 and 6...

Page 11: ...mum Parallelization SVGm 4WF 067C 550 Cabinet 67 230 550 V 100 units SVGm 69 kvar Table 6 Relation of models SVGm of 69 kvar Model 4 Wires L1 L2 L3 N Type Power kvar Mains voltage Un Maximum Parallelization Rack Cabinet Wall SVGm 4WF 069M 400 69 208 400 V 100 units SVGm 4WF 069C 400 69 208 400 V 100 units SVGm 4WF 069R 400 69 208 400 V 100 units ...

Page 12: ...Gm 3WF 100C 690 100 230 690 V 100 units SVGm 134 138 200 201 207 268 276 300 and 400 kvar Table 8 Relation of models SVGm of 134 138 200 201 207 268 276 300 and 400 kvar Model 3 Wires L1 L2 L3 4 Wires L1 L2 L3 N Type Power kvar Mains voltage Un Maximum Parallelization SVGm 4WF 134C 550 Cabinet 134 230 550 V 50 units SVGm 4WF 138C 400 Cabinet 138 208 400 V 50 units SVGm 3WF 200C 480 Cabinet 200 208...

Page 13: ...ins voltage Un Maximum Parallelization SVGm 4WF 207C 400 Cabinet 207 208 400 V 30 units SVGm 4WF 268C 550 Cabinet 268 230 550 V 25 units SVGm 4WF 276C 400 Cabinet 276 208 400 V 25 units SVGm 3WF 300C 480 Cabinet 300 208 480 V 30 units SVGm 3WF 300C 690 Cabinet 300 230 690 V 30 units SVGm 3WF 400C 480 Cabinet 400 208 480 V 25 units SVGm 3WF 400C 690 Cabinet 400 230 690 V 25 units ...

Page 14: ...ause serious damage to the device itself and to other devices of the installation Only suitable for assembly on concrete or other non combustible surfaces and in re stricted access areas The devices are not intended for use in life support medical safety equipment or similar applications whereby a fault in the device could cause loss of life or physical injury They are neither intended for militar...

Page 15: ...hat controls the rotation speed of the fans and the maximum power of the device according to the internal temperature to ensure the best performance in any condition Table 9 Ventilation distances Wall type SVGm Ventilation distances Wall type SVGm 50 mm 400 mm 3 2 1 2 Rack type SVGm The Rack type SVGm uses a forced ventilation cooling system with an air inlet on the front panel and an air outlet a...

Page 16: ... SVGm 300 mm 300 mm 3 2 1 3 Cabinet type SVGm The cabinet type SVGm uses a forced ventilation cooling system with an air inlet on the front panel and an air outlet at the back of the device The ventilation grille at the top must not be blocked leaving enough space to the ceiling to allow the heat to dissipate The distance depends on the characteristics of the installation site There is no need to ...

Page 17: ...its storage period Table 13 Start up process according to storage time Storage time Process 1 year No special treatment required 1 year Connect the SVGm to the mains at least one hour before starting up the device Power the device and leave it in STOP mode 3 4 INSTALLATION 3 4 1 WALL TYPE SVGm The Wall type SVGm has a number of holes on the top and bottom of the device Figure 4 to facilitate trans...

Page 18: ... cm You can install more than one SVGm in a single cabinet Follow these steps to install it inside the cabinet 1 Extend the rack cabinet s anti tip feet Unless the rack cabinet is secured to the floor the anti tip feet have to be extended and fixed to the floor to ensure maximum safety during the assembly process 2 Open or remove the door at the front of the cabinet 3 Place the SVGm on the cabinet...

Page 19: ...ust never be welded to the floor using arc welding as this may destroy the electronic components The device s top panel is part of the ventilation system The top panel is inverted to make it easier to transport It must be placed in the correct position to enable the device to operate properly To do this 1 Remove the transport rings 2 Remove the top panel from the top of the cabinet 3 Rotate the to...

Page 20: ...ust be selected according to the external protection devices Cabinet type SVGm models For the cabinet s power supply a cable with a cross section suitable for the maximum current that can flow through the device must be used Although the device is com posed of 100 kvar modules to make installation easier the modules are already wired and the user only has to take into account the device s total ca...

Page 21: ...ces only DC sensitive RCD RCD type B should be used with SVGm Static generators work internally with DC currents and in case of failure the DC currents may produce malfunction on type A RCD devices Ensure that the installation of the device in your electric distribution system TN VT IT complies with current standards Note In networks with a grounded phase the permanent phase to ground voltage can ...

Page 22: ...n the lower face of the device The device has a terminal cover on the mains connection terminals Figure 8 Terminal cover SVGm 3WF 030M SVGm 4WF 020M SVGm 3WF 060M and SVGm 4WF 040M Figure 9 Terminal cover SVGm 3WF 100M and SVGm 4WF 069M Remove the terminal cover before connecting the device 2 M5 1 5 Nm Put the terminal cover back on once the device has been connected ...

Page 23: ...ction N 8 S1 Current input L1 18 N Mains connection N 9 S2 Current input L1 19 Earth connection 10 S1 Current input L2 ETHERNET LINK IN OUT RS485 S1 S1 S1 S2 S2 S2 L1 L2 L3 1 3 4 5 6 7 8 9 10 11 12 13 14 15 16 17 18 19 RBUS 2 Figure 10 SVGm 3WF 030M SVGm 4WF 020M SVGm 3WF 060M and SVGm 4WF 040M terminals ETHERNET LINK IN OUT RS485 S1 S1 S1 S2 S2 S2 L1 L2 L3 1 3 4 5 6 7 8 9 10 11 12 13 RBUS 2 A B S...

Page 24: ...put L3 4 OUT Output for parallel connection 14 L1 Mains connection L1 5 A RS 485 communications 15 L2 Mains connection L2 6 B RS 485 communications 16 L3 Mains connection L3 7 S RS 485 communications 17 N Mains connection N 8 S1 Current input L1 18 N Mains connection N 9 S2 Current input L1 19 Earth connection 10 S1 Current input L2 S1 S1 S1 S2 S2 S2 L1 L2 L3 RS485 A B S LINK IN OUT ETHERNET 1 2 3...

Page 25: ...igure 14 Sliding windows for the connection wiring You should never remove the cover closest to the front part Cabinets with connections at the top have a sheet in the upper part of the cabinet which can be ma chined as shown in Figure 15 to insert the connection wiring 72 80 80 80 138 75 Unidades en mm Units in mm Figure 15 Machining a cabinet with connections at the top The current input and the...

Page 26: ...nections at the top Figure 16 Screws SVGm 3WF xxC 480 and SVGm 4WF xxC 400 models Protectores de sobretensión Surge voltage protection Figure 17 Screws SVGm 3WF xxxC 690 and SVGm 4WF xxxC 550 models The green indicator voltage protection indicate that they are working correctly Im mediately replace those whose indicator is red see 10 8 MAINTENANCE OF SURGE PROTECTIVE DEVICES SVGm 3WF xxxC 690 and ...

Page 27: ...ront cover is open the device s terminals can be accessed Figure 18 Figure 19 and Figure 20 1 2 3 4 5 6 7 8 9 10 Figure 18 terminals connections at the bottom 1 2 3 4 5 6 7 8 9 10 Figure 19 terminals connections at the top 11 Figure 20 SVGm cabinet type earth terminal ...

Page 28: ... terminals 1 S1 Current input L1 6 S2 Current input L3 2 S2 Current input L1 7 L1 Mains connection L1 3 S1 Current input L2 8 L2 Mains connection L2 4 S2 Current input L2 9 L3 Mains connection L3 5 S1 Current input L3 10 N Mains connection N 11 Earth connection ...

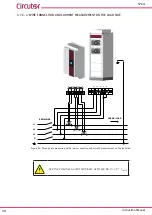
Page 29: ...ON THE MAINS SIDE N L1 L2 L3 CARGA LOAD L1 L2 L3 RED MAINS S1 S2 S1 S2 S1 S2 L1 P1 P2 L2 L3 P1 P2P1 P2 S1 S2 P1 P2 S1 S2 P1 P2 S1 S2 P1 P2 N N Figure 21 Three phase measuring with 4 wire connection and current measurement on the mains side Use the 2 neutral current terminals as In can be In 3 I PHASE ...

Page 30: ... SIDE N L1 L2 L3 CARGA LOAD L1 L2 L3 RED MAINS S1 S2 S1 S2 S1 S2 L1 P1 P2 L2 L3 P1 P2P1 P2 S1 S2 P1 P2 S1 S2 P1 P2 S1 S2 P1 P2 N N Figure 22 Three phase measuring with 4 wire connection and current measurement on the load side Use the 2 neutral current terminals as In can be In 3 I PHASE ...

Page 31: ...D CURRENT MEASUREMENT ON THE MAINS SIDE L1 L2 L3 CARGA LOAD L1 L2 L3 RED MAINS S1 S2 S1 S2 S1 S2 L1 P1 P2 L2 L3 P1 P2P1 P2 S1 S2 P1 P2 S1 S2 P1 P2 S1 S2 P1 P2 Figure 23 Three phase measuring with 3 wire connection and current measurement on the mains side ...

Page 32: ...ND CURRENT MEASUREMENT ON THE LOAD SIDE L1 L2 L3 CARGA LOAD L1 L2 L3 RED MAINS S1 S2 S1 S2 S1 S2 L1 P1 P2 L2 L3 P1 P2P1 P2 S1 S2 P1 P2 S1 S2 P1 P2 S1 S2 P1 P2 Figure 24 Three phase measuring with 3 wire connection and current measurement on the load side ...

Page 33: ...3 S1 S2 S1 S2 S1 S2 L1 P1 P2 L2 L3 P1 P2P1 P2 S1 S2 P1 P2 S1 S2 P1 P2 CARGA LOAD L1 L2 L3 RED MAINS Figure 25 Three phase measuring with a 3 wire connection and 2 current transformers on the mains side The connection of 2 current transformers is only possible in three phase mains without neutral 3 wires ...

Page 34: ...3 S1 S2 S1 S2 S1 S2 L1 P1 P2 L2 L3 P1 P2P1 P2 S1 S2 P1 P2 S1 S2 P1 P2 CARGA LOAD L1 L2 L3 RED MAINS Figure 26 Three phase measuring with a 3 wire connection and 2 current transformers on the load side The connection of 2 current transformers is only possible in three phase mains without neutral 3 wires ...

Page 35: ...evice Master 1 2 100 Figure 27 Connection of 2 to 100 SVGm in parallel Transformers on the mains side Master 1 2 100 Figure 28 Connection of 2 to 100 SVGm in parallel Transformers on the load side New device can be connected to existing devices without having to shut down or disconnect them This ensures capacity can be increased or degraded device in critical installations can be replaced without ...

Page 36: ...nout 4 3 2 1 1 Not connected 2 CAN A 3 CAN B 4 Not connected Note The communication cable must be a CAT 5 cable or higher Connect the OUT terminal from the master static generator to the IN terminal from the second static generator the OUT terminal from the second static generator to the IN terminal of the third and so on Table 17 OUT IN 2 3 2 3 ON RBUS OUT IN 2 3 2 3 ON RBUS ON RBUS Figure 29 Con...

Page 37: ...T 2 3 2 3 SVGm xxx 200C OUT IN 2 3 IN 2 3 OUT 2 3 2 3 ON RBUS ON RBUS ON RBUS ON RBUS ON RBUS ON RBUS Figure 30 Connecting 3 devices in parallel using the communication cable 200 kvar Master SVGm 5 Configure the installation in the master device see 7 CONFIGURATION 6 Complete the configuration of the slave devices see 7 CONFIGURATION 7 Enable the terminator switch for parallel connection RBUS Term...

Page 38: ...g to whether it takes into account the content of harmonics or only the fundamental frequency component The effects of reactive currents in the conductors of distribution lines can be minimised with two methods Passively by adding reactive loads with the opposite sign to that of the loads of the instal lation For example adding capacitors to handle inductive loads Actively by generating a current ...

Page 39: ...easured or we need to compensate the inductive reactive power of the power transformer or the cable length between the measurement point and the billing point may generate reactive power that affects the target power factor To solve these problems a fixed reactive power to be generated offset can be specified In this case the device will calculate the reactive power to be generated based on the ta...

Page 40: ...r Modbus TCP the SVGm will communi cate with the measuring device This mode overcomes the distance limitation between the measuring point and the installation point with this distance now depending only on the communication technology used 4 4 TIME PROGRAMMER Note Feature available from HMI version 1 20 of the device The reactive power compensation targets can vary depending on the day and time as...

Page 41: ... failure thanks to an on screen message and it is also found in the Modbus register This type of failure indicates damage or degradation of any of the control and process elements both hardware and software Turning off the device and contacting Technical Service is recommended whenever this alarm comes about 4 6 THERMAL PROTECTION The device features several levels of thermal protection Ventilatio...

Page 42: ...splay The last screen before entering the energy saving mode will be shown The display is divided into three areas Figure 35 246 246 Lorem ipsum Upper area Central area Lower area Figure 35 The display is divided into three areas 4 7 1 UPPER AREA The following will be displayed on the upper area A short description of the status of the device The symbol when the device requires maintenance see sec...

Page 43: ...installation This analysis enables it to give advice on how to optimise overall system performance Once the icon has been read it disappears until further advice is offered And the necessary keys at each point Table 18 Table 18 Central area keys Key Function Restarts the device after an alarm Starts the device Stops the device 4 7 3 LOWER AREA Figure 37 Lower area The lower area displays the navig...

Page 44: ...ster Use the key to navigate to the display screen of the load pa rameters 6 4 POWER AND COS ɸ OF LOAD and Make sure the active power measurement of the load corresponds to the active power levels of the installation Make sure the reactive power measurement of the load corresponds to the reactive power levels of the installation Check the cos ɸ in the three phases If phases appear with very high r...

Page 45: ...ote Control option has been selected 7 9 REMOTE CONTROL for the device to check the Active and Reactive Power values through an external analyzer REMOTE is shown on the Grid side The key allows you to restart the device if an alarm has been generated and this has been resolved The key is the start and stop key of the SVGm Use the and keys to navigate through the different display screens In the up...

Page 46: ... Charging process of the internal bus prior to start up Stop Description Device stopped Alarm Description An alarm has been generated Access the Alarms screen 6 7 ALARMS to obtain more information 6 1 2 SLAVE DEVICE In Figure 40 the main screen of the slave device is shown RUN STOP key RESET key of power Status messages Figure 40 Main screen of the slave device This shows the of power used The and...

Page 47: ...ses L1 L2 L3 voltage Phases L1 L2 L3 and Neutral mains current Phases L1 L2 L3 and Neutral load current The Frequency Use the and keys to navigate through the different display screens 6 3 MAINS POWER AND COS ɸ Note This screen is not visible on the slave devices Note Screen not visible if the Remote Control option selected 7 9 REMOTE CONTROL Figure 42 shows the mains power and cos ɸ Figure 42 Dis...

Page 48: ... POWER AND COS ɸ Note This screen is not visible on the slave devices Note Screen not visible if the Remote Control option selected 7 9 REMOTE CONTROL Figure 43 shows the load power and cos ɸ Figure 43 Display of the load power and cos ɸ It shows The Active Power P Reactive Power Q and Apparent Power S The cos ɸ Note The sign in reactive power indicates that it is capacitive and the sign that it i...

Page 49: ... mains phasors are shown Figure 44 Mains phasors Use the and keys to navigate through the different display screens 6 6 LOAD PHASORS Note This screen is not visible on the slave devices In this screen Figure 45 the load phasors are shown Figure 45 Load phasors Use the and keys to navigate through the different display screens ...

Page 50: ...y to delete the alarm log Table 21 shows the messages that could appear on the device If the cause of the alarm disappears the device will be reconnected automatically If the same alarm is triggered 5 times during a 1 hour period the automatic device reconnection function will be disabled The key rearms the device if the cause of the alarm has disappeared or has been resolved If the device remains...

Page 51: ...cal Service DC DC Bus overvoltage Description Internal DC bus voltage error Corrective action Check connections Check mains power quality and presence of notches If it continues contact the technical service IGBT failure Description Possible hardware failure detected Corrective action Contact Technical service High temp IGBT Description The temperature of the power module is very high Corrective a...

Page 52: ...cal service 5V supply failure Description Power supply failure Corrective action Contact Technical service Internal comms error Description Failure in internal communications Corrective action Restart Contact the Technical Service 6 8 WARNINGS Note This screen is not visible on the slave devices When the device generates a warning it will continue to operate but the symbol will be displayed on the...

Page 53: ...rocedure and reset the maintenance meter see 10 MAINTE NANCE Fan maintenance Description Fans have been operating for over 40 000 hours they must be replaced and the maintenance meter must be reset Corrective action Replace the fans and reset the maintenance meter see 10 MAINTENANCE Fan degradation Description Deterioration in the ventilation capacity of the system has been detected Corrective act...

Page 54: ...rrective action Schedule mode is activated The SVGm tries to connect to an NTP time server Communication fails or it is out of sync It may take some minutes to synchronize Check Ethernet communications and access to Internet Remote meter comms failure Description SVGm is failing to communicate with remote meter Corrective action Check SVGm configuration Check communications and remote meter config...

Page 55: ...IGBTs Figure 50 Temperature The screen displays Ok correct temperature High high temperature Low low temperature Use the and keys to navigate through the different display screens 6 10 ETHERNET COMMUNICATIONS In this screen Figure 51 the IP address of the device and the netmask are shown Figure 51 Communications Use the and keys to navigate through the different display screens ...

Page 56: ...necessary to recalibrate it It is recommended to use a soft tip pointer take care not to damage the display and press icon The calibration screen is shown below Figure 53 Figure 53 Calibrate touch sensor Note You have accessed the calibration screen by accident wait until the line that surrounds the central circle is complete and you will be returned automatically to the information screen of the ...

Page 57: ...ave device status screen 1 The slave to be checked can be selected from the top tab by serial number Select the slave the screen shown in Figure 55 will be displayed This screen shows the Model Type and Serial number of the device as well as its status active alarms and the temperature of the IGBTs and inductors Figure 55 Slave device status screen 2 Note If there is a communication error the mess...

Page 58: ...ccessed in display mode i e all parameters of the device are shown but they cannot be modified By pressing the key the setup menu is accessed in edit mode i e the parameters of the device can be modified In this case before entering the setup menu it is necessary to enter the password Figure 57 Password 1234 Figure 57 Password to access the setup menu in edit mode ...

Page 59: ...Press the key to access the main screen of the device without saving the configuration values 7 2 DEVICE SPECIFICATIONS Note This screen is informative it can not be modified In this screen Figure 59 the specifications of the device are displayed Figure 59 Configuration screen Device specifications Model device model the options are Table 23 Configuration values Model Model Possible values 3W 3 wi...

Page 60: ...e Slave In this screen the type of device is selected the possible options are Single select this option if the SVGm does not have static generators connected in parallel Master select this option if the static generator is going to be used as the master of a group of devices in parallel Slave select this option if the device is going to be used as the slave of a group of devices in parallel Once ...

Page 61: ...r when re quired The SVGm will stop when the load current is below the entered value and will start when it is higher Table 25 Configuration values Min current Min current Minimum value 0 A Maximum value 5000 A Current limit This parameter allows the maximum power of the static generator to be limited The value is config ured as a percentage with respect to the device s rated power Table 26 Config...

Page 62: ... to the specified cos Φ Mode 2 In this mode two limits are defined to form an acceptance range The device will adjust the reactive power on the mains side to keep cos Φ within the specified acceptance range This mode minimises the amount of power used by the device to compensate for reactive power thus reducing its energy consumption Table 27 Configuration values cos Φ cos Φ Range of values 0 7 0 ...

Page 63: ... Φ Figure 63 Figure 63 Configuration screen Offset Example The device calculates that to achieve a cos Φ 1 it must generate 50 kvar capacitive An offset of 30 kvar inductive is programmed It will thus generate 50 30 20 kvar capacitive The offset value can be capacitive or inductive Table 28 Configuration values Offset Offset Minimum value 0 kvar Maximum value 10000 kvar Press the key to access the...

Page 64: ...nstall a transformer measuring the L1 phase and another measuring the L2 phase The L3 phase is left without a measuring transformer In three phase mains with neutral 3 transformers are needed to ensure the correct operation of the device Position The location of the transformers is configured with this parameter the options are LOAD If the transformers are installed in the load side downstream fro...

Page 65: ...be one already present in the installation or one used solely for this purpose This screen Figure 65 is used to set up the type of transformer and its transformation ratio Figure 65 Configuration screen Medium voltage Activate the Medium Voltage option so the device can compensate for reactive power Type Transf select the type of step up transformer as indicated on its rating plate Ratio select th...

Page 66: ...al measurement transformers The remote control option is activated and the analyzer is selected on this screen Figure 66 Figure 66 Configuration screen Remote control Activate the Remote Control option to use an external analyzer Select the CIRCUTOR power analyzer or meter from the drop down menu Note The compensation in this mode of operation is slower The reaction time is about 15 seconds Press ...

Page 67: ...e to set up how the SVGm will communicate with it Figure 67 Figure 67 Configuration screen Remote Control 2 Modbus Address select the peripheral number of the analyzer used Select the type of communication Modbus TCP or Modbus RTU the SVGm will use to commu nicate with the analyzer IP Address IP address of the analyzer IP Port IP port of the analyzer Press the key to access the next configuration ...

Page 68: ...6 Spain the schedule is preset as per time of use period P6 Option Custom lets you set a different time band for every day of the week Note If the start time is after the end time the alternative program is activated between 00 00 and the end time and between the start time and 24 00 Press the key to access the next configuration step Press the key to access the main screen of the device without s...

Page 69: ...ctive power on the mains side to keep cos Φ within the specified acceptance range This mode minimises the amount of power used by the device to compensate for reactive power thus reducing its energy consumption Table 32 Configuration values Mode 2 Mode 2 cos Φ Offset Range of values 0 7 0 7 0 10000 kvar Fixed Q This way the device generates a constant reactive power Table 33 Configuration values F...

Page 70: ...nfigured manually IP Address IP address Netmask subnet mask Gateway gateway Press the key to access the next configuration step Press the key to access the main screen of the device without saving the configuration values 7 14 RS 485 COMMUNICATIONS The RS 485 communications configuration in SVGm models is set to a Baud Rate of 9600 bps 8 Data bits 1 Stop bit and no Parity Only the device s Modbus ...

Page 71: ...igured in this screen Figure 72 Figure 72 Configuration screen Date Time Time Date Time zone By activating the Internet time option the device synchronises with an NTP server Press the key to access the next configuration step Press the key to access the main screen of the device without saving the configuration values 7 16 PASSWORD This screen Figure 73 is used to configure the device s password ...

Page 72: ...n being pressed and will not stop unless the correct password is entered Press the key to access the next configuration step Press the key to access the main screen of the device without saving the configuration values 7 17 SAVE DATA The modified configuration values are saved in the final setup menu screen Figure 74 Figure 74 Final setup menu screen Press the key to save the modified data Press t...

Page 73: ...d twisted pair cable minimum 3 wires with a maximum distance between the SVGm and the master device of 1200 metres A maximum of 32 SVGm static generators can be connected to this bus To establish communications with the master device use an RS 485 converter B A S RS 232 USB Ethernet Profibus PC RS 485 RS 485 RS 232 USB Ethernet Profibus S A B Figure 75 RS 485 Connection diagram The RS 485 communic...

Page 74: ...Register no 2 CRC 0 A 03 04 0000 00FA xxxx Address 0A Responding peripheral number 10 in decimal Function 03 Read function No of bytes 04 No of bytes received Register 000000FA value of load current L1 with 1 decimal 0xFA 25 0 A CRC xxxx CRC character 8 2 2 MODBUS MAP All Modbus map variables are in hexadecimal format For these variables Functions 03 and 04 are implemented 8 2 2 1 Load Measurement...

Page 75: ...mal Temperature IGBT 5 1 2 F6 ºC with 1 decimal Temperature IGBT 6 1 2 F7 ºC with 1 decimal Temperature Inductor 3 1 2 FB ºC with 1 decimal Temperature Inductor 4 1 2 FC ºC with 1 decimal Phase L1 L2 voltage DE V with 1 decimal Phase L2 L3 voltage DF V with 1 decimal Phase L3 L1 voltage E0 V with 1 decimal Positive DC bus voltage E1 V with 1 decimal Negative DC bus voltage E2 V with 1 decimal 1 Fo...

Page 76: ...arm 0x00000100 DC bus overvoltage alarm 0x00000200 IGBT failure 0x00004000 High temperature IGBT 0x00008000 High temperature inductor 0x00010000 Initial Conditions Error 0x00040000 Hardware failure 0x00080000 DC Bus charge failure 0x00100000 Selt test failed 0x00200000 Temperature alarm 0x01000000 DSP failure 0x02000000 5V supply failure Table 41 Modbus memory map Static generator messages Table 3...

Page 77: ...ces in parallel the parameter value is that of the device connected with RS 485 Table 42 Modbus memory map Static generator messages Table 4 Parameter Address SVGm status 6 104 Status Decimal value Description 0 The device is starting the systems 50 Initiating internal communication systems 60 Configuring the device 100 The SVGm is starting up 200 Waiting for the conditions to be met in order to o...

Page 78: ...guring the parameters Figure 76 shows the main web server screen from where you can access all of the information of the SVGm Figure 76 Main screen of the web site The language of the web site can be modified using the buttons that appear on the upper right part of the page To modify the Configuration parameters it is necessary to enter the User and Password in the Admin istrator section There are...

Page 79: ...VGm 2 User with read access user Table 44 Default username and password for a user with read access Default User and Password User name user Password user For security purposes change the passwords for accessing the web site ...

Page 80: ...een 6 8 WARNINGS describes the type of maintenance procedures that must be carried out Note The time intervals of the maintenance operations can vary depending on the device s operating conditions and environmental factors Follow the safety instructions in the SAFETY PRECAUTIONS section before carrying out any maintenance on the SVGm Failure to follow these instructions may result in injury or eve...

Page 81: ...tatus and torque of the electrical connections as well as the mechanical attachment to the wall 5 Reset the standard maintenance meter to do so Access the main setup screen Figure 77 Main configuration screen Press the Edit key and enter the password used to access the maintenance screen Main tenance password 8888 The screen shown in Figure 78 will be displayed Figure 78 Maintenance screen Press t...

Page 82: ... Increase in temperature of the device under the same environmental conditions and load The SVGm regularly indicates a temperature alarm The set of fans must be replaced if they have exceeded their useful life or show signs of deterioration In such cases CIRCUTOR will provide a spare part that consists of a set of fans so that the device can be repaired quickly and easily For an installation with ...

Page 83: ...charge before opening the device 6 5 4 7 8 8 8 3 3 3 Wall bushing Front cover Figure 80 Steps to change fans Remove the 8 screws from the front cover 2 Disconnect the display Remove the insulators Remove the screws from the fuses 3 Disconnect the fans Remove the 7 screws from the fan cover 2 Remove the fan cover Be careful when passing the cable through the wall grommet Replace the fans 2 0 7 Nm F...

Page 84: ...ressing the key and entering the password to log into the maintenance screen Maintenance password 8888 The screen in Figure 81 is displayed Checking the operation of the fans 1 Press the key the fan starts to operate at a rotation speed of 50 check that it is working properly Press the key to stop the fan 2 Press the key the fan starts to operate at a rotation speed of 100 check that it is working...

Page 85: ...0M Code 920122 2 Screwdriver for PH2 head screws 3 Screwdriver for Allen 3 head screws Figure 82 Location of the cooling fans To proceed to change the set of fans Place the SVGm in STOP mode and disconnect the device from the power If necessary disconnect all the connection cables and short circuit the current transformers Wait for 1 minute for the capacitors to discharge before opening the device...

Page 86: ...n Manual 11 8 5 3 3 6 11 4 Wall bushing Lower cover Front cover Figure 83 Steps to change fans Part 1 12 10 9 9 7 6 Figure 84 Steps to change fans Part 2 Remove the 8 screws from the front cover 2 Disconnect the display ...

Page 87: ... fans Remove lower cover Replace the fans 2 0 7 Nm Place the lower cover Connect the fans on the lower level Run the cables for the fans in the upper level through the wall grommet Assemble the lower cover 2 1 5 Nm Connect the upper floor fans Tighten the bars to the terminal block 2 2 2 Nm Insert the Allen screws and nuts in the bar but do not tighten 21 Mount the fuses Place the screws in the co...

Page 88: ...ews 10 Screwdriver for Hexagonal 10 mm head screws To proceed to change the set of fans Place the SVGm in STOP mode and disconnect the device from the power If necessary disconnect all the connection cables and short circuit the current transformers Wait for 1 minute for the capacitors to discharge before opening the device Remove the 8 screws of the upper cover 25 3 3 3 Figure 85 SVGm type Rack c...

Page 89: ...ds Remove the wall grommet from the fan cables to allow disassembly 4 Remove the screws from the driver board 25 emove the driver board by gently pulling upwards Remove the screws from the bars 5 along with the screws in the end of the inductance type 5 and 10mm 5 8 8 6 Figure 87 SVGm type Rack Change of cooling fans Step 5 6 8 Remove the 3 screws from the fans 4 ...

Page 90: ...e fan assembly screws 4 5 5 Nm Mount the bars Tighten the IGBT and inductance screws IGBT screws 4 5 Nm Inductance screws 8 Nm Mount the driver board Use the visual guides The cross should be seen through the holes in the board Screw the driver board 0 7 Nm Place the wall grommet on the bar brackets and reassemble the board bracket Screw in 4 5 Nm Connect the flat belts Hall effect sensors and fan...

Page 91: ...ver for PH2 head screws 25 Screwdriver for Torx 25 head screws 4 Screwdriver for Allen 4 head screws 5 Screwdriver for Allen 5 head screws 10 Screwdriver for Hexagonal 10 mm head screws To proceed to change the set of fans Place the SVGm in STOP mode and disconnect the device from the power If necessary disconnect all the connection cables and short circuit the current transformers Wait for 1 minu...

Page 92: ...VGm xxx 100x Code 920124 25 Screwdriver for Torx 25 head screws 30 Screwdriver for Torx 30 head screws 4 Screwdriver for Allen 4 head screws 5 Screwdriver for Allen 5 head screws 10 Screwdriver for Hexagonal 10 mm head screws To proceed to change the set of fans Place the SVGm in STOP mode and disconnect the device from the power If necessary disconnect all the connection cables and short circuit ...

Page 93: ...strikes etc the indicator must be verified to be green If it needs replacing the indicator will change to red In this case the condition of the associated pro tective fuse must also be checked The NH00 fuses include a status indicator that is visible when the front cover is removed If any work has to be done inside the connection area the device must be discon nected from the power supply It is im...

Page 94: ...Gm 3WF 100M 30000 VA 60000 VA 100000 VA 400V SVGm 4WF 020M SVGm 4WF 040M SVGm 4WF 069R SVGm 4WF 069M 20700 VA 41400 VA 69000 VA SVGm 3WF 100C 480 SVGm 4WF 069C 400 SVGm 3WF 200C 480 SVGm 4WF 138C 400 Rated insulation voltage Ui 480 V 480 V Impulse withstand voltage Uimp 4kV CAT III Class 1 4kV CAT III Class 1 Rated current SVGm 3WF 100C 480 SVGm 3WF 200C 480 145 A 290 A SVGm 4WF 069C 400 SVGm 4WF ...

Page 95: ...VA 400000 VA 400V SVGm 4WF 207C 400 SVGm 4WF 276C 400 207000 VA 276000 VA SVGm 3WF 100C 690 SVGm 4WF 067C 550 SVGm 3WF 200C 690 SVGm 4WF 134C 550 Rated insulation voltage Ui 690 V 690 V Impulse withstand voltage Uimp 6kV CAT III Class 1 6kV CAT III Class 1 Rated current SVGm 3WF 100C 690 SVGm 3WF 200C 690 84 A 168 A SVGm 4WF 067C 550 SVGm 4WF 134C 550 70 A 140 A Short time withstand current Icw 3 ...

Page 96: ... SVGm 4WF 268C 550 210 A RMS 280 A RMS Maximum power 690V SVGm 3WF 300C 690 SVGm 3WF 400C 690 300000 VA 400000 VA 550V SVGm 4WF 201C 550 SVGm 4WF 268C 550 201000 VA 268000 VA Current measurement Type Transformer 5 5A 5000 5A Consumption 1 5 VA per transformer SVGm specifications Response time 100 μs Cos ɸ programmable 0 7 inductive 1 0 7 capacitive Parallel connection Up to 100 devices of differen...

Page 97: ...m 4WF xxxC 550 OVC III 600V SVGm 3WF xxxC 480 SVGm 4WF xxxC 400 SVGm 3WF xxxC 690 and SVGm 4WF xxxC 550 Pollution degree 2 Impact resistance IK 10 Electromagnetic compatibility Installation in type A environments 7 Consult for operating temperatures below 10ºC Standards Electromagnetic compatibility CEM Part 6 4 Generic standards Emissions stand ard for industrial environments IEC 61000 6 4 2006 U...

Page 98: ... Type Mains M6 ring terminal 12 mm 2 2 2 4 Nm PH2 Earth M6 ring terminal 16 mm 2 2 2 4 Nm PH2 Connections Type Current 6 pole connector max 2 5 mm2 0 5 0 6 Nm Flat 3 mm RS 485 3 pole connector max 2 5 mm2 0 5 0 6 Nm Flat 3 mm Ethernet RJ 45 8 1 metre from the mounting wall ISO 11201 2010 V2 430 530 178 300 500 65 65 15 15 9 Figure 93 Dimensions SVGm 3WF 030M and SVGm 4WF 020M ...

Page 99: ...s M6 ring terminal 12 mm 2 2 2 4 Nm PH2 Earth M6 ring terminal 16 mm 2 2 2 4 Nm PH2 Connections Type Current 6 pole connector max 2 5 mm2 0 5 0 6 Nm Flat 3 mm RS 485 3 pole connector max 2 5 mm2 0 5 0 6 Nm Flat 3 mm Ethernet RJ 45 9 1 metre from the mounting wall ISO 11201 2010 V2 430 530 348 300 500 15 15 24 24 9 Figure 94 Dimensions SVGm 3WF 060M and SVGm 4WF 040M ...

Page 100: ...e 60 dBA Connections Type Mains M8 ring terminal 23 mm 8 10 Nm PH2 Earth M10 ring terminal 10 14 Nm Hex 17 mm Connections Type Current 6 pole connector max 2 5 mm2 0 5 0 6 Nm Flat 3 mm RS 485 3 pole connector max 2 5 mm2 0 5 0 6 Nm Flat 3 mm Ethernet RJ 45 745 439 745 288 712 300 n11 Figure 95 Dimensions SVGm 3WF 100M and SVGm 4WF 069M ...

Page 101: ...60 dBA Connections Type Mains Ring terminal M8 23 mm 8 10 Nm PH2 Earth Ring terminal M10 10 14 Nm Hex 17 mm Connections Type Current 6 pole connector max 2 5 mm2 0 5 0 6 Nm Flat 3 mm RS 485 3 pole connector max 2 5 mm2 0 5 0 6 Nm Flat 3 mm Ethernet RJ 45 482 5 265 9 714 5 688 436 8 263 Figure 96 Dimensions SVGm 3WF 100R and SVGm 4WF 069R ...

Page 102: ...34C 550 SVGm 3WF 200C 480 SVGm 4WF 138C 400 70 dBA 60 dBA 73 dBA 63 dBA SVGm 3WF 300C 690 SVGm 4WF 201C 550 SVGm 3WF 300C 480 SVGm 4WF 207C 400 SVGm 3WF 400C 690 SVGm 4WF 268C 550 SVGm 3WF 400C 480 SVGm 4WF 276C 400 76 dBA 66 dBA 79 dBA 69 dBA Connections Current Type Spring 2 5 mm2 Earth 10 Type Ring terminal 8 mm 10 Nm Hex 13 mm Ethernet Type RJ 45 Mains Static generator Bar Drill Diameter of th...

Page 103: ... mm 45 Nm SVGm 4WF 069C 400 SVGm 4WF 134C 550 80x10 37 mm SVGm 4WF 138C 400 SVGm 4WF 201C 550 SVGm 4WF 268C 550 SVGm 4WF 207C 400 100x10 3xM10 SVGm 4WF 276C 400 10 If the phase conductors exceed 32 mm2 the earth conductor can be the half of the cross section of the phase conduc tors 608 812 1755 665 465 1890 Figure 97 Dimensions Cabinet type SVGm ...

Page 104: ...re improper installation or improper usage of the unit Consequently this guarantee does not apply to failures occurring in the following cases Overvoltages and or electrical disturbances in the supply Water if the product does not have the appropriate IP classification Poor ventilation and or excessive temperatures Improper installation and or lack of maintenance Buyer repairs or modifications wit...

Page 105: ...105 Instruction Manual SVGm 14 CE CERTIFICATE ...

Page 106: ...106 SVGm Instruction Manual ...

Page 107: ...107 Instruction Manual SVGm ...

Page 108: ...CIRCUTOR SA Vial Sant Jordi s n 08232 Viladecavalls Barcelona Tel 34 93 745 29 00 Fax 34 93 745 29 14 www circutor es central circutor com ...

Reviews: