background image


Raption 150C

Instruction Manual

90

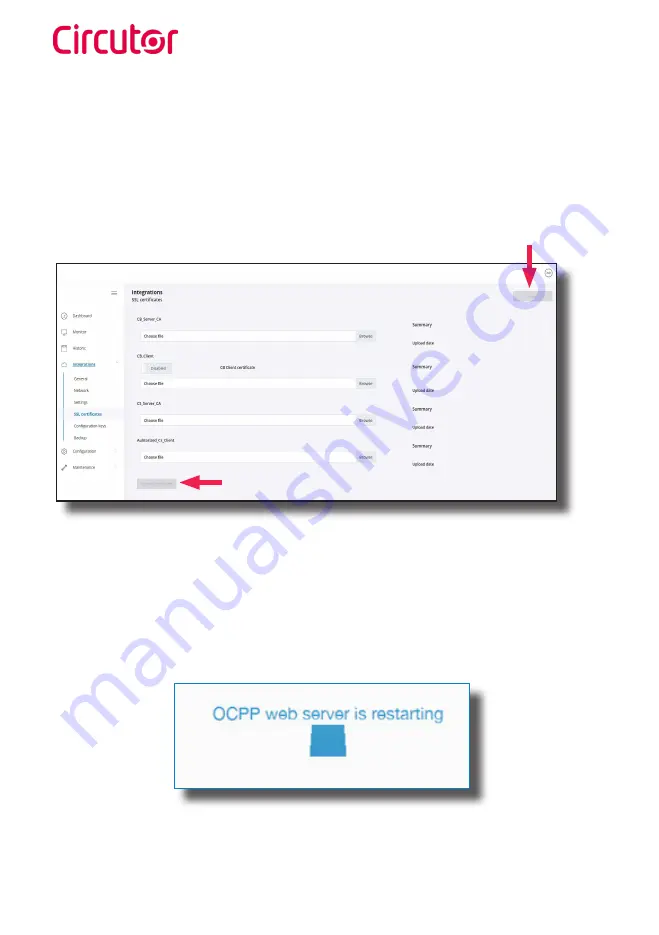
Once finished, please do not forget to apply changes pressing 

‘Upload certificates’


in the 

screen lower part and to save changes using 

‘Save’

 button in the screen upper right part.

Please, wait until the new configuration is being applied to the Charge Point. A message is 
displayed informing the progress:

Go to the 

Setup Webpage 

→ 

‘Integrations’

 tab → 

‘SSL Certificates’

 tab

When working with

 ‘secure

’ connections, HTTPS, a certificate from the backoffice (normally a 

‘bundle’ file) may be needed to assure proper communication with the charging station.

Depending on the case, select the proper option and press Browse button in order to upload 
the certificate. Most common case is

 ‘CS Server CA’

:

Summary of Contents for RAPTION 150C CCS CHA

Page 1: ...Raption 150C Series INSTRUCTION MANUAL M358B01 03 22A...

Page 2: ...Raption 150C Instruction Manual 2...

Page 3: ...isclaimer CIRCUTOR SA reserves the right to make modifications to the device or the unit specifications set out in this instruction manual without prior notice CIRCUTOR SA on its web site supplies its...

Page 4: ...by any means without the prior written permission of the original manufacturer Information provided in this manual is intended to be accurate and reliable However the original manufacturer assumes no...

Page 5: ...tion 26 F Charging summary 27 G Emergency button 28 H Connectors status 29 I Consulting the connectors status 31 4 How to configure it 36 A What is needed 37 B Network topology 38 C LAN connection pro...

Page 6: ...either individually or simultaneously The unit integrates an intuitive user interface easy to use It is an 8 touch screen by which all necessary operations for recharging are performed It has been de...

Page 7: ...chnician Remove from service any item that has a fault that could be dangerous for users broken connectors caps that don t close Use only CIRCUTOR supplied spare parts Do not use this product if the e...

Page 8: ...ector Ethernet the unit allows communicate using TCP IP on an Ethernet network giving flexibility to the system operator and management of the Charge Point Remote monitoring and control in real time 4...

Page 9: ...17 16 15 7 18 1 Cover 2 CCS light beacon 3 CCS holder 4 CCS connector 5 Handle 6 RFID reader 7 Card payment 8 Touch screen 9 Air inlet Unit 10 CHAdeMO light beacon 11 CHAdeMO holder 12 CHAdeMO connect...

Page 10: ...Raption 150C Instruction Manual 10 C Dimensions Units specified in millimeters 1290 1140 1910 550 610 460...

Page 11: ...Green Available The connector or socket is available to start a charging session Blue Charging The connector or socket is performing a charging session Cyan Reserved The connector or socket has been...

Page 12: ...Combo 2 CCS Tethered cable 3 5 meters Up to 375 A 150 kW E Connectors The Charge Point can operate under the following scenarios Only DC CHAdeMO Only DC CCS2 Simultaneous CHAdeMO and CCS 2 connectors...

Page 13: ...ystem consists on a sensor for connector detection and the lock mechanism CHA connector is locked by the Charge Point CCS connector is locked by a piston Also there is one Led over each holder indicat...

Page 14: ...he Charge Point is powered on the system will take around 10 seconds to start up the screen will show next image In the lower right corner the firmware version is shown After 10 seconds the first scre...

Page 15: ...options are the options that will let to initiate a Charging session to the user that has the identification card has been registered in advance or a code has been given to type it manually in the sc...

Page 16: ...or the current Charge Transaction When Charge Point returns to main or standby screen it will return the default language which is configured in the Setup Webpage 1 More languages than shown available...

Page 17: ...7 B Starting a charging session Once you have shown your identification card the HMI will show next screen Wait while Charge Point authorizes the user If everything is correct and the user is authoriz...

Page 18: ...us is available Once you have chosen your connector follow the instructions in the screen to start the charge transaction 1 Connect your vehicle and press the Start button At any time it is possible t...

Page 19: ...ruction Manual 19 2 Checking vehicle connection Please wait In a few seconds the charging session will start and the HMI will show the charging process Tap this button in order to go back to the ident...

Page 20: ...supervision of the main management system called Back Office It can generate a whitelist in order to register new users manage charging sessions etc If the user is not authorized the HMI will show th...

Page 21: ...Concurrent charge in this case the identifier is already involved in another charge transaction D Not authorized Authorization expired it is possible that the back office has put a deadline to your i...

Page 22: ...e has blocked temporarily your identification card F After the user has been properly authorized just at the moment that has to choose the connector the screen will show the connectors status It could...

Page 23: ...e position This situation can be detected by the Charge Point and it will be displayed by HMI as Please check gear shift position put it in parking mode After check it press over Retry button H Is pos...

Page 24: ...owing the charging process and next message Show your identification to stop the session can be stopped by the same user that has started it After showing the identification card the Charge Point will...

Page 25: ...Raption 150C Instruction Manual 25 Once you have stopped the charging session the HMI will show the summary screen Press over the Exit touch button and disconnect your vehicle...

Page 26: ...power of charge etc 4 House touch button it goes back to the identification screen 5 Charge time with status bar charging time elapsed so far 6 Energy charged energy supplied to the vehicle so far 7 B...

Page 27: ...final battery state of charge at the end of the charging session 5 Exit button It has to be pressed in order to finish the charging session After pressing the HMI screen will go back to the identifica...

Page 28: ...arge transaction until the recovery process is completed successfully All the power modules will shut down in order to protect the user and the own Charge Point The HMI screen will remain powered up i...

Page 29: ...nnector is out of service for any technical reason Press over Information touch button in order to get more information about it The Charge Point is out of service because the emergency button has bee...

Page 30: ...be able to use per the user that has made the reserve Note if the user that has reserved the Charge Point is yourself the charging session will start normally if not the Charge Point will not be able...

Page 31: ...tion 150C Instruction Manual 31 I Consulting the connectors status It is possible to press over each connector picture to get more information about the status 1 CONNECTOR AVAIL ABLE 2 CONNECTOR IN ER...

Page 32: ...Raption 150C Instruction Manual 32 3 CONNECTOR DISABLED 4 CONNECTOR IN USE...

Page 33: ...Raption 150C Instruction Manual 33 5 CONNECTOR RESERVED 6 CONNECTOR BLOCKED PER RESERVED Note Applies only when simultaneously charge is not available...

Page 34: ...Raption 150C Instruction Manual 34 7 CONNECTOR BLOCKED PER CHARGING Note Applies only when simultaneously charge is not available 8 CONNECTOR BLOCKED PER ERROR...

Page 35: ...Raption 150C Instruction Manual 35...

Page 36: ...direct access to the main setup page will be allowed The Charge Point is shipped from the factory with default network setting of DHCP enabled It means that the Charge Point will try to obtain an IP...

Page 37: ...up an IP address to the Charge Point A What is needed Service PC running Microsoft Windows at least Windows XP UTP Cable Crossover recommended IPSetup exe 2 PowerStudio Scada Client 2 2 In order to ge...

Page 38: ...be done with static IP address and TCP IP v4 protocol Next section shows how to do this configuration Below image shows Ethernet connection topology and the IP addresses used in this guide as example...

Page 39: ...es a step by step guide to connect the Service PC to the Charge Point in order to see real time status 1 On the Service PC click over the Network icon next to the clock of the taskbar and click on Ope...

Page 40: ...Raption 150C Instruction Manual 40 3 Right click on Local Area Connection and then click on Properties 4 Select Internet Protocol Version 4 TCP IP option and click on Properties...

Page 41: ...uction Manual 41 5 Setup IP address and subnet mask like as shown here below and click OK twice to complete the assigning IP address process to the computer 6 Now execute IPSetup exe software provided...

Page 42: ...following parameters and click on Configure MAC of the Charge Point see label on the cover s screen IP address i e 192 168 1 50 Netmask i e 255 255 255 0 Gateway leave default settings 8 Wait 30 secon...

Page 43: ...ess will complete when the following message appears click on OK 10 If the message shown is the next one check the following parameters and click on OK Check IP address entered Check the MAC of the de...

Page 44: ...ard and setting up the modem The modem that has been installed in Raption Series is Teltonika RUT 240 Step 1 Open Charge Point s right door and locate the modem on the rear side Step 2 Check that the...

Page 45: ...status RUT240 is part of the RUT2xx series of compact mobile routers with high speed wireless and Ethernet connections 1 LAN Ethernet port 2 WAN Ethernet port 3 3 LAN Led indicator 4 WAN Led indicator...

Page 46: ...ED s blinking every 1 sec no SIM or bad PIN 2G 3G 4G LED s blinking every 1 sec connected 2G 3G 4G but no data session established Blinking from 2G LED to 4G LED repeatedly SIM holder not inserted or...

Page 47: ...the SIM card 4 Push in the SIM holder After installing the SIM card check out that the 4G antenna mobile Wi Fi antenna and the power connector are properly attached Insert SIM card which was given by...

Page 48: ...curity reasons modem s Wi Fi connection is disabled by default In order to enable it remember to adjust it in Charge Point side as explained in section 4 4 2 At your service computer look for access p...

Page 49: ...pay attention to Sim card state field it has to be Ready You have now successfully logged into the RUT240 from here on you can configure almost any aspect of your router See note in next page 4 3 Open...

Page 50: ...require any authentication ask them about what type PAP or CHAP select it on Authentication method field and introduce a password and username 2 If you need to do some custom over the modem configura...

Page 51: ...if the connection has been done properly check next steps Go to Status Network Mobile and pay attention to Data connection state it has to be Connected Go to Status Network WAN and pay attention to I...

Page 52: ...both your Service PC and the Charge Point NOTES 1 If the modem has not detected the automatic IP address switch off the circuit breaker wait for 10 seconds and switch on again Connect again your Servi...

Page 53: ...e It can be written the name that you want for your Charge Point It is highly recommended to name it keeping this structure ChargePoint_xxxxxxxxxxxx to identify it easier MAC address It will be the MA...

Page 54: ...peat again the points 4 2 and 4 3 explained above 4 2 look for modem access point and connect on it 4 3 log on modem webpage with authentication 4 10 Now go again to Status Network LAN DHCP Leases and...

Page 55: ...0 8080 TCP 8080 192 168 1 50 8080 50000 TCP 50000 192 168 1 50 50000 9191 TCP 9191 192 168 1 1 80 The ports that you can see in the table below are introduced in the modem by default although only the...

Page 56: ...aption 150C Instruction Manual 56 4 12 Go to Network Firewall Traffic Rules Roll down and look for Enable_HTTP_WAN and Enable_HTTPS_WAN fields and enable these Roll down again and push over Save butto...

Page 57: ...a reboot Go to System Reboot and push over the Reboot tab During the process the system will show the progress do not switch off the modem 4 14 Repeat again the points 4 2 and 4 3 explained above 4 2...

Page 58: ...0 LTE modem option is chosen at Charge Point s setup webpage Make sure that your Service PC is still connected with the Charge point through Wi fi open a web browser and type 192 168 1 50 Go to Config...

Page 59: ...Raption 150C Instruction Manual 59...

Page 60: ...been set 192 168 1 50 Open a web browser on the service PC and enter this IP next image will appear The webpage opened shows the Dashboard Overview as a main screen but there are many more options In...

Page 61: ...ifier that allows information to be sent between devices on a network MAC Address Identifier of the network card of the Charge Point As a relevant information it shows A Dashboard COMMUNICATIONS CHARG...

Page 62: ...rge Point the type of connectors it has and the availability of them It is possible to start or stop a charging session able or disable a connector or lock or unlock it remotely It is also shown when...

Page 63: ...mation of every charge transaction started in the Charge Point It can be checked date and hour of begin and end of a charge transaction energy charged alias of the user and type of charge used All of...

Page 64: ...Integrations Clicking over the Integrations tab user will be able to activate OCPP integrations Note The integration of the Charge Point needs a separate section In the next sections number 7 and 8 i...

Page 65: ...ments it has and level of security it is desirable to have IDENTIFICATION METHOD It is possible to enable or disable the option to use the Charge Point with or without identification and also if the u...

Page 66: ...charge transaction starts When the charge transaction is finished the blocked fee is returned and only charge to the user according to the tariff described below Upload configuration allows to upload...

Page 67: ...ut exceeding the limit configured DISABLED the Charge Point does not take in consideration any limit giving the maximum power for each connector Profiles It lets to choose whether from the EV transact...

Page 68: ...68 Value Description Shared power It indicates the power available to divide between the connect ed vehicles The Max current supply A is the available power ONLY for AC outlets OCPP Smart Charging The...

Page 69: ...on Manual 69 COMMUNICATIONS This section provides basic configuration of the network parameters DHCP server router means to enable or disable the IP address assignment To be enabled when working with...

Page 70: ...or disable the email support and timeout Also in the Charge Point can be uploaded up to 20 languages between the wide variety able to choose Also it is possible to customize the languages in the Char...

Page 71: ...d to inform the customer It is necessary to work with an integrated system for the payment such as Kit VISA or OCPP Integrations The payment will be done through one of these platforms As explained in...

Page 72: ...cost of the charge transaction Fixed service fee Price of a new charge transaction Energy fee Amount of money to be paid based on the energy delivered to the EV Time fee Amount of money to be paid ba...

Page 73: ...be done some modifications in modem configura tion as explained below DISABLED not possible to assure secure connections between Charge Point and laptop Authentication ENABLE Introduce a user and a p...

Page 74: ...scribed in the section 5 you are ready to start logging into your router and start configuring it 1 Go to Network Firewall Port Forwarding Port Forwarding Rules Locate the port named Enable_ HTTPS_WAN...

Page 75: ...sabled 2 Go to Network Firewall Port Forwarding New Port Forward Rule At the bottom part of the screen add a new port forward rule with the following parameters and once introduced click Add button Na...

Page 76: ...76 3 Go to Network Firewall Traffic Rules Locate the port named Enable_ HTTPS_WAN and click Edit button Once in Edit screen insert 192 168 1 50 in Destination address field and 443 in Destina tion po...

Page 77: ...At the bottom part of the screen add a new traffic rule with the following parameters and once introduced click Add button Name OCPP Protocol All Destination address 192 168 1 50 Destination port 8443...

Page 78: ...is section it can be consulted the status of the devices which are communicating via RS 485 UPDATES Through this tab the Charge Point firmware and the application can be upgraded remotely To obtain th...

Page 79: ...gs shown in this section are automatically produced by the Charge Point It is a detailed list of the charging sessions system performance or user activities When Charge Point is powered ON system begi...

Page 80: ...PC of the Charge Point It is necessary for the technical service staff but does not show any information regarding to the external connection of the Charge Point or to the charging session ADVANCED Th...

Page 81: ...Point Primary NTP Server Synchronize the time through internet automatically Secondary NTP Server Soft Reset Restart of the Charge Point closing applications and clearing any data in RAM Unsaved data...

Page 82: ...to offer a uniform solution for the communication between Charge Point and a Central System With this open protocol it is possible to connect any Central System with any Charge Point regardless of th...

Page 83: ...the Charge Point must obtain the public IP address in order to send it later to the backend Different values can be selected Choose the option selected under Public IP source according to your networ...

Page 84: ...wn in the picture Note Charge Point is working as stand alone if none option is selected All ID cards are authorized to start stop a new charge transaction and no requests are sent to the backend Char...

Page 85: ...it is possible to modify some parameters related with network Value Description Incoming OCPP TCP Port Internal Incoming listening port for remote request internal Incoming OCPP TCP Port External Inc...

Page 86: ...Integrations tab Settings tab Check OCPP Settings according to the backend policies please contact to the Central System to get the configuration parameters Before making any changes read following ta...

Page 87: ...ransaction does not stops even if backend rejects the user StartTransaction conf Note Set this option according to your backend system Authorize Remote Tx Requests ENABLED The Charge Point asks for au...

Page 88: ...ote charge transaction request DISABLED Charge point starts a new remote charge transac tion without authorization request Authorize always in offline mode ENABLED If user is not present locally in th...

Page 89: ...an internal error Note Special development must be done in backend in order to retry the messages by charge point Compress OCPP messages ENABLED Reduce messages between Charge Point and backend DISAB...

Page 90: ...being applied to the Charge Point A message is displayed informing the progress Go to the Setup Webpage Integrations tab SSL Certificates tab When working with secure connections HTTPS a certificate...

Page 91: ...this value to 0 disables the Heartbeat Metervalues sample interval Number of seconds between MeterValue during an ongoing Charge Transaction Note setting this value to 0 disables the MeterValue Local...

Page 92: ...Go to the Setup Webpage Integrations Backup tab It is possible to download a backup of the Charge Point pressing Download setup button On the other hand it can also be uploaded a backup previously do...

Page 93: ...Raption 150C Instruction Manual 93...

Page 94: ...to offer a uniform solution for the communication between Charge Point and a Central System With this open protocol it is possible to connect any Central System with any Charge Point regardless of th...

Page 95: ...neral tab Once in General section Public IP source establishes where the Charge Point must obtain the public IP address in order to send it later to the backend Different values can be selected Choose...

Page 96: ...e time Go back to setup web page and click on the Integrations tab choose the option selected under Available integrations according to your backend policies as shown in the picture Note Charge Point...

Page 97: ...Description Charge Point ID Charge Point identifier Basic Authentication Set an authentication if required being the options Enabled and Disabled Connection URL URL address of the central system CS Pa...

Page 98: ...struction Manual 98 Go to the Setup Webpage Integrations Settings tab Once OCPP 1 6 option is selected a link appears allowing access to the OCPP configuration Please click on the link button as shown...

Page 99: ...eter sent between start and stop Energy for metervalues PARTIAL Sends partial energy consumption while vehicle is charg ing TOTAL sends the actual count of the total accumulated energy me ter User con...

Page 100: ...100 Go to the Setup Webpage Integrations SSL certificates tab For WSS connections is needed a Central System certificate Upload it in this section To obtain the latest certificates please contact Cent...

Page 101: ...Raption 150C Instruction Manual 101 Go to the Setup Webpage Integrations Configuration keys tab...

Page 102: ...he Central System sends a remote start DISABLED the Charge Point starts the Charge Transaction when the Central System sends a remote start Local pre authorisation ENABLED Charge Point looks for local...

Page 103: ...select one or more List of supported values used in the MeterValue Transaction message retry interval Number of seconds between transaction message attempts Note setting this value to 0 disables the...

Page 104: ...Go to the Setup Webpage Integrations Backup tab It is possible to download a backup of the Charge Point pressing Download setup button On the other hand it can also be uploaded a backup previously do...

Page 105: ...o to the Setup Webpage Integrations Security tab In this section could be introduced a user and password in order to enter in this section It is possible this option to be changed whenever is desired...

Page 106: ...se Ethernet communications via internet see section 4 SCADA Client The IP address assigned in the chapter 5 will be useful to connect with the Charge Point in order to monitor the real time status The...

Page 107: ...Raption 150C Instruction Manual 107 Monitoring...

Page 108: ...tant to understand the way the power of this Charge Point works There is a total of 6 power modules divided in to blocks of 3 each one When there is only one car charging the two blocks work for the p...

Page 109: ...Raption 150C Instruction Manual 109 Output power setup C Maximum output power Steps 1 Execute PowerStudio Client software 2 Push on General tab and after on Connect tab...

Page 110: ...aption 150C Instruction Manual 110 3 Enter the IP address given to the Charge Point and port number 80 after press over Ok 4 Press on the Views tab icon at the TOOLBAR and after click on Devices statu...

Page 111: ...l 111 5 Find in the Serial 1 the CCS Mode 4 and CHADEMO Mode 4 options Click on the connector whose power has to be adjusted CCS or CHA 6 Once the CCS Mode 4 is already opened press over Combo General...

Page 112: ...150C Instruction Manual 112 7 The pop up window below appears at Limit Power tab it is possible to set the maximum DC power output it can be selected from 10kW until 150kW for CCS Click OK to confirm...

Page 113: ...Raption 150C Instruction Manual 113 6 Once the CHADEMO Mode 4 is already opened press over CHAdeMO General 1 and press the setup button...

Page 114: ...150C Instruction Manual 114 7 The pop up window below appears at Limit Power tab it is possible to set the maximum DC power output it can be selected from 10kW until 100kW for CHA Click OK to confirm...

Page 115: ...Raption 150C Instruction Manual 115...

Page 116: ...AL DATA AC Power Supply 3P N PE AC Voltage 400 V 10 Maximum AC input current 260 A Required power supply capacity 160 kVA Power Factor 0 98 Efficiency 95 at nominal output power Frequency 50 60 Hz AC...

Page 117: ...l areas ENVIRONMENTAL CONDITIONS Operating temperature 30 C to 50 C Ambient temperature storage 40 C to 60 C Operating humidity 5 to 95 Non condensing MECHANICAL DATA Enclosure rating IP54 IK10 Enclos...

Page 118: ...Raption 150C Instruction Manual 118...

Page 119: ...devices has been improperly used or the storage installation and maintenance instructions listed in this manual have not been followed Improper usage is defined as any operating or storage condition c...

Page 120: ...CIRCUTOR SA Vial Sant Jordi s n 08232 Viladecavalls Barcelona Tel 34 93 745 29 00 Fax 34 93 745 29 14 www circutor com central circutor com...

Reviews: