background image

Install Your Phones

Included with each phone is an installation and use guide.  The following instructions are 

generic enough to cover all the phones available for your RevolutionPBX system.

If you are providing your own phones please consult the installation guide provided with your 

phone.

General Phone Installation

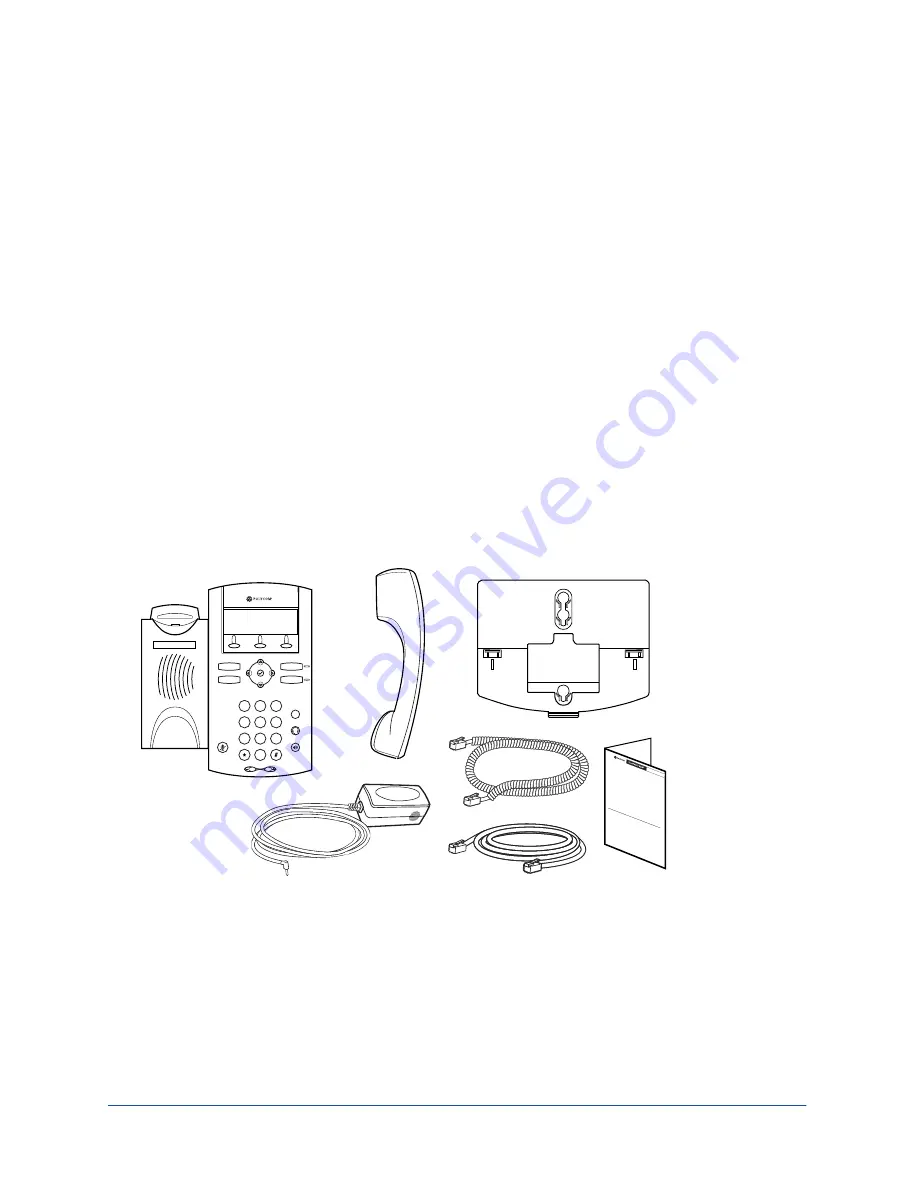
After opening each phone box there will be the phone, headset, headset cord, instruction 
manuals and CAT 5 cable.  The picture below shows a Polycom IP331 but represents the 

typical content found in the phone box.  Remove the items from the box saving the box in 

case it is needed for moving or shipping the phone in the future.

SAFETY AND REGULATORY INFORMATION. This device complies with Part 15 of the FCC 

Rules. Operation is subject to the following two conditions:

(1) This device may not cause harmful interference, and (2) This device must accept 

any interferences received, including interference that may cause undesired operation.

Note: This equipment has been tested and found to comply with the limits for a Class B 

digital device, pursuant to Part 15 of the FCC Rules. These limits are designed to 

provide reasonable protection against harmful interference when the equipment is 

operated in a commercial environment. This equipment generates, uses, and can 

radiate radio frequency energy and, if not installed and used in accordance with the 

instructions, may cause harmful interference to radio communications. Operation of 

this equipment in a residential area is likely to cause harmful interference in which 

case the user will be required to correct the interference at his own expense.

This SoundPoint® IP 32x/33x has been marked with the CE mark. This mark 

indicates compliance with EEC directories 2006/95/EC and 2004/108/EC. A full copy 

of the Declaration of Conformity can be obtained from Polycom Ltd., 270 Bath Road, 

Slough, Berkshire, SL1 4DX, UK.

In accordance with Part 15 of the FCC Rules, the user is cautioned that any changes or 

modifications not expressly approved by Polycom, Inc. could void the user’s authority 

to operate the equipment.

Installation must be performed in accordance with all relevant national wiring rules. 

L’Installation doit être exécutée conformément à tous les règlements nationaux 

applicable au filage électrique.

The outlet to which this apparatus is connected must be installed near the equipment 

and must always be readily accessible.

La prise électrique à laquelle l’appareil est branché doit être installée près de 

l’équipement et doit toujours être facilement accessible.

This Class [B] digital apparatus complies with Canadian ICES-003.

Cet appareil numérique de la classe [B] sera conforme à la norme NMB-003 du 

Canada.

The software included in this Product (including, without limitation, firmware and all 

updated thereto, including any software that may be downloaded electronically via the 

internet or otherwise (the “Software”) is licensed, not sold.  Customer shall not reverse 

compile, disassemble, or otherwise reverse engineer, embed with any other software 

product, or modify in any manner with respect thereto, the software in whole or in 

part.

LIMITED WARRANTY. Polycom warrants to the end user (“Customer”) that this product 

will be free from defects in workmanship and materials, under normal use and 

service, for one year from the date of purchase from Polycom or its authorized 

reseller.

Polycom’s sole obligation under this express warranty shall be, at Polycom’s option 

and expense, to repair the defective product or part, deliver to Customer an 

equivalent product or part to replace the defective item, or if neither of the two 

foregoing options are reasonably available, Polycom may, in its sole discretion, refund 

to Customer the purchase price paid for the defective product.  All products that are 

replaced will become the property of Polycom. Replacement products or parts may be 

new or reconditioned. Polycom warrants any replaced or repaired product or part for 

ninety (90) days from shipment, or the remainder of the initial warranty period, 

whichever is longer.

Products returned to Polycom must be sent prepaid and packaged appropriately for 

safe shipment, and it is recommended that they be insured or sent by a method that 

provides for tracking of the package. Responsibility for loss or damage does not 

transfer to Polycom until the returned item is received by Polycom. The repaired or 

replaced item will be shipped to Customer, at Polycom’s expense, not later than thirty 

(30) days after Polycom receives the defective product, and Polycom will retain risk of 

loss or damage until the item is delivered to Customer.

EXCLUSIONS. Polycom will not be liable under this limited warranty if its testing and 

examination disclose that the alleged defect or malfunction in the product does not 

exist or results from:

•Failure to follow Polycom’s installation, operation, or maintenance instructions.

•Unauthorized product repair, modification or alteration.

•Unauthorized use of common carrier communication services accessed through the 

product.

•Abuse, misuse, negligent acts or omissions of Customer and persons under Customer’s 

control; or

•Acts of third parties, acts of God, accident, fire, lightning, power surges or outages, or 

other hazards.

WARRANTY EXCLUSIVE. IF A POLYCOM PRODUCT DOES NOT OPERATE AS WARRANTED 

ABOVE, CUSTOMER’S SOLE REMEDY FOR BREACH OF THAT WARRANTY SHALL BE 

REPAIR, REPLACEMENT, OR REFUND OF THE PURCHASE PRICE PAID, AT POLYCOM’S 

OPTION. TO THE FULL EXTENT ALLOWED BY LAW, THE FOREGOING WARRANTIES AND 

REMEDIES ARE EXCLUSIVE AND ARE IN LIEU OF ALL OTHER WARRANTIES, TERMS, OR 

CONDITIONS, EXPRESS OR IMPLIED, EITHER IN FACT OR BY OPERATION OF LAW, 

STATUTORY OR OTHERWISE, INCLUDING WARRANTIES, TERMS, OR CONDITIONS OF 

MERCHANTABILITY, FITNESS FOR A PARTICULAR PURPOSE, SATISFACTORY QUALITY, 

CORRESPONDENCE WITH DESCRIPTION, AND NON-INFRINGEMENT, ALL OF WHICH ARE 

EXPRESSLY DISCLAIMED. POLYCOM NEITHER ASSUMES NOR AUTHORIZES ANY OTHER 

PERSON TO ASSUME FOR IT ANY OTHER LIABILITY IN CONNECTION WITH THE SALE, 

INSTALLATION, MAINTENANCE OR USE OF ITS PRODUCTS.

SERVICE AGREEMENTS. Please contact your Polycom Authorized Reseller for 

information about service agreements applicable to your product.

SOFTWARE SUPPORT. Polycom will provide support for software running on the Product 

if all of the following conditions are satisfied:

• The product is under warranty or is covered by a Polycom service contract;

• The product is operating on a Polycom-approved partner platform; and

• The product software is the current major version or the next preceding major 

version (software revisions are labeled as “x.y.z,” with the first two digits designating 

major versions).

Requests for software support should be made through the Polycom Reseller from 

whom the product was purchased.

LIMITATION OF LIABILITY. TO THE FULL EXTENT ALLOWED BY LAW, POLYCOM 

EXCLUDES FOR ITSELF AND ITS SUPPLIERS ANY LIABILITY, WHETHER BASED IN 

CONTRACT OR TORT (INCLUDING NEGLIGENCE), FOR INCIDENTAL, CONSEQUENTIAL, 

INDIRECT, SPECIAL, OR PUNITIVE DAMAGES OF ANY KIND, OR FOR LOSS OF REVENUE 

OR PROFITS, LOSS OF BUSINESS, LOSS OF INFORMATION OR DATA, OR OTHER 

FINANCIAL LOSS ARISING OUT OF OR IN CONNECTION WITH THE SALE, INSTALLATION, 

MAINTENANCE, USE, PERFORMANCE, FAILURE, OR INTERRUPTION OF ITS PRODUCTS, 

EVEN IF POLYCOM OR ITS AUTHORIZED RESELLER HAS BEEN ADVISED OF THE 

POSSIBILITY OF SUCH DAMAGES, AND LIMITS ITS LIABILITY TO REPAIR, REPLACEMENT, 

OR REFUND OF THE PURCHASE PRICE PAID, AT POLYCOM’S OPTION. THIS DISCLAIMER 

OF LIABILITY FOR DAMAGES WILL NOT BE AFFECTED IF ANY REMEDY PROVIDED 

HEREIN SHALL FAIL OF ITS ESSENTIAL PURPOSE.

DISCLAIMER. Some countries, states, or provinces do not allow the exclusion or 

limitation of implied warranties or the limitation of incidental or consequential 

damages for certain products supplied to consumers, or the limitation of liability for 

personal injury, so the above limitations and exclusions may be limited in their 

application to the customer. When the implied warranties are not allowed to be 

excluded in their entirety, they will be limited to the duration of the applicable written 

warranty. This warranty gives the customer specific legal rights which may vary 

depending on local law.

GOVERNING LAW. This Limited Warranty and Limitation of Liability shall be governed 

by the laws of the State of California, U.S.A., and by the laws of the United States, 

excluding their conflicts of laws principles. The United Nations Convention on Contracts 

for the International Sale of Goods is hereby excluded in its entirety from application 

to this Limited Warranty and Limitation of Liability. COPYRIGHT. All rights reserved 

under International and pan-American Copyright Conventions. No part of the contents 

of this manual may be copied, reproduced, or transmitted in any form or by any 

means, or translated into another language or format, in whole or part, without 

written consent of Polycom, Inc. 

Polycom® and the logo design are registered trademarks and SoundPoint® 

IP 32x/33x is a trademark of Polycom, Inc. in the United States, and various 

countries. 

Do not remove (or allow any third party to remove) any product identification, 

copyright or other notices. 

The software contained within this product is protected by United States copyright laws 

and international treaty provisions. Polycom, Inc., retains title and ownership of all 

property rights with respect to the software within this product.

End User License, Warranty, and Safety Notices

1725-12241-001 Rev. 

B

Contact Information:

Please contact your Polycom Authorized Reseller for assistance.

http://www.polycom.com

Polycom, Inc. 4750 Willow Road, Pleasanton, CA 94588-2708 USA

Quick Start Guide

Package Contents

Not shown: 
AC Power Cord
(regional variation)

Quick Star

t Guide

1

4

GHI

PQRS

ABC

2

5

JKL

TUV

8

OPER

0

DEF

3

MNO

6

WXYZ

9

7

!"#$

%&'()*

+&,#

-('.

%&'()/

SoundPoint IP 

32x/33x

ABC

2

1

DEF

3

5

4

MNO

JKL

GHI

6

TUV

8

WXYZ

9

OPER

PQRS

0

7

!"#$

%&'()/

%&'()*

+&,#

-('.


After removing the parts from the box connect them as noted in the following diagram.  If 

your network is POE (power over ethernet) there is no need for an AC Adapter.

Page  17  of  38 

RevolutionPBX  Install Guide v3.4


revised 3/18/11

Summary of Contents for RevolutionPBX

Page 1: ...Installation Guide Version 3 4 Chronos Telecom LLC 6501 E Greenway Pkwy Ste 103 402 Scottsdale AZ 85254 T 480 522 2114 www revolutionpbx com RevolutionPBX ...

Page 2: ...gs 11 Configure your PBX system 13 Install and Start the PBX Server 14 Install Your Phones 17 Configuring Polycom IP Phones 19 Configure Cisco 7940 and 7940g phones 20 Configure Aastra 67xx Series Phones 23 Installing your Soft Phones 28 VoiceMail 29 Basic Dialing 32 End User License Agreement 35 Page 2 of 38 RevolutionPBX Install Guide v3 4 revised 3 18 11 ...

Page 3: ...cy dialing From the factory the emergency dialing settings are set as follows If analog POTS installed RevolutionPBX will seize the first available POTS line and dial 911 as an outside call Callers currently on the phone may be disconnected If NO POTS lines installed RevolutionPBX will seize the first line and dial 911 as an outside call Callers currently on the phone will be disconnected Even tho...

Page 4: ... 911 and when the operator answers tell them you have installed a new phone system and then have them confirm the phone number and address that are displayed If these are wrong contact your phone service provider immediately The End User License Agreement limits our liability regarding Emergency Dialing Please read and confirm your system is properly setup Page 4 of 38 RevolutionPBX Install Guide ...

Page 5: ...reseller support System Purchased direct from ChronosTelecom phone or website USA and Canada 480 522 2145 International 1 480 522 2145 Sales System Purchased from an Authorized Reseller If you purchased your system through an authorized reseller please contact the reseller directly for all sales questions including ordering additional phones System Purchased direct from ChronosTelecom phone or web...

Page 6: ... Included Agreement 90 day software updates 90 day email support 4 hrs of phone support during first 30 days Stored configuration for life of PBX Basic Annual All software updates and new features during term of agreement 5 Support Incidents Email Support response within 24 hours of receipt Phone Support response within 24 hours of first call in Premier Annual All software updates and new features...

Page 7: ...evolutionPBX provides a simple method to upload your own music and ads to be played when callers are placed on hold From the UI simply click on SETTINGS and then MUSIC ON HOLD Music and Ads on hold are selectable for each extension Call Filters by Extension RevolutionPBX now supports time of day and incoming Caller ID routing by extension in addition to incoming calls Employees who work from home ...

Page 8: ...figured and ready for plug n call use After installing each user will need to record their name and voice mail greetings to complete installation If you purchased your system from an authorized reseller then your reseller will configure your system either prior to or during installation As with the factory shipped system each user will then need to record their name and voice mail greetings to com...

Page 9: ...ith CAT 5 Cable if purchased Telephone Power Adapters if purchased What s needed to Install the PBX To complete installation you will need Location in your office that is within 5 ft of Network Switch or an Ethernet Jack connected to your network switch A POE Network Switch is recommended if your telephones support POE Telephone Service Location for T1 E1 or POTS Electrical Outlet for UPS Power Supp...

Page 10: ...ted to a UPS will continue to function Please see Emergency Dialing for further information on using the RevolutionPBX in an emergency when power has failed THIS IS IMPORTANT WARRANTY COVERAGE FOR POWER RELATED CLAIMS IS NOT PROVIDED FOR SYSTEMS NOT CONNECTED TO A UPS THE USB MONITORING CABLE FROM THE UPS MUST ALSO BE CONNECTED TO THE REVOLUTIONPBX Open Port on your Network Switch Ethernet Ports a...

Page 11: ...N a 22111 TCP 3 If using REMOTE phones route the following ports from the WAN internet to the RevolutionPBX on the LAN This only needs to be done if you are using telephones located remote not on your internal network a 5060 both UDP and TCP b 5080 both UDP and TCP c 10000 to 20000 both UDP and TCP 4 If using Cisco Phones Set option 66 Boot Server on the DHCP server for your network to be the IP a...

Page 12: ...evolutionPBX Once they are through obtaining their configuration disconnect them from the network and connect them at their remote location Best Results Best results are achieved when the PBX and Phones are connected to the same network switch and ideally on their own network VLAN or LAN Additionally the firewall should be modern and have any SIP Application Layer Gateways ALG turned off Important ...

Page 13: ...tly how it was prior to the catastrophe in as little as 20 minutes once the hardware arrives Website If you purchased your system through the RevolutionPBX website you should have already completed the system setup and your system shipped pre configured and ready to run If you have not configured your system you have been provided with a user name and password to use the RevolutionPBX website to c...

Page 14: ...o the wall using appropriate screws 3 Plug one end of the included CAT 5 ethernet cable color may vary into the back of the server as noted below 4 Plug the other end of the CAT 5 ethernet cable into an open port on your network switch 5 Connect Phone Service a If your phone service is standard telephone lines plug the phone lines into the Analog Phone Card installed in your system When looking at...

Page 15: ...plugged into the UPS c Plug the UPS into the wall electrical outlet and turn the UPS on d Plug the USB Cable from the UPS into the RevolutionPBX USB Port This will allow RevolutionPBX to monitor the UPS If power is lost and the UPS is running out of battery backup RevolutionPBX will shut itself down eliminating potential for power loss and system failure PLEASE NOTE The USB connection will ONLY wo...

Page 16: ... the red button the Server Computer contacts the RevolutionPBX secure web server to update software and download the correct configuration for your phone system This process typically takes 10 12 minutes Starting Up After you ve completed the items in installing your system will be ready to go Now follow the steps below to install your telephones and start making phone calls Page 16 of 38 Revoluti...

Page 17: ...LYCOM ETHER BASED IN TAL CONSEQUENTIAL FOR LOSS OF REVENUE DATA OR OTHER HE SALE INSTALLATION ON OF ITS PRODUCTS DVISED OF THE REPAIR REPLACEMENT PTION THIS DISCLAIMER EMEDY PROVIDED the exclusion or or consequential mitation of liability for be limited in their not allowed to be of the applicable written s which may vary bility shall be governed of the United States Convention on Contracts ntiret...

Page 18: ...s complete please check for dial tone If no dial tone please confirm that your phone is properly installed Option A 24V Power Adapter Connect Cables Wallmount Installation Handset and Cord Deskmount Installation NOTE Choose either Deskmount or Wallmount Installation NOTE To supply power choose either Option A or Option B Option B Power over Ethernet PoE Headset Not Included For more information se...

Page 19: ...terface Phone tab and you will see the newly added phone listed as Auto Discovered with the next extension assigned to it To make this phone work you will need to rename it and hit the Deploy New Settings Button Configuration After setting the phone up in the User Interface plug the Polycom IP series phone into the network and if needed plug the AC power supply in Polycom IP series phones will aut...

Page 20: ...setting up the phone on the User Interface can be found in the section Configure your PBX system Configuration Prior to plugging in the Polycom IP series phone please visit the PBX User Interface and configure the phone Instructions for doing this are in the section Configure your PBX system There are two methods of adding the Cisco 79xx series phones to the RevolutionPBX If you are familiar with ...

Page 21: ... the DHCP server for your network to be the IP ad dress of your RevolutionPBX 3 The PBX IP Address can be found on the RevolutionPBX system website under menu item DOCUMENTATION and then COMPANY FIREWALL SETTINGS 4 Connect the phone s to your network and boot them up 5 Once phones boot up they will connect to the server and configure themselves based on the settings you provided to the User Interf...

Page 22: ...work Config 7 Press 32 for Alternate TFTP Server and ensure it s set to Yes then Save that set ting 8 Press 3 for Network Config 9 Press 7 and Edit to edit the TFTP Server setting 10 Backspace and correct the IP address so it matches the Internal IP of Revolu tionPBX The PBX IP Address can be found on the RevolutionPBX system website under menu item DOCUMENTATION and then COMPANY FIREWALL SETTINGS...

Page 23: ...rename it and hit the Deploy New Settings Button Configuration There are three methods of configuring the Aastra Telecom 67xx series phones to the RevolutionPBX Note We do not provide support troubleshooting or instruction on configuring your DHCP server nor do we provide free support to program phones that were not purchased from ChronosTelecom This guide will instruct you on how to configure you...

Page 24: ...o know the IP address for each phone you wish to provision and have access to a web browser IE Safari Firefox etc that is on the same network as the phones Find IP address on an Aastra Phone 1 Press the OPTION Key on the phone to enter the Options List Scroll to Phone Status and press Select 2 Scroll to IP MAC Addresses and press Select Finding Your Phone s IP Address If you want to access your ph...

Page 25: ...the IP Address field Done Select Phone Status Done Select 1 IP MAC Addresses 2 LAN Port 3 PC Port 4 Firmware Info 5 Error Messages IP MAC Addresses IP Address 192 168 0 100 MAC Address 00 44 7D 18 03 26 Done Model 6755i IP Phone User Guide 23 Phone Status 3 Scroll to IP MAC Addresses and press Select The IP address of your 6755i IP phone displays in the IP Address field Done Select 1 Call Forward ...

Page 26: ...ownload Protocol SELECT HTTP HTTP Server enter ctpv net HTTP Path enter your serial number found on the bottom of the server 6 Click Save Settings 7 When the screen refreshes select RESET from the Menu and then RESTART PHONE Page 26 of 38 RevolutionPBX Install Guide v3 4 revised 3 18 11 ...

Page 27: ...trator password Default password is 22222 4 Press 1 CONFIGURATION SERVER 5 Press 4 HTTP SETTINGS 6 Press 1 SERVER 7 Enter ctpv net using the keypad and then hit DONE 8 Press 2 PATH 9 Enter your Serial Number and hit DONE 10 Hit DONE 2 times to get to the OPTIONS LIST 11 Press 6 RESTART PHONE and the RESTART when it asks if you are sure Page 27 of 38 RevolutionPBX Install Guide v3 4 revised 3 18 11...

Page 28: ...ne you have Please consult the instruction manual for your particular soft phone Information required to setup the soft phone for use on your RevolutionPBX is found on the DOCUMENTATION page of the system setup website Page 28 of 38 RevolutionPBX Install Guide v3 4 revised 3 18 11 ...

Page 29: ...eed them 6 Select the greeting number you wish to record by pressing a number from 1 9 7 After selecting your greeting number follow the Attendant instructions to record your greeting 8 After recording your greeting select 1 to listen to your greeting 2 to save your greeting or 3 to re record your greeting 9 Once your satisfied with how your greeting sounds select 2 to save 10 Attendant will then ...

Page 30: ...ou to record your name after the beep Follow her directions 6 After recording your name select 1 to listen to your name 2 to save your name or 3 to re record your name 7 Once your satisfied with how your name sounds select 2 to save and then hang up Your name is now saved in the system and will be used in the company directory Page 30 of 38 RevolutionPBX Install Guide v3 4 revised 3 18 11 ...

Page 31: ... 2 Saved Messages 5 Advanced Options Record Name Password Main Menu New Messages 1 3 2 0 4 6 5 7 9 8 Rewind Restart Fast Forward Pause Delete Undelete Save New Messages 1 3 2 0 4 6 5 7 9 8 Forward Email Listen Pause Delete Forward Message Save Call Back After Message Playback New Messages 1 3 2 0 4 6 5 7 9 8 Rewind Restart Fast Forward Pause Delete Undelete Save Page 31 of 38 RevolutionPBX Install...

Page 32: ...our system administrator can provide you with a list of both remote office extensions and phone extensions Example You are in the New York office but need to call the London office Both offices have their own RevolutionPBX system but they are linked with Remote Office London has a remote office extension of 5 and you need to reach Paul at extension 234 in London To dial Paul in London from New York simply dia...

Page 33: ...rankfurt to Munich in Germany would be dialed as 089 265 369 then press DIAL International USA and Canada To dial international phone numbers simply Dial 011 and then the phone number with country code area code and phone number then press Dial International call from USA to Germany would be dialed as 011 49 89 265 369 then press DIAL Other Countries To dial international phone numbers in other co...

Page 34: ...r Countries To dial toll free phone numbers in other countries please dial as you would on a normal telephone Depending on the country you are in this may include dialing 00 prior to the country code area code and then phone number Toll Free calls in London U K would be dialed as 0800 89 0011 then press DIAL Page 34 of 38 RevolutionPBX Install Guide v3 4 revised 3 18 11 ...

Page 35: ... copies of the Software supplied to you by CHRONOS or an authorized reseller provided you hold a valid license to the original Software and have paid any applicable fee for Upgrades Notwithstanding the foregoing you acknowledge that certain com ponents of the Software may be covered by open source software licenses Open Source Components CHRONOS will provide a list of Open Source Components for a ...

Page 36: ...zed agents have the qualifications necessary to properly implement and configure the Products to handle emergency calls if applicable You further acknowledge and agree that it is your sole and ongoing respon sibility to ensure the proper operation of any emergency calling system based on the Products including but not limited to initially and regularly testing the operation of the Products includi...

Page 37: ...tware may not be exported or re exported to Cuba Iran North Korea Sudan Syria or any other country to which the United States embargoes goods In addition the Software may not be distributed to persons on the Table of Denial Or ders the Entity List or the List of Specially Designated Nationals By downloading or using a CHRONOS Software Product you are certifying that you are not a national of Cuba ...

Page 38: ...egotiations or understandings with respect thereto The provisions of this EULA shall take precedence over any conflicting terms in any subsequent purchase order documentation or collateral The parties agree that this EULA may be executed electroni cally and that electronic copies of this EULA shall be binding upon the parties If any provision of this EULA is held to be void invalid unenforceable o...

Reviews: