8
Assembly Instructions
Before beginning assembly, be sure to observe our
recommendations and safety instructions.
Step 1:
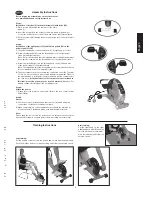
Installation of footbar (3) on the main frame (1) with bolts (10).
1.
Place screws (10) beside the rear part of the main
frame (1).
2.
Insert the footbar (3) in the holder of the main frame (1) and adjust
so that the hole patterns of the holders and the footbar (3) are aligned.
3.
Push the screws (10) through the holes and fasten the footbar (3) at main
frame(1).
Step 2:
Installation of the right pedals (35) and the left pedals (34) on the
pedal crank (15+16).
1.
The pedals and pedal crank are marked „R“ for right and „L“ for left.
2.
Screw the right pedal (35) into the threaded hole on the right pedal
crank (16) and tighten firmly.
(Note: It must be observed that the threaded part of the right pedal must
be screwed clockwise into the threaded hole of the right pedal crank.)
3.
Screw the left pedal (34) into the threaded hole on the left hand side
of the pedal crank (15) and tighten firmly.
(Note: The threaded part of the left pedal must be screwed anticlockwise
into the threaded hole of the left pedal crank.)
4.
Take the computer from the housing, lay one button cell of the Typs AG
13 / LR 44 in at on the back side located battery compartment, Observe
the right direction (+ polarity into the bracket) and put the computer into
the case back.
(If the batteries for the computer are not included in
this item, please buy them at your located market.)
(Attention: For
battery change absolutely pull the net plug before!)
Step 3:
Attach the power
1. Please insert the plug of power cable (23)into the jack of wall power
(230V/50Hz).
Step 4:
Checks
1.
Check the correct installation and function of all screwed and plug
connections. Installation is thereby complete.
2.
When everything is in order, familiarize yourself with the machine at
a low resistance. Setting and make your individual adjustments.
Note:
Please keep the tool set and the instructions in a safe place as these may
be required for repairs or spare parts orders becoming necessary later.
GB
Contents
1. Summary of Parts
Page 4
2. Parts List
Page 5
3. Important Recommendations and Safety Information Page 8
4. Assembly Instructions With Exploded Diagrams
Page 9
5. Training Instructions
Page 9
6. Computer instructions
Page 10
Dear customer,
We congratulate you on your purchase of this home training sports unit
and hope that we will have a great deal of pleasure with it. Please take heed
of the enclosed notes and instructions and follow them closely concerning
assembly and use.
Please do not hesitate to contact us at any time if you should have any
questions.
Top Sport Gilles GmbH
GB
Important Recommendations,
Safety Instructions and Regulatory Compliance
Training Instructions
1.
Assembly the machine exactly as described in the installation instructions
and use only the enclosed, specific parts of the machine contained in the
parts list. Before assembling, verify the completeness of the delivery against
the delivery notice and the completeness of the carton against the parts list
in the installation and operating instructions.
2.
Check the firm seating off all screws, nuts and other connections before
using the machine for the first time and at regular intervals to ensure that
the trainer is in a safe condition.
3.
Set up the machine in a dry, level place and protect it from moisture and
water. Uneven parts of the floor must be compensated by suitable
measures and by the provided adjustable parts of the machine if such
are installed. Ensure that no contact occurs with moisture or water.
4.
Place a suitable base (e.g. rubber mat, wooden board etc.) beneath the
machine if the area of the machine must be specially protected against
indentations, dirt etc.
5.
Before beginning training, remove all objects within a radius of 2 me-
tres
from the machine.
6.
Do not use aggressive cleaning agents to clean the machine and employ
only the supplied tools or suitable tools of your own to assemble the machine
and for any necessary repairs. Remove drops of sweat from the machine
immediately after finishing training.
7.
Your health can be impaired by incorrect or excessive training. Consult
a doctor before beginning a planned training programme. He can define
the maximum exertion (pulse, Watts, duration of training etc.) to which you
may expose yourself and can give you precise information on the correct
posture during training, the targets of your training and your diet. Never
train after eating large meals. Observe that this machine is not suitable for
therapeutic purposes.
8.
Only train on the machine when it is in correct working order. Use original
spare parts only for any necessary repairs.
9.
When setting the adjustable parts, observe the correct position and the
marked, maximum setting positions and ensure that the newly adjusted
position is correctly secured.
10.
Unless otherwise described in the instructions, the machine must only
be used for training by one person at a time.
11.
Wear training clothes and shoes which are suitable for fitness training
with the machine. Your clothes must be such that they cannot catch du-
ring training due to their shape (e.g. length). Your training shoes should be
appropriate for the trainer, must support your feet firmly and must have
non-slip soles.
12.
If you notice a feeling of dizziness, sickness, chest pain or other
abnormal symptoms, stop training and consult a doctor.
13.
Never forget that sports machines are not toys. They must therefore
only be used according to their purpose and by suitably informed and
instructed persons.
14.
People such as children, invalids and handicapped persons should
only use the machine in the presence of another person who can give aid
and advice. Take suitable measures to ensure that children never use the
machine without supervision.
15.
Ensure that the person conducting training and other people never
move or hold any parts of their body into the vicinity of moving parts.
16.
At the end of its life span this product is not allowed to dispose over
the normal household waste, but it must be given to an assembly point for
the recycling of electric and electronic components. You may find the symbol
on the product, on the instructions or on the packing.
The materials are reusable in accordance with their marking. With the re-use,
the material utilization or the protection of our environment. Please ask the
local administration for the responsible disposal place.
17.
To protect the environment, do not dispose of the packaging materials,
used batteries or parts of the machine as household waste. Put these in
the appropriate collection bins or bring them to a suitable collection point.
18.
CE Marking (Declaration of conformity) for European Users
This products complies with the following EU directives: EMV 2004/108/EG
und LVD 2006/95/EG directives.
This declaration is valid for the areas of the European Union.
Electro-Magnetic Interference for all Users.
This is a Class B product. In a domestic environment, this product may
cause radio interferences in which case the user may be required to take
adequate measures.
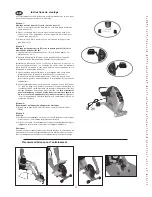
Leg training:
Put the middle of the feet onto the pedals and secure with the pedal strap.
Push the Ein/Aus button to start exercising and follow the entered speed.


