background image

Installation

11

LWU900-DS/LHD878-DS/LWU755-DS
User's Manual - Instant Stack Guide

020-001617-01 Rev. 1 (12-2018)

LIT MAN USR DS Series ISG

2.5 Fine adjusting image position

To superimpose the images of Main (Set 

B

) and Sub (Set 

A

), fine adjust the


image size and position of Main (Set 

B

) using 

3D KEYSTONE

.

3.

  Using 3D KEYSTONE on Main (Set 

B

), adjust the


image size and position of Main (Set 

B

) to 

superimpose to the image of Sub (Set 

A

). 

(

Operating Guide


EASY MENU

 or 

SETUP menu

)    

Adjust 3D KEYSTONE in the following ways.
(1) Roughly adjust the four corners in the order below.

Top left → Top right 


   → Bottom right → Bottom left

(2) Fine adjust the four corners in the same way.

NOTE

  • Refer to 

NOTES for all users

. (

12

)

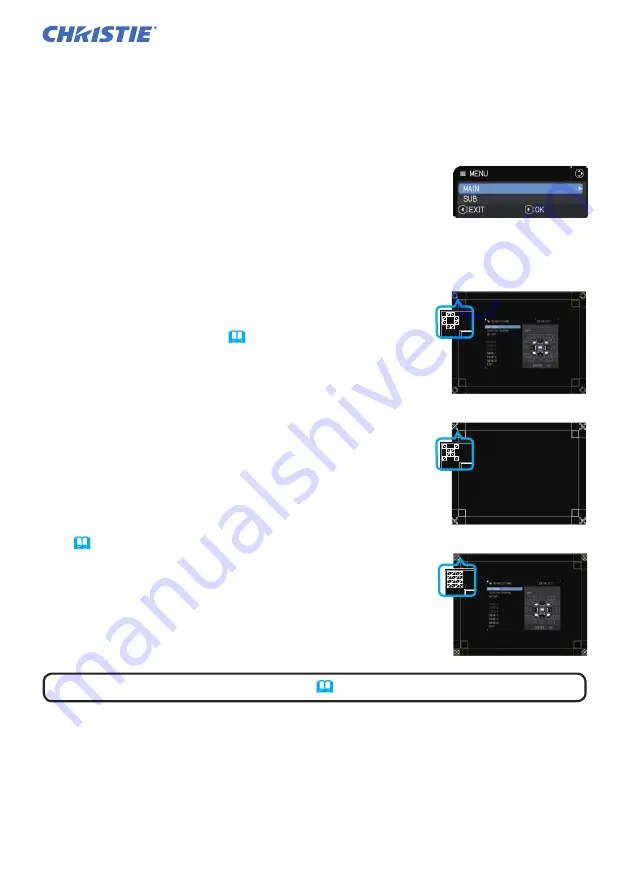
For Intellectual Stack users

1.

  Press the 

MENU

 button on the remote control or the 

control panel on Main (Set 

B

) to display the MENU


dialog.


Highlight MAIN with the ▲/▼ buttons, and press the 

► button.


Menu on Main (Set 

B

) appears.

2.

  Using the ▲/▼/◄/► buttons on the remote control 

or the control panel on Main (Set 

B

), select 3D 

KEYSTONE from EASY MENU, or the SETUP menu 

of ADVANCED MENU. (

Operating Guide


EASY 

MENU


or 

SETUP menu

The image for Intellectual Stack appears on screen.  

This image includes a TEMPLATE screen with the 3D 

KEYSTONE dialog from Main (Set 

B

) and another 

TEMPLATE screen from Sub (Set 

A

).

Main (Set B)

Image from Sub (Set A)

Superimposed image

Superimposed image

Image from Main (Set B)

Summary of Contents for 121-057103-01

Page 1: ...DS Series LWU900 DS LHD878 DS LWU755 DS User s Manual Detailed Instant Stack Guide 020 001617 01...

Page 2: ......

Page 3: ...Trademark acknowledgment All the trademarks in this manual are the properties of their respective owners Various symbols are used in this manual The meanings of these symbols are described below A b o...

Page 4: ...STACK menu 13 3 2 Selecting Main Sub or off 14 3 3 Selecting the light source operation mode 15 3 4 Selecting the light source switching mode 17 3 5 Selecting input source for Sub 18 3 6 Exiting Intel...

Page 5: ...ain projector is capable of receiving the remote control signals Operate the projectors from the control panel of the Main projector or with the remote control pointing at the Main projector For detai...

Page 6: ...to adjust the superimposed images The image positions may shift due to temperature change vibration or shock caused by hitting the projector Install the projectors in a stable environment when using...

Page 7: ...ing Guide OPTION menu Images from Set A and Set B may superimpose well but the image positions can shift over time Readjust to superimpose the images 2 1 Preparing for Intellectual Stack When using In...

Page 8: ...ON setting if necessary as it may change the image position Operating Guide SETUP menu 3 Adjust the image of Set A to fit the screen with the ZOOM FOCUS and LENS SHIFT features Operating Guide Adjusti...

Page 9: ...PTION menu NOTE To avoid incorrect operations with the remote control it is recommended to operate with the control panel or a wired remote control KEYLOCK or REMOTE ID function is also available 7 Af...

Page 10: ...eset the adjustment of KEYSTONE and 3D KEYSTONE on Set B Operating Guide EASY MENU or SETUP menu 1 Turn on Set B NOTE After turning on Set B make sure the image of Set B is not significantly tilted co...

Page 11: ...ng Guide Using the menu function 5 Use the buttons to go into the following menu ADVANCED MENU OPTION SERVICE COMMUNICATION STACK STACK menu appears on screen Operating Guide OPTION menu 3 Adjust the...

Page 12: ...t respond to the remote control signals 2 The following dialogs appear on the lower right screen Main Set B Sub Set A 3 If you press the button the dialog closes and the Main Set B menu appears when M...

Page 13: ...om right Bottom left 2 Fine adjust the four corners in the same way NOTE Refer to NOTES for all users 12 For Intellectual Stack users 1 Press the MENU button on the remote control or the control panel...

Page 14: ...the projectors Check the RESOLUTION setting in the INPUT menu and change to the same setting if the setting differs between Main and Sub Operating Guide INPUT menu For Simple Stack users 1 Press the...

Page 15: ...TE If using Simple Stack without RS 232C connection skip this chapter If you do not need to change the settings made during the installation explained prior to this chapter go to 3 3 Selecting the lig...

Page 16: ...to the previous menu or press the button to complete the setting 20 3 2 Selecting Main Sub or off To enable Intellectual Stack select either MAIN or SUB Intellectual Stack starts when one projector is...

Page 17: ...he Main projector is displayed When DUAL is selected for LIGHT MODE there are operating restrictions as follows AUTO POWER OFF and FREEZE functions on both projectors are disabled It takes slightly lo...

Page 18: ...able is disconnected or AC power is not supplied the other projector does not turn on In cases when PIN LOCK or TRANSITION DETECTOR on both projectors is set to ON Operating Guide SECURITY menu the tw...

Page 19: ...ors the projector with the most light source usage may be turned on even if AUTO is selected 3 4 Selecting the light source switching mode The following setting is necessary only when ALTERNATE is sel...

Page 20: ...on the Main projector to the COMPUTER IN port on the Sub projector If FIXED COMPUTER IN is selected video signals can be input to the COMPUTER IN port on the Main projector Set the port for video sig...

Page 21: ...INPUT button on the projector is pressed the MAIN INPUT SOURCE dialog will be displayed on screen If FIXED HDMI 1 is selected the HDMI 1 port on the Sub projector should be connected to the HDMI OUT...

Page 22: ...ialog appears Pressing the button functioning as YES key in the dialog saves the setting and closes the dialog The screen becomes black while the setting is being applied Wait for a while Pressing the...

Page 23: ...three seconds Pressing the button does not turn on the Main or Sub projector The Main projector is capable of receiving the remote control signals but not the Sub projector so the remote control shoul...

Page 24: ...Guide OPTION menu COMMUNICATION TYPE Operating Guide OPTION menu SERVICE COMMUNICATION SEARCH SKIP Operating Guide OPTION menu KEYLOCK operates according to the setting of the Main projector The KEYL...

Page 25: ...tarted properly when the projectors are turned on again If the PIN LOCK or TRANSITION DETECTOR security function on both projectors is set to ON both projectors turn on Enter the security code for Mai...

Page 26: ...described below do not exist Main in this chapter is read as one projector and Sub as the other projector For details on the specifications of the input ports refer to Connecting with your devices Op...

Page 27: ...ethods to input an image to the Sub projector 18 20 Inputting an image from the MONITOR OUT port on Main to Sub Inputting an image to Sub and Main individually NOTES for Intellectual Stack COMPUTER IN...

Page 28: ...into two with device such as a signal splitter 2 Connect the output ports of the image output device to the same input ports on the Main and Sub projectors NOTES for Intellectual Stack LAN cannot be...

Page 29: ...lated to menu operations must be performed on the Main projector Before operating the menu for Intellectual Stack check if the Main projector is functioning 1 Press the MENU button on the remote contr...

Page 30: ...ain The Main projector is turned on If AUTO is displayed the projector with the least light source usage is turned on Therefore the Main projector may not be turned on even if you restart the projecto...

Page 31: ...he buttons to go into the following menu ADVANCED MENU OPTION SERVICE COMMUNICATION STACK STACK menu appears on screen Operating Guide OPTION menu 3 Use the buttons to highlight SUB INPUT SOURCE and p...

Page 32: ...ress the MENU button on the remote control or control panel on the Main projector Use the buttons to open the COMPUTER IN dialog Operating Guide INPUT menu 3 To input component signals to COMPUTER IN...

Page 33: ...he remote control or the INPUT button of the Main projector The MAIN INPUT SOURCE dialog is displayed on screen Use the buttons to highlight the port to which the signal cable is connected and press t...

Page 34: ...ng changes may occur when using the Stack function Refer to the following for the restrictions concerning Intellectual Stack If using Simple Stack skip this chapter continued on next page This Schedul...

Page 35: ...power and entering the standby mode according to the Intellectual Stack settings or by pressing the STANDBY button on the remote control or STANDBY ON button of the Main projector The projectors canno...

Page 36: ...y connected To use the Intellectual Stack feature connect an RS 232C cross cable between the Main and Sub projectors If the cable is not connected the Main projector cannot control the Sub projector 8...

Page 37: ...rojector when using the remote control 3 The images are either out of focus or not well superimposed The two images are not superimposed correctly Adjust to superimpose the images with the ZOOM FOCUS...

Page 38: ...ic of South Africa ph 27 0 11 510 0094 Korea Seoul ph 82 2 702 1601 Japan Tokyo ph 81 3 3599 7481 India ph 91 080 6708 9999 Germany ph 49 2161 664540 France ph 33 0 1 41 21 44 04 Russian Federation an...

Page 39: ......

Reviews: